‘ADM Power’: Power Tools for Citrix ADM

Hi everyone, I know it’s been a while but I figured this post would be one of those ‘better late than never’ types where readers can hopefully forgive me in exchange for a shiny new utility that I created and felt was useful enough to share!

Without further ado I give you ‘ADM Power‘, a forms-based PowerShell script that automates and simplifies a lot of Citrix ADM & ADC tasks in an enterprise environment (i.e. more than a few ADCs).

What is ADM Power?

As the name implies this PowerShell script uses Citrix’s Nitro APIs to interact with a target ADM, as well as the ADCs it manages, and includes several ‘power tools’ that I’ve started trying to describe in the readme.
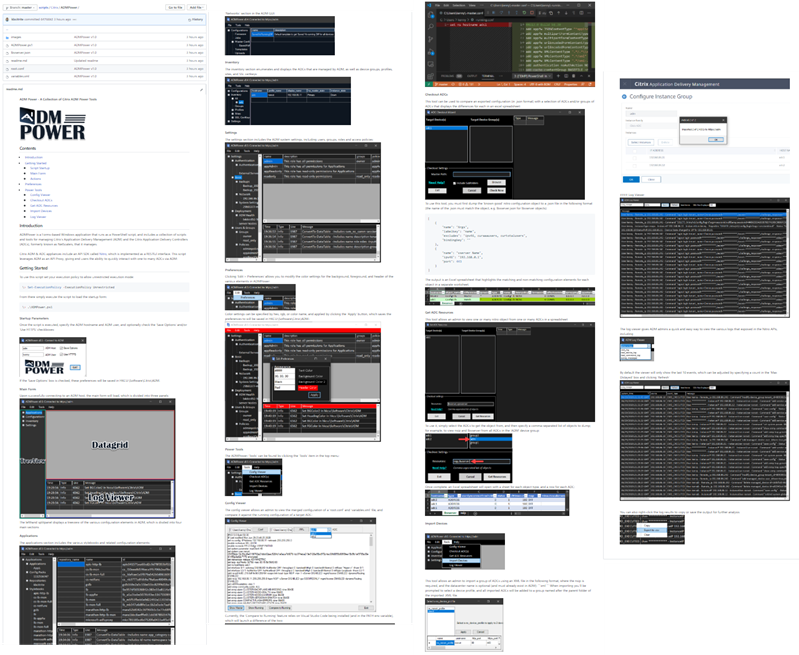
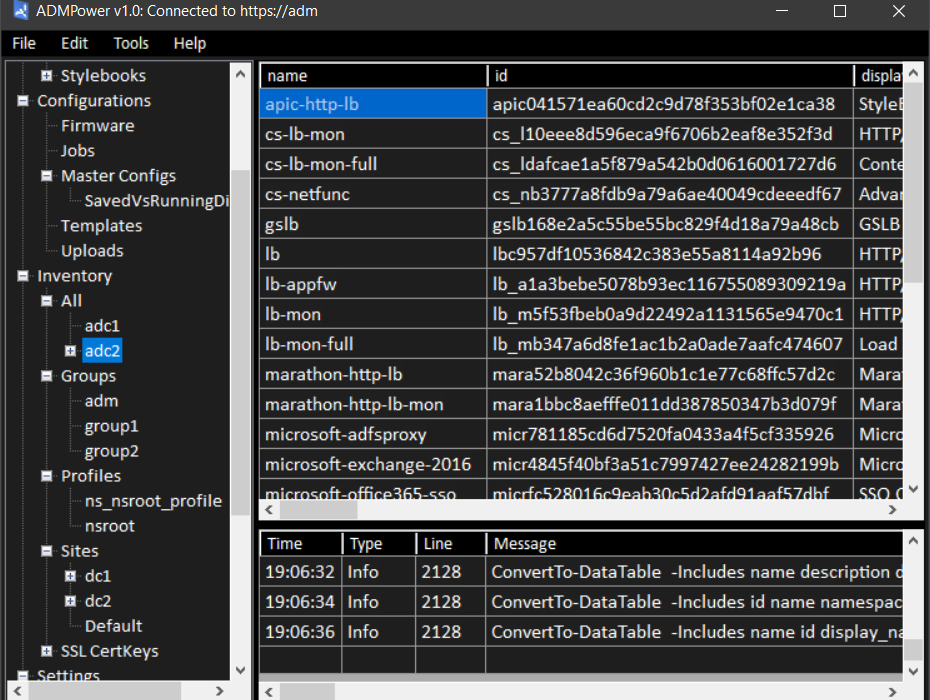
The script builds upon and includes modified versions of the functions that I shared in this PowerShell module for Citrix ADM last year, is designed to be self contained, and only requires the ADMPower.ps1 file and ability to run it.. and of course access to a functional ADM 🙂

How do you use it?

Because the script uses Windows form objects to interact with the user, it’s more like a utility than a script. For example, instead of using startup parameters when you launch the script, it prompts you for the relevant details to connect to your ADM instance:
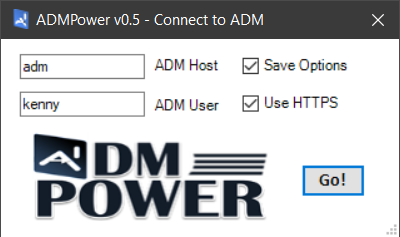
Once connected, you can do lots of ‘stuff & things’ that I’ve added along the way, and can even add your own by reverse engineering my probably not-so-organized script :S

What can it do?

I’ve added a lot of stuff that I find useful, and so there are a lot of things in the readme that I won’t mention here.

That said, I haven’t documented everything that it can do because I tried to make usage as intuitive as possible by leveraging standard GUI elements like labels, toolstrips, and context menus.

For example, you can right-click ADCs to perform common tasks against them, such as logging on in the browser (using the ADM device profile), or opening an SSH or SCP session using prompted credentials:
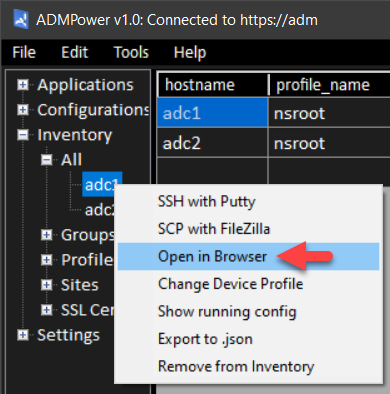
Right-click nodes for actions
Search for actions to modify or add your own

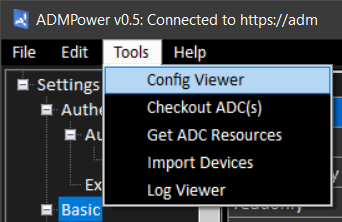
As you can see there are a few other right-click options on ADCs, and there are others elsewhere, particularly in the ‘Inventory’ and ‘Configurations’ sections, as well as a collection of Tools in the menu bar:
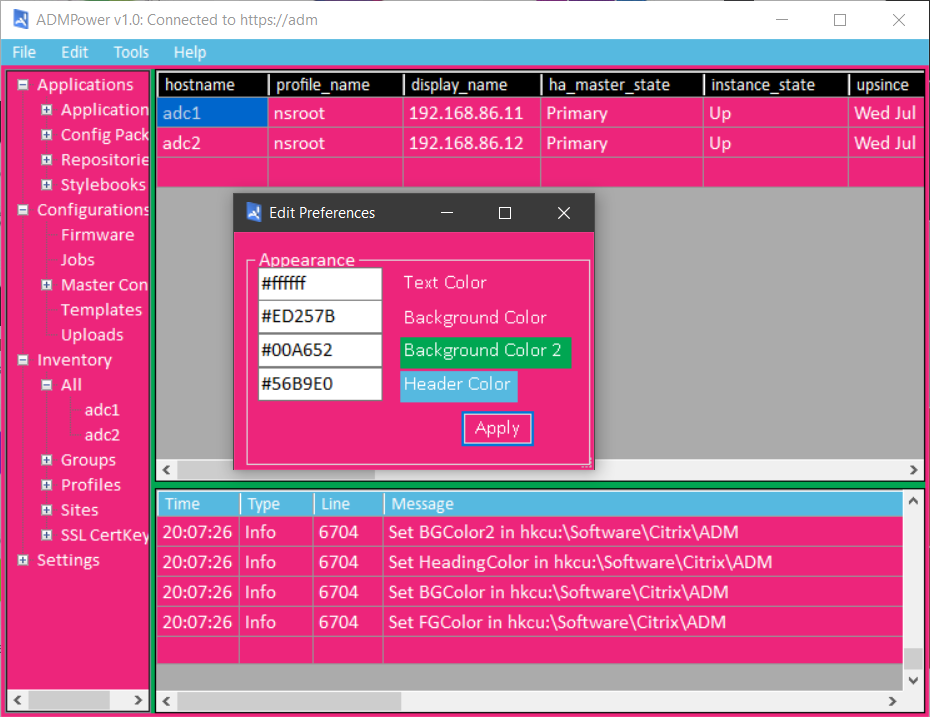
I even added an ‘Edit>Preferences’ form so that you can make ADM Power look the way you like!
Why is Kenny sharing this?

The reason I wrote this in PowerShell was to give anyone who can run it the opportunity to use it while also giving those who can edit and/or write scripts (or use tools like poshgui) the ability to use or extend whatever parts they find useful.

In return I’d ask that if you use this script you give credit where it’s due, and otherwise help me to make the tool more Powerful by providing useful feedback and/or bug fixes! 🙂

In Conclusion..

I’m still working on documenting everything, but I felt like the readme has enough to get most started. I’d like to emphasize that you should use caution when running any script from the internet, and would checking with your organization’s internal policies before you start using it in a production environment.

In general I would suggest starting with a read-only account if you want to step through it first and get acquainted, but would otherwise say that it reads more than it writes and is mostly safe from accidental screw-ups.. but please be careful regardless.

I plan to keep the utility updated as I add features and/or fix bugs, so please feel free to ask questions and share any feedback you might have.

Thanks! -KB
Checking ADC Settings via ADM

Since there seems to be a fair amount of interest in the ADM PowerShell module I shared, and because the recent release of the v19.4.0.34 (1904) of Citrix Workspace App uses a modern ‘Crypto Kit’ (see CTX250104) that requires ECDHE ciphers and ECC curve bindings, I thought I’d share a basic script that leverages ADM’s capabilities as an API proxy to check out NetScaler/ADC configurations.

Using the ADM.psm1 PowerShell module, the following script will generate a .csv list of every ADC in the ADM inventory’s Citrix Gateway vServer ECC curve bindings:

Param(
    [string]$ADMHost = "https://adm.domain.local",
    [string]$OutFile = ".\out.csv"
)
$RunningPath = Split-Path -parent $MyInvocation.MyCommand.Definition
Set-Location $RunningPath
Import-Module '.\ADM.psm1' -Force
$ADMSession = Connect-ADM $ADMHost (Get-Credential)
$Output = @()
foreach ($ADC in (Invoke-ADMNitro -ADMSession $ADMSession -OperationMethod GET -ResourceType ns).ns) 
{
    $vServers = (Invoke-ADMNitro -ADMSession $ADMSession -OperationMethod GET -ResourceType vpnvserver -ADCHost $ADC.ip_address).vpnvserver
    foreach ($vServer in $vServers)
    {
        $ECCBindings = (Invoke-ADMNitro -ADMSession $ADMSession -OperationMethod GET -ResourceType sslvserver_ecccurve_binding -ResourceName $vServer.name -ADCHost $ADC.ip_address).sslvserver_ecccurve_binding
        foreach ($Binding in $ECCBindings)
        {
            $ExportObject = New-Object PSCustomObject -Property @{
            'ADC Name' = $ADC.hostname
            'ECC Curve' = $Binding.ecccurvename
            'vServer' = $Binding.vservername 
            }
            $Output += $ExportObject
        }
    }    
}
$Output | Export-Csv $OutFile -NoTypeInformation
Invoke-Item $OutFile

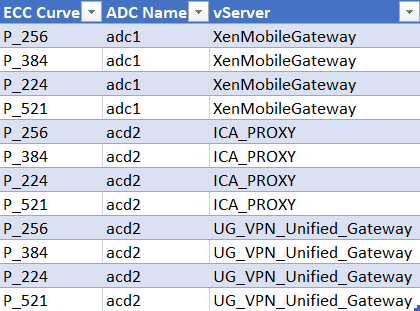
If you were following along, and everything went well, your associated .csv viewer should show you the results:

ecc_bindings

One of the great things about using ADM as an API proxy is that it takes care of organizing ADCs, which makes scripted interactions much more manageable, especially when you’re dealing with a global deployment of ADCs (i.e. ‘more than a few’).

Taking this further, if I wanted to only target a specific device group in the above query I could filter the ADC list by first getting the device_group object with name = “Group1”, which can be passed to Invoke-ADMNitro -Filters as a hashtable:

$Filter = @{
    name = "Group1"
}
$DeviceGroups = (Invoke-ADMNitro -ADMSession $ADMSession -OperationMethod GET -ResourceType device_group -Filters $Filter).device_group
foreach ($Device in $DeviceGroups.static_device_list_arr)
{	
    $vServers = (Invoke-ADMNitro -ADMSession $ADMSession -OperationMethod GET -ResourceType vpnvserver -ADCHost $Device).vpnvserver
    foreach ($vServer in $vServers)
    { ...

You can then use the array of device IP addresses, instead of all ADCs, to check against.

Similarly, you could do the same using by region or ‘Sites’ (e.g. Datacenters) if you’ve populated them in ADM, or using a wildcard match on the filter. If you’re ever unsure about what the ResourceName or filter should be, just open your F12 debug tools in Chrome and inspect the requests in the network tab:

f12

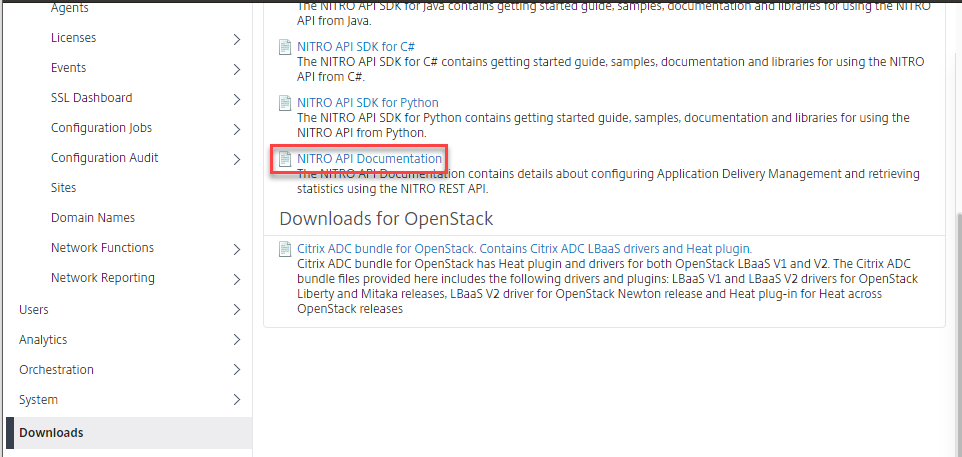
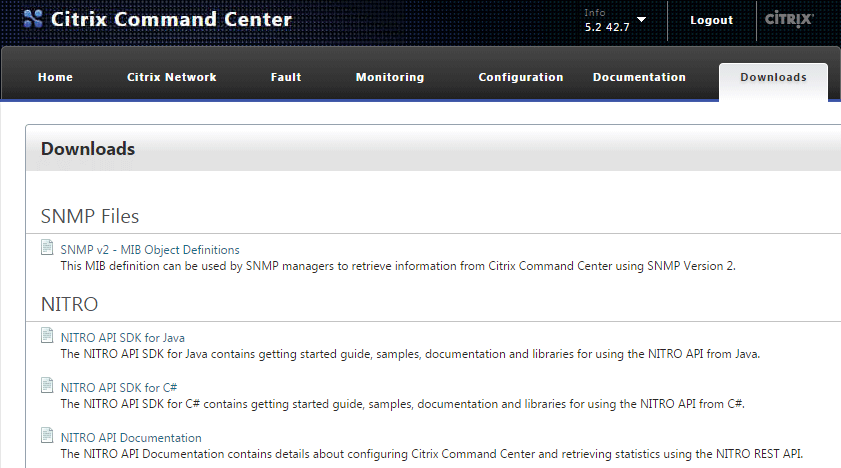
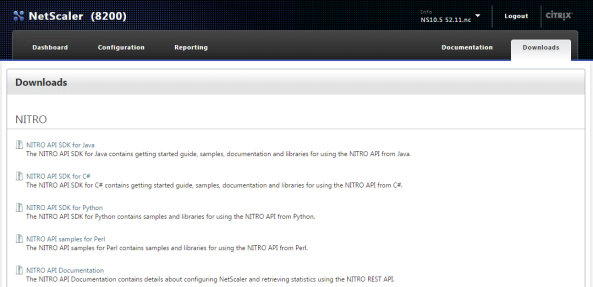
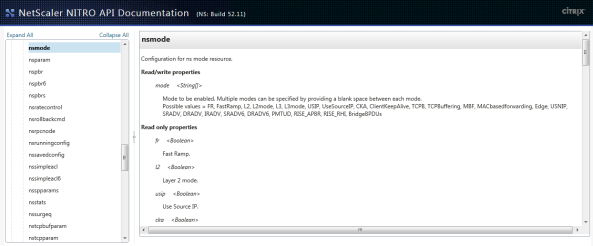
Similarly, you can always download the API docs and/or SDK from the ‘Downloads’ section in ADM, which I prefer to view the C# API SDK in DotPeek:

api_docs

Anyways, I’ll try to share other examples as I get time, but hopefully this was useful for someone out there!

PowerShell Module for Citrix ADM

I know it’s been a while since my last post, but I felt compelled to share a PowerShell module for Citrix ADM I wrote for interacting with Citrix Application Delivery Management appliances. The module uses Invoke-RestMethod to interface the Nitro REST APIs for ADM, and was inspired by the module that Citrix originally shared which was credited to Esther Barthel, and so thank you Esther for the foundation!

Basically, this module works much in the same was as the NetScaler version, and makes it easier to talk to an ADM and the ADCs that it manages by acting as an API Proxy to the ADCs. It also allows for advanced API operations such as uploading firmware, certificates, configuration jobs & templates, and pretty much anything else you can do in the GUI, for both ADM and ADCs.

Anyways, check out ADM.psm1 along with Sample.ps1 to get a feel for it (there’s also a readme), and hopefully this is helpful for others that manage ADMs and/or ADCs on a regular basis!

NetScaler Syntax Highlighting for Notepad++

This morning a colleague mentioned that it would be nice to have syntax highlighting for NetScaler configuration files in Notepad++,  so what better way to have one, then to make one!

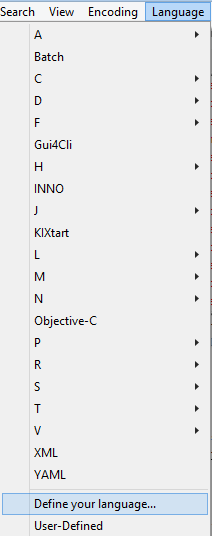
To use it save this .xml and load it in NPP by clicking ‘Language > Define your language…’:

Import User-Defined Language in Notepad++

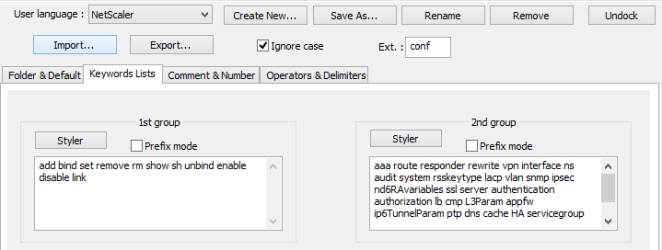
Then click ‘Import’ to load it up:

Import

Once loaded you should see most NetScaler syntax highlighted accordingly:

Sample Conf

Enjoy!

RDP-Proxy on NetScaler!

In case you weren’t paying attention (it was easy to miss) RDP-proxy is now available on the 10.5 enhancement branch! This feature appears to have been added as of the 10.5 51.1017.e.nc:

Users can connect with single sign-on to Remote Desktop (RDP) connections through NetScaler Gateway. [From Build 51.1017.e] [#422442]

That’s right, you can now configure NetScaler Gateway vServers to host RDP-proxy with CredSSP single-sign on. And it’s not all that difficult to set up; here’s the quick and dirty on doing so.

First, you’ll want to create your RDP profile under the NetScaler Gateway section in the GUI, or using the ‘add rdp profile’ command in the CLI:RDP Profile

RDP Profile CLI

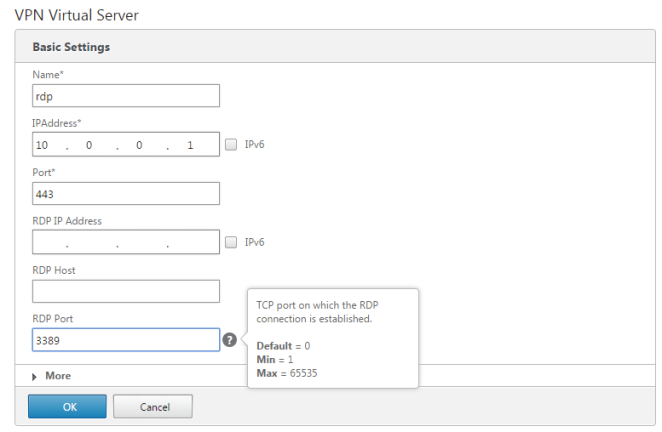
Assuming you can manage building a NetScaler Gateway vServer, there’s not much different here, you just need to specify the RDP IP (optional) and port:

rdp_proxy_vserver

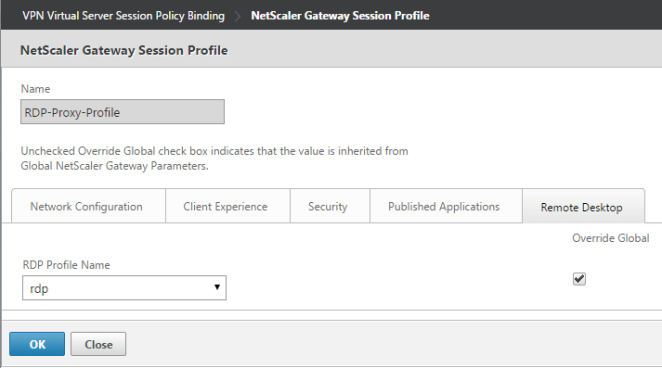
Next, specify the RDP profile in your NetScaler Gateway vServer’s session profile under the new ‘Remote Desktop’ tab:
RDP Session Profile


And that should take care of the configuration. Once configured you can launch RDP sessions by logging into the vServer and opening /rdpproxy/rdphostip:

rdp_launch

This will cause the NetScaler to generate a .rdp file that will look something like this:

redirectclipboard:i:0
redirectdrives:i:0
redirectprinters:i:1
keyboardhook:i:2
audiocapturemode:i:0
videoplaybackmode:i:1
negotiate security layer:i:1
enablecredsspsupport:i:1
authentication level:i:0
full address:s:rdp.desktopsandapps.com:3389
loadbalanceinfo:s:461346de68dd72323493ddd65585ae1b77bbdc1b1c61cafec567bcbbee5a9380

Notice the loadbalanceinfo parameter which is populated with a random string. This reference is used to validate the launch (a self-contained STA of sorts). Also, the enablecredsspsupport parameter instructs the NetScaler to attempt single sign-on to the target RDP host using CredSSP.

Well, that’s about all the time I have for now. Remember that this is in fact an ‘enhancement’ build, though it is now also included in the v11 main branch. Hopefully Citrix continues to improve this functionality as I’m sure they have customers everywhere who could benefit from native RDP-Proxy on the same ADC that’s serving up ICA-Proxy.. Enjoy!

Nitro C# APIs for Command Center – Scripting with PowerShell

In my previous post on the Nitro APIs for NetScaler I shared some PowerShell examples for interacting with a NetScaler using the Nitro C# API SDK in PowerShell. I wanted to share some similar tips and samples for scripting with the Command Center APIs, which has quite a few more gotchas than the NetScaler APIs (in my opinion :).

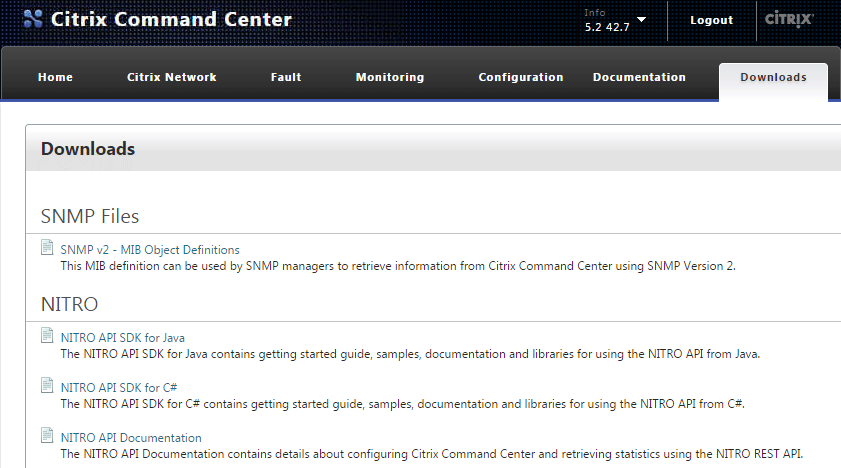
Loading the Command Center version of the Nitro C# framework in PowerShell is about the same as the NetScaler. Just like on the NetScaler, the needed assemblies can be found at the ‘Downloads’ section on the Command Center web console:

Command Center Downloads

Download and extract the tarball to your scripting environment’s working directory. Next, add the Command Center Nitro .NET framework into your runspace using the Add-Type cmdlet:

Add-Type -Path .\newtonsoft.json.dll
Add-Type -Path .\cmdctr_nitro.dll

The last requirement, which is not needed with the NetScaler APIs, is to copy ccapi.xml to your $HOME directory:

Copy-Item -Path .\ccapi.xml -Destination $HOME

If you don’t have this file in your $HOME directory you’ll get an exception when attempting to connect to the server. To do so, use com.citrix.cmdctr.nitro.service.nitro_service.login(UserName, Password):

$Credentials = Get-Credential
$nitrosession = new-object com.citrix.cmdctr.nitro.service.nitro_service($ccserver,8443,"https")
$nitrosession.login($Credentials.GetNetworkCredential().UserName, $Credentials.GetNetworkCredential().Password)

Once logged in the class heirarchy is very similar to the NetScaler APIs. Let’s look at a couple of examples of what you can do from here with some code snips along the way.

The primary reason that I wanted to write a script against Command Center was to run batches of tasks against a list of NetScalers and variables. In the script I took two such csv lists as parameters loop on each to execute the tasks sequentially against each NetScaler in the list.In this example I’ll show you how to run a custom task and passing values to populate the task’s ‘UserInput’ variables.

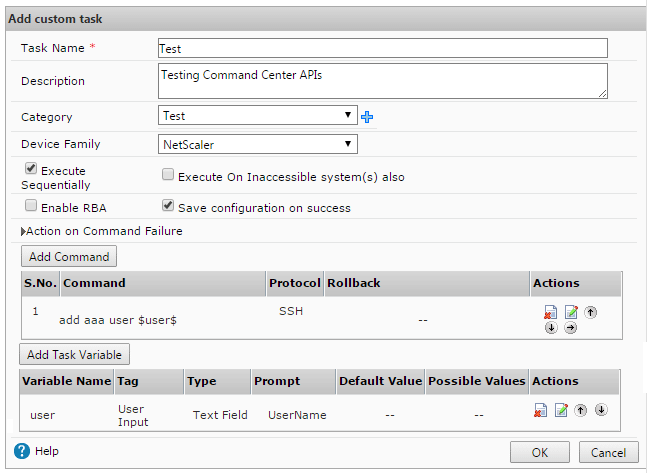
First, create a custom task in Command Center, in this example we’ll add a user that’s passed as a variable $user$:

Command Center Custom Task

In your PowerShell runspace load the following cmdctr.nitro.resource.configuration objects; ns_task_execution_data to get the task’s UserInput values, an ns_task of the task that will be executed, and a scheduler_data to specify how it should be execute:

$taskname = "Test"
$user = "User1"
$nsip = "10.0.0.1"
$task = New-Object com.citrix.cmdctr.nitro.resource.configuration.ns_task_execution_data
$taskdetails = [com.citrix.cmdctr.nitro.resource.configuration.ns_task]::get($nitrosession, $taskname)
$taskschedule = New-Object com.citrix.cmdctr.nitro.resource.configuration.scheduler_data
$taskschedule.recurr_type = "no_reccur"

From here we’ll need to put the user variable into the $task.user_input_props property. To do this you’ll need to build an explicit Dictionary[System.String,System.String] object:

$userinputprops = New-Object "System.Collections.Generic.Dictionary``2[System.String,System.String]"

Next, assign the user name variable taskdetails.task_variable_list[0].name dictionary entry. Note that the format is very specific here, most notably explicit single quotes around $UserInput$ to make sure the $’s stay in the string:

$userinputprops['$UserInput$' + $taskdetails.task_variable_list[0].name] = $user)

Since there’s only one variable in this task, we can set the $task.user_input_props property using ns_taskexecution_data.set_user_input_props(), but would otherwise do a for loop on the $taskdetails.task_variable[] array to assign multiple variables:

$task.set_user_input_props($userinputprops)

Now fill out a few other task properties, including the user who ran the job, an annotation notating the computer it was executed from, the target NetScaler IP to run the task against

$task.task_name = $taskdetails.name
$task.executed_by = ($Credentials.UserName).Split('\')[1]
$task.scheduler_data = $taskschedule
$task.annotation = "Nitro automated task executed from $($env:COMPUTERNAME)"
$task.device_list = $nsip

Then execute the task using the execute() method of the ns_task_execution_data class, passing the $task object as the second parameter:

$task = [com.citrix.cmdctr.nitro.resource.configuration.ns_task_execution_data]::execute($nitrosession,$cctask)

This will start the task in Command Center, which can then be monitored by calling get() in ns_task_status:

$taskstatus = [com.citrix.cmdctr.nitro.resource.configuration.ns_task_status]::get($nitrosession, ($cctask.execution_ids)[0])

You can then do a while/start-sleep loop on $taskstatus.status to find out what happened:

Do { $taskstatus = [com.citrix.cmdctr.nitro.resource.configuration.ns_task_status]::get($nitrosession, ($cctask.execution_ids)[0])
Start-Sleep -Seconds 1 }
While ($taskstatus.status -match "Progress" -or $taskstatus.status -match "Queued")

Once the task is complete, check the status of what happened:

if ($taskstatus.status -eq "Success")
{ Write-Host "$($cctask.task_name) completed on $nsip" }

As always it’s a lot easier to deal with a success than a failure, here’s wait it takes to see what command failed, and what the error was, if the task faced a conflicting config:

if ($taskstatus.status -eq "Failed")
{	
 $ccfilter = New-Object com.citrix.cmdctr.nitro.util.filtervalue
 $ccfilter.properties.Add("id",$taskstatus.taskexecution_id + "")
 $errorlog = [com.citrix.cmdctr.nitro.resource.configuration.command_log]::get_filtered($nit rosession,$ccfilter)
 $failedcmd = ($errorlog.output.Split("`n")[2] -replace "`n|`r").Split(':')[1]
 $failedmsg = ($errorlog.output.Split("`n")[3] -replace "`n|`r").Split(':')[1] 
 Write-Host "$($cctask.task_name) failed at '$failedcmd', the error was '$failedmsg'"	
}

I hope this example was useful and that you enjoyed a second Nitro boost for your Citrix scripting repertoire!

Nitro C# APIs for NetScaler – Scripting with PowerShell

Hello again! It’s been a while, I know, but I’m back with some fresh goodness that I hope you will enjoy. I want to give a quick shout out to Thomas Poppelgaard for encouraging me to share some new content, and in return I promised him that I’ll dust off SiteDiag in the near future 🙂 Since my last post I joined a financial services firm where I’ve been working on a global NetScaler deployment, so I’ve got lots of great insights about NetScaler and Command Center that I wanted to share.

During my involvement on the engineering side of a larger NetScaler deployment I came across several situations that warranted scripts for both NetScaler and Command Center. The primary driver behind these scripts was the automation of configuration deployment and management (comparing and setting configurations against lists of NetScalers). This post aims to cover the basics of using the C# Nitro APIs in PowerShell. I also hope to share similar tips on the Command Center APIs in a future post.

So, to get started scripting you’ll need to download and extract the Nitro API SDK for C# to the host where you plan to run the script. The download is hosted on the NetScaler itself under the ‘Downloads’ section (on the far right in 10.5):

NetScaler API SDK Downloads

NetScaler API SDK Downloads

Once you’ve extracted everything out you’ll have two DLLs that will need to be loaded into your PowerShell environment, newtonsoft.json.dll and nitro.dll. To ‘include’ these runtime libraries in your script, simply use the Add-Type cmdlet for each:

Add-Type -Path .\newtonsoft.json.dll
Add-Type -Path .\nitro.dll

Now that the runtime libraries are included you can directly call the Nitro objects using the com.citrix.netscaler.nitro namespace:

com.citrix.netscaler.nitro Namespace


The next step is to connect to the NetScaler by creating com.citrix.netscaler.nitro.service.nitro_service object and calling the login() method, which looks like this in PowerShell:

$Credentials = Get-Credential #prompt for credentials
$nitrosession = New-Object com.citrix.netscaler.nitro.service.nitro_service("netscaler.fqdn",'HTTPS') 
$nitrosession.login($Credentials.GetNetworkCredential().UserName, $Credentials.GetNetworkCredential().Password)

And this is where the ‘fun’ starts. Referencing the Nitro API Documentation, you can explore all of the classes and methods that are now at your disposal, including every imaginable configuration and statistic.

Let’s take an example of checking the status of modes, which is handled by the com.citrix.netscaler.nitro.resource.config.ns.nsmode class:

com.citrix.netscaler.nitro.resource.config.ns.nsmode


Say you wanted to get all of the modes that are currently set on a NetScaler, you’d simply call the get() method, passing the $nitrosession object as the only argument:

[com.citrix.netscaler.nitro.resource.config.ns.nsmode]::get($nitrosession)

mode : {FR, L3, MBF, Edge...}
fr : True
l2 : False
usip : False
cka : False
tcpb : False
mbf : True
edge : True
usnip : True
l3 : True
pmtud : True
sradv : False
dradv : False
iradv : False
sradv6 : False
dradv6 : False
bridgebpdus : False

This command uses the nitro_service object as the connection reference for the nsmode.get() method, pretty straightforward.

Now, say you wanted to change one of the modes, L2 in this example, and this is where it can get a little tricky. First, you’ll need to store nsmode in a PowerShell object using the same get() method above:

$nsmode = [com.citrix.netscaler.nitro.resource.config.ns.nsmode]::get($nitrosession)

Then you’ll need to build an array of modes that you want to enable, including any that are already enabled, to pass to the enable() method (there’s probably an easier way to do this than the below snippet, but hey, it works!):

$modes = @(); foreach ($mode in $nsmode.mode){$modes += $mode}; $modes += "L2"

This will give you an array ($modes) that contains all of the modes that you want to enable, plus the modes that were already enabled. You’ll then need to use the nsmode.set_mode() method to set the modes that should be passed to the enable() method:

$nsmode.set_mode($modes)

And the moment of truth, passing the modified $nsmode object to the enable() method:

[com.citrix.netscaler.nitro.resource.config.ns.nsmode]::enable($nitrosession, $nsmode)
errorcode  message sessionid severity 
---------  ------- --------- -------- 
0         Done              NONE

Let’s explore another example that involves a rewrite policy and action set, which can quickly become a web of interconnecting classes and methods.

First, let’s put all of the rewrite policies into an object:

$rewritepolicies = [com.citrix.netscaler.nitro.resource.config.rewrite.rewritepolicy]::get($nitrosession)

Which will give you a collection of rewrite policy objects in the following format:

__count : 
name : ns_cvpn_sp_js_vgp_pol
rule : http.req.url.path.endswith("ViewGroupPermissions.aspx") && http.req.method.eq(POST) && http.res.body(10).contains("0|/")
action : ns_cvpn_sp_ct_rw_act
undefaction : 
comment : 
logaction : 
newname : 
hits : 0
undefhits : 0
description : 
isdefault : True
builtin :

From here, you can call other methods for the rewrite class by referencing the object that you’re interested in. For example, to get a list of bindings for ns_cvpn_default_bypass_url_pol, which is the first policy returned on a NetScaler, you would reference $rewritepolicies[0].name when using the rewritepolicy_binding.get() method:

[com.citrix.netscaler.nitro.resource.config.rewrite.rewritepolicy_binding]::get($nitrosession, $rewritepolicies[0].name)

Similarly, you can get a rewrite action by referencing the rewrite policy’s action property:

[com.citrix.netscaler.nitro.resource.config.rewrite.rewriteaction]::get($nitrosession,$rewritepolicies[0].action)

I’ll stop here for the sake of time and complexity, as there are so many ways that you can go with this foundation. I highly recommend using a tool like PowerGUI so that you can see the classes as you type, and explore the various objects and methods at your disposal.

Anyways, I hope this all makes enough sense for someone to start scripting for NetScalers in PowerShell, and will try to post a similar article on the Command Center APIs soon.

XenApp PowerShell Scripting with Get-XASession

I was working on a PowerShell script in XenApp today to quickly view active sessions by user, server, application, and session duration. Having focused most of my PoSH time in recent years to the XenDesktop SDK, I was somewhat disappointed with the limited flexibility (and official documentation) of the XenApp SDK, specifically with the Get-XASession cmdlet.

My main complaint is that Get-XASession doesn’t have many ‘Required’ parameters, which means that queries are limited to a subset of session details:

Get-XASession

For example, if I want to find all sessions that are ‘Active’, I have to pipe the results of Get-XASession and evaluate each returned object. So, the following pipeline evaluation is required if you wanted to see all active sessions:

Get-XASession | Where-Object { $_.State -match 'Active'}

Using this as a foundation to find Active sessions, I took it a step further by using an input parameter (application name) to list sessions by application, and then formatted the output of the session details to get me what I’m looking for:

param ([String]$app)
foreach ($session in (Get-XASession | Where-Object { 
$_.BrowserName -match $app -and $_.State -match 'Active'} | 
select AccountName, ServerName, LogonTime, ConnectTime, CurrentTime, SessionID | 
Sort-Object LogonTime -Descending))
{
 $logon = (Get-Date) - $session.LogOnTime
 $connect = (Get-Date) - $session.ConnectTime
 "$($session.AccountName) logged on to $($session.ServerName) {0:00}:{1:00}:{2:00}" 
 -f $logon.Hours,$logon.Minutes,$logon.Seconds + " ago."
}

This script returns a active sessions by user name, connected to $app, the server on which it’s running, and the elapsed time (in ascending order) since they logged on (just subtract the $_.LogonTime date/time object from Get-Date). Notice how the $session object is compiled of properties of the sorted Get-XASession output by way of piping the output through several filters, which lets you create your own objects that can be easily manipulated and cross-referenced in the script. I also did some date/time formatting with {0:00}:{1:00}:{2:00}” -f $logon.Hours,$logon.Minutes,$logon.Seconds, though you can present this time duration in any way that makes sense.

Well, I hope this was worth a quick read, have a good weekend!

Windows 8.1 DPI Scaling Causes ‘older’ Applications to be scaled/blurred

Since Windows 8.1 reached GA today, I loaded it up first thing this morning on my Ativ Book 7 to enjoy the much anticipated tweaks that make this Ultrabook even more ultra! However, once I got the update installed, I opened a few applications, including Chrome, and a XenDesktop 7 ICA session using Receiver for Windows and immediately noticed that these apps were blurrier than the desktop or Modern Apps.

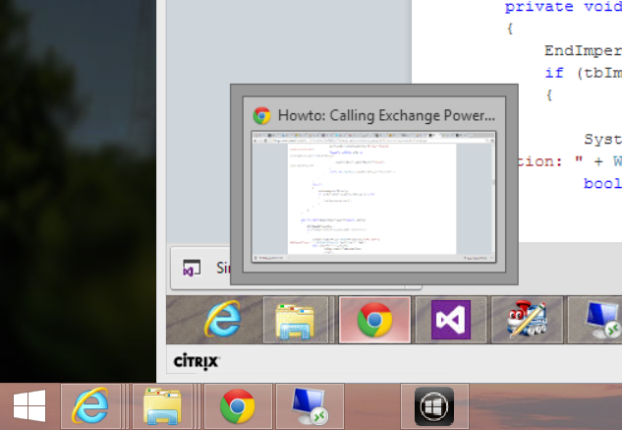
As you can see in this screen clip, there’s a slight blur on the seamless ICA desktop (110%ish scaled), as is the CDViewer taskbar icon:

Image

I quickly found that Microsoft decided to enable dynamic display scaling on non DPI Aware programs for high-DPI displays. If you’re interested (like I was) to know more about why Microsoft made this decision in 8.1, you should check out this blog which goes into detail on the topic.

The short of it is that the ‘..additional scaling capability provides two distinct advantages for high-DPI displays on Windows 8.1:

  1. UI can scale larger which makes readability better and touch/mouse interactions easier.
  2. 200% scaling enables pixel-doubling for up-scaling which provides a clear and crisp appearance for images, graphics, and text.

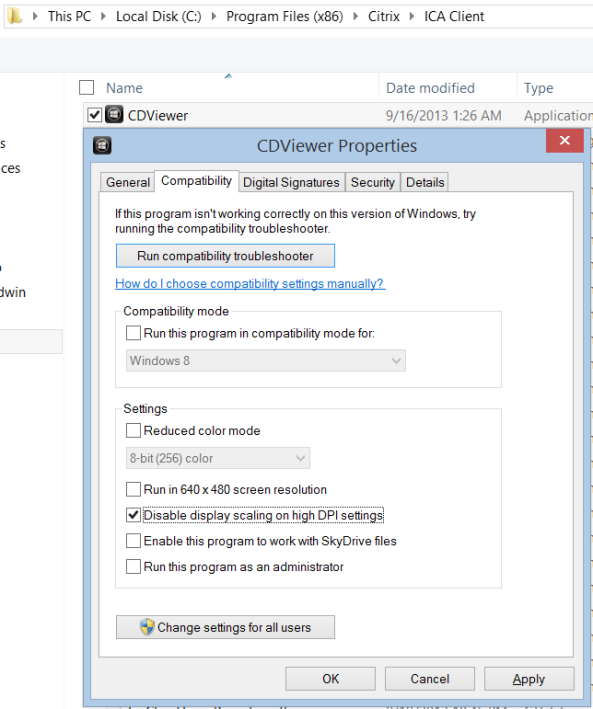
Since the Ativ 7 crams a 1080p display into a 13.3″ panel, it falls under the category of a high DPI display at about 165 PPI. To change this behavior for a particular application, you have to adjust the executable’s compatibility settings to ‘Disable display scaling on high DPI settings’:

Disable Display scaling on large DPI displays

Disable display scaling on high DPI settings

By doing this for CDViewer.exe, for example, I was able to get the ‘Desktop Viewer’ to launch in native DPI, which is blur free (and displayed in normal DPI). If I need to get a more readable/usable DPI, I can always adjust the same settings on the virtual desktop side:

sharp

This setting can be also be disabled via the registry by setting an AppCompatFlags\Layers Reg_SZ value named as the executable in question, with the string set to HIGHDPIAWARE (in HKEY_CURRENT_USER\Software\Microsoft\Windows NT\CurrentVersion\AppCompatFlags\Layers):

UseDPIScaling

You can also disable DPI scaling for all applications on a particular display by checking the ‘Let me choose one scaling level for all my displays’ in the ‘Display’ control panel item, and setting the scaling ratio to 100% (Smaller):

The only caveat to this approach is that DPI scaling is also disabled for Explorer, so the taskbar and desktop will be small as well.

Thanks for the thought Microsoft, but please give us an option to do without this feature!

XenDesktop 7 Session Launch – Part 3, Brokering

In my last post I talked about the ways that the Citrix client/WI enumerates XenDesktop resources by way of NFuse transactions to the site’s XML broker. The XML broker is responsible for telling the StoreFront server which published resources were found for a particular user. For more technical detail on NFuse transactions, check out my XML Broker Health Check post which gives a good example of NFuse transactions by way of some pretty straightforward XML requests sent through PowerShell.

The next major piece of the session launch process is what’s known as Brokering. This process allows a user to click a desktop or app resource, and have a ‘worker’ selected and readied for an inbound ICA connection. XenDesktop 7’s brokering functionality is mostly unchanged from that of XenDesktop 5, the only main difference being that it now includes multi-user RDS workers.

Conceptually, this factor doesn’t change how the Citrix Connection Brokering Protocol works, it simply adds multi-user support for Windows RDS servers. This functionality has actually existed with limited capabilities since XenDesktop 5.6 for CSPs (Hosted Server VDI), so it’s certainly not a huge leap in terms of changes to the broker agent. The XenDesktop brokering process consists of several key components, including:

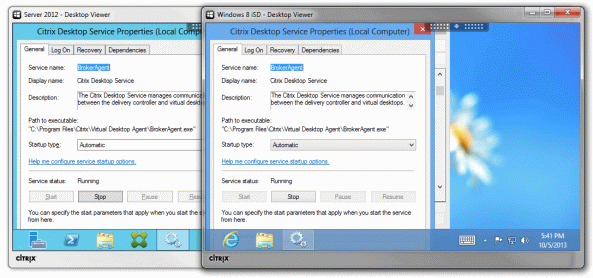
  • Citrix Desktop Service (CDS / VDA) – This component provides a bridge between the ‘Delivery Controller’ and the ‘Worker’ and is commonly referred to as the ‘Virtual Desktop Agent’ or VDA. In XD5 this was the WorkstationAgent.exe process, though in XD7 the process was renamed to BrokerAgent.exe. However, the directory still reflects the VDA designation, so I still like to refer to it as the VDA:

CDS

  • Citrix Broker Service – The Broker Service is responsible for negotiating session launch requests with ‘workers’. The Broker service communicates with the CDS over a protocol that Citrix refers to as CBP (connection brokering protocol) to validate a worker’s readiness to fulfill a session launch request, gather the necessary details (IP address or host name), and send the details back to the StoreFront site to be packaged and delivered as an .ICA launch file that’s consumed by the Receiver.
  • Connection Brokering Protocol – This protocol behaves much like NFuse, though it uses .NET WCF endpoints to exchange a series of contracts to communicate registration and session launch details between a worker and delivery controller. This protocol was designed with the following key requirements as it’s functionality is highly critical to reliably providing on-demand desktop sessions:
    • Efficient: information should be exchanged only if and when required (just in time). Limiting the data exchange to a minimum also reduces the risk of leaking sensitive data.
    • Versioned: It must be possible for both workers and controllers to evolve concurrently and out of step without breaking protocol syntax or semantics.
    • Scalable: The delivery controller is a key piece of infrastructure, and its performance must not be impacted by unprompted messages and data from workers, as can happen in IMA, for instance during “election storms”.
    • Flexible: the protocol should allow the architecture to evolve over time, by not building key assumptions into the protocol’s foundation code. Factoring independent operations into separate service interfaces is one example of how a protocol can allow for increasing controller differentiation in future.
    • Compliant: Standards-based mechanisms (WCF) are used instead of proprietary technologies (IMA).
    • Secure: Security is critical, and the protocol must support appropriate mechanisms to ensure confidentiality, integrity (WCF contracts), and authenticity (NTLM/Kerberos auth) of data exchanged between workers and controllers.

The XenDesktop brokering process makes the following basic assumptions about CDS workers:

  • Desktops are either Private or Shared
  • Each desktop is associated with a single delivery group
  • Each desktop is backed by a single worker
  • Each worker is individually associated with a hosting unit, with a null unit index value indicating an unmanaged worker (existing or physical catalog types)
  • Desktops within a private desktop group can have permanent user assignments. The association may comprise one or more users, or a single client IP address
  • Multiple desktops within a private desktop group may have the same user assignments
  • Desktops within a shared desktop group may temporarily be assigned to a single user for the duration of a session
  • Multiple desktops within a shared desktop group may be assigned to the same user concurrently
  • Automatic assign-on-first-use behavior involves the broker selecting a desktop within a private desktop group with no assignment, and assigning it to the currently requesting user; the desktop’s group will not change by virtue of user assignment
  • The assignment of a desktop to its assignee(s) in a private desktop group can only be undone by an administrative user through the PoSH SDK

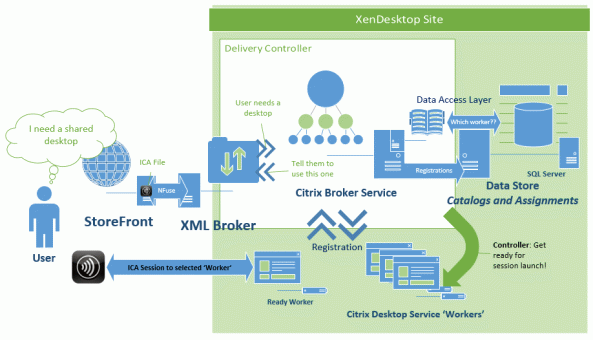
In a nutshell, the Delivery Controller is responsible for negotiating session launch requests by locating and preparing workers to accept ICA sessions that were requested by a StoreFront server via the XML broker.

XD7brokering

The broker service finds a worker to fulfill the session request, powers it on if needed, waits for it to become ready if a power action was sent. Once the worker is ready, the DDC sends the requisite connection details to the StoreFront server to build and deliver the ICA file, which is sent to the Receiver for consumption by the ICA client.

Hopefully this was a decent enough explanation of brokering. While I didn’t get a chance to go into a lot of detail about how a worker is found, and how CBP interacts with the ICA stack, I think this at least gives a good high level overview of the concept to know what components are involved and what their general interactions with each other are.

My next part in this series will look at the ICA stack, and how a connection is established between ICA clients and servers.