XenDesktop 7 Session Launch – Part 2, Enumeration

In my last post I talked about how the Citrix Receiver authenticates to a StoreFront server. In this post, I want to talk about resource enumeration with Citrix Receiver <> StoreFront <> XenDesktop deployments.

Before I go into the technical aspects of the way Citrix enumerates published resources, I want to briefly explain the history behind the Citrix XML Broker, as well as how the Citrix client enumerates published resources. In case anyone is interested in a broader history of Citrix, I encourage you to check out the 20 years of Citrix History publication that was published in 2009.

Citrix NFuse and the XML Portal Server

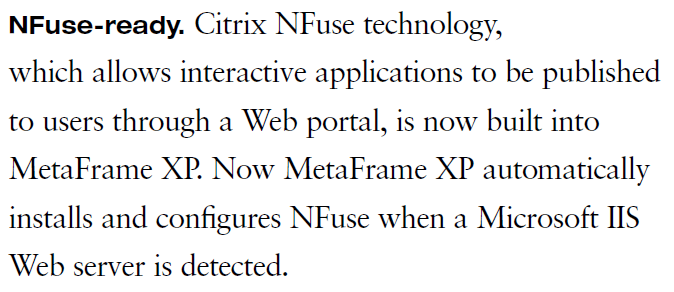
Back in 2000, Citrix signed a licensing deal with Sequoia Software (whom they later acquired in 2001) to integrate the NFuse as the foundation for providing an extensible application portal for MetaFrame. The XML Portal Server (XPS) technology was then built around NFuse to provide the ability to dynamically enumerate and present resources to end users. This integration was critical in giving Citrix the ability to stand apart from the competition (terminal services), and was the reason the next version of MetaFrame had the XP designation:

xpsnfuse

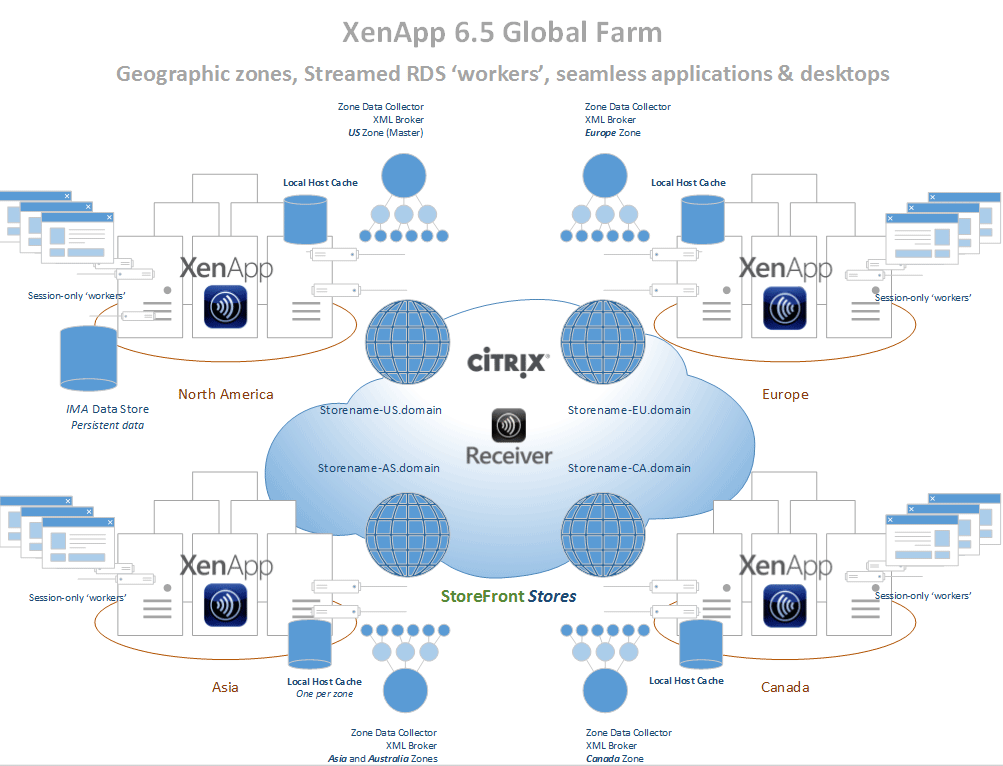
Since it’s introduction back in 2000, the NFuse protocol has remained at the core of every Citrix desktop/application virtualization product by way of the ‘XML Broker’ service. This service was included in all future releases, including all versions of XenApp & XenDesktop. Until XenDesktop 5 was released, the XML broker service ran as it’s own standalone service. During the XenDesktop ‘Storm’ site architecture rework (now called FMA, aka NOT IMA) the XenDesktop product team decided to relocate the XML broker service to run as a ‘virtual’ service by piggy-backing on the XenDesktop Broker service. Other than this move to virtualize the XML broker service, the service remains as NFuse capable as the XML broker service used in MetaFrame.

Because of the NFuse protocol, resource enumeration has remained compatible as MetaFrame evolved into XenDesktop. In other words, the old MetaFrame Web Interface Server would still enumerate published desktops from a XenDesktop 7 DDC, and a StoreFront 2.0 server would enumerate published applications from a MetaFrame XP XML broker service (theoretically at least!), as long as the requests are NFuse compatible.

One of the main reasons the NFuse protocol is so durable is that it’s able to negotiate capabilities. In this example, a StoreFront site contacts a XenDesktop XML broker to determine what capabilities it has, and what resources are published to the authenticated user:

enumeration

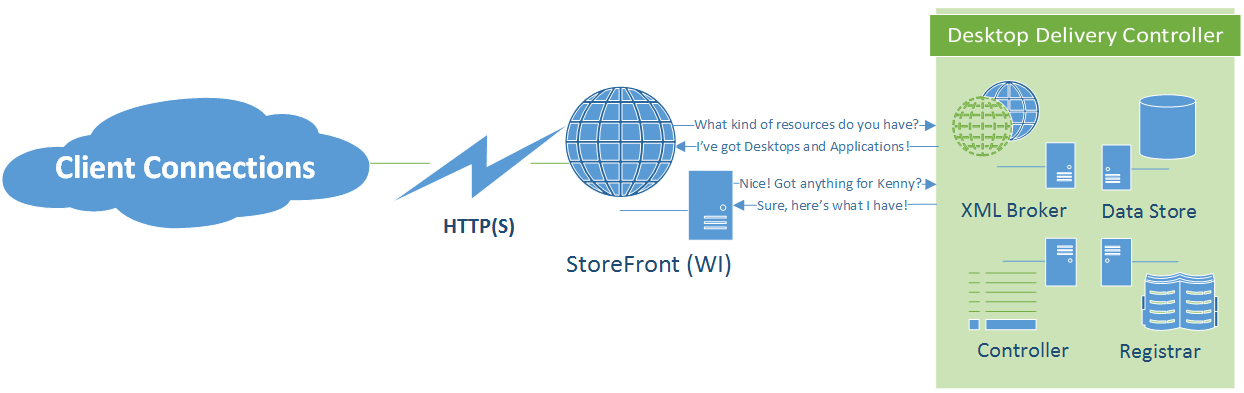
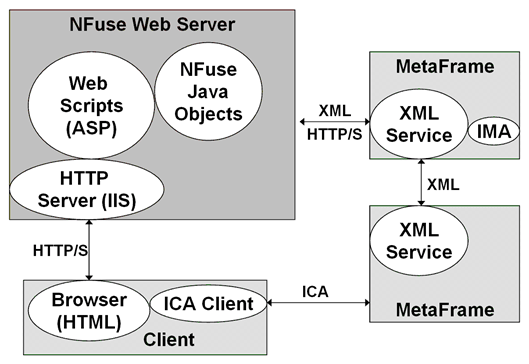
In this process, the web front-end server sends an XML message to the configured XML broker to request a list of capabilities. The XML broker then responds with an XML formatted list of the types of resources it has access to. StoreFront will then request any compatible resources for the the authenticated user account. The XML broker then works with the XenDesktop broker and controller services to find out what resources are assigned to the user. The enumerated resources are consumed by StoreFront and presented to the end user.  This figure from the NFuse Classic 1.7 is still mostly relevant, just different companion components:

nfuse

StoreFront & Receiver

With Citrix Web Interface, the results of application enumeration were presented all at once to the authenticated user (optionally sorted into tabs and/or folders). In other words, all resources published to a user would be shown to them, though you could hide resources as needed. StoreFront with Receiver added the functionality that was originally introduced with Citrix Merchandising Server and Dazzle, which is to allow a user to pick their ‘favorite’ resources, providing Self-Service ‘App Store’ functionality and allowing a user’s favorite resources to follow them across multiple client devices and device types.

Prior to Dazzle/Receiver, applications were either enumerated in a web browser using a Web Interface ‘Web’ site, or enumerated directly by the Citrix client agent through a ‘Services’ site. In the past three years the Citrix client has evolved from the ‘Online Plug-in’ to the Receiver for Windows.

clients

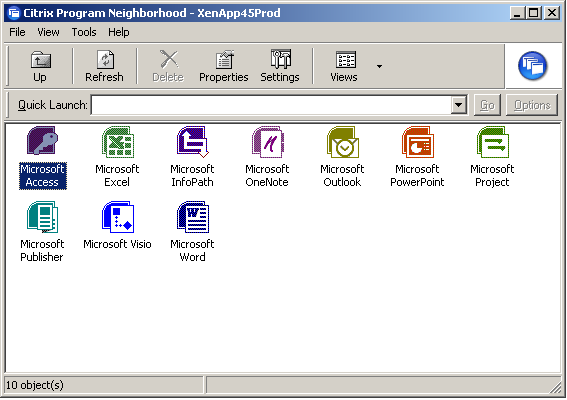
The concept of client-side agent enumeration began with the ‘Program Neighborhood’ client (pre Online Plug-in), which would access a Services site (hence the default name PNAgent), and looked like this:

Program-Neighborhood-12

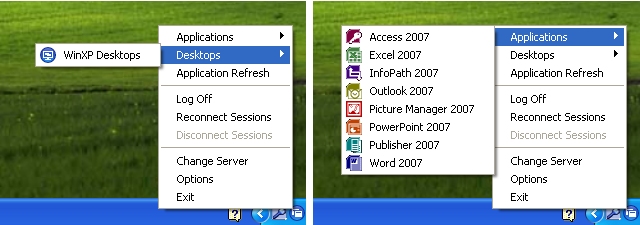
Until XenApp replaced Presentation Server, this was the way users would typically connect to applications, as the web portal wasn’t nearly as solid as the old WI server running in IE 5/6. By the time XenApp was released, Citrix decided to rework the ‘PNAgent’ to display resources as a system tray icon jump menu (which remains a fan favorite, quick, easy, intuitive) in what was first called the XenApp Plug-in, and later renamed to the Online Plug-in when XenDesktop was released:

DRXDBoth

However, around the time the Apple App Store was released, and Windows Vista changed some application UI design consideration, Citrix decided to create a self-service framework by way of Dazzle and Merchandising Server. As a result of this they decided to do away with the notification icon ‘jump-menu’ since it didn’t align with Microsoft’s general UI design recommendations for Windows Vista/7. When Receiver was launched, this legacy ‘PNAgent’ functionality was taken out of the standard ‘Receiver’, and moved to only be included in the ‘Enterprise’ flavor of the Receiver, which is really just a nice way to say that they’re accommodating ‘Enterprise’ customers who still want/need to use this legacy functionality.

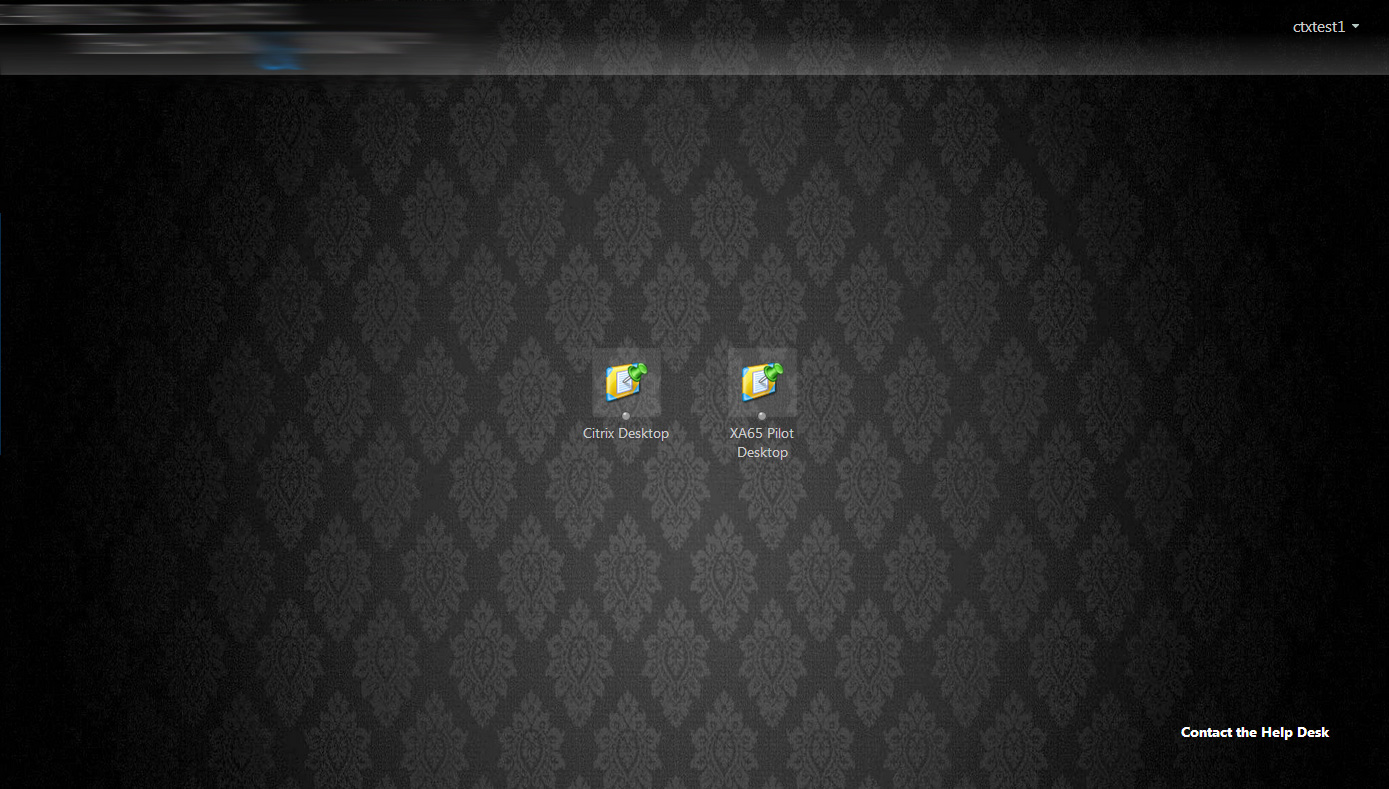
As of Receiver Enterprise (the black icon) PNAgent enumerated shortcuts are only available in the start-menu or desktop (according to the site/farm settings):

PNA

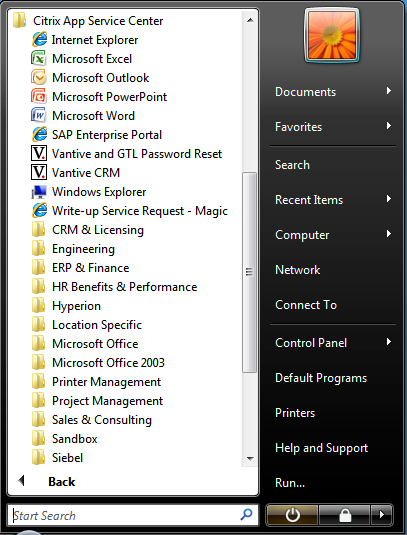
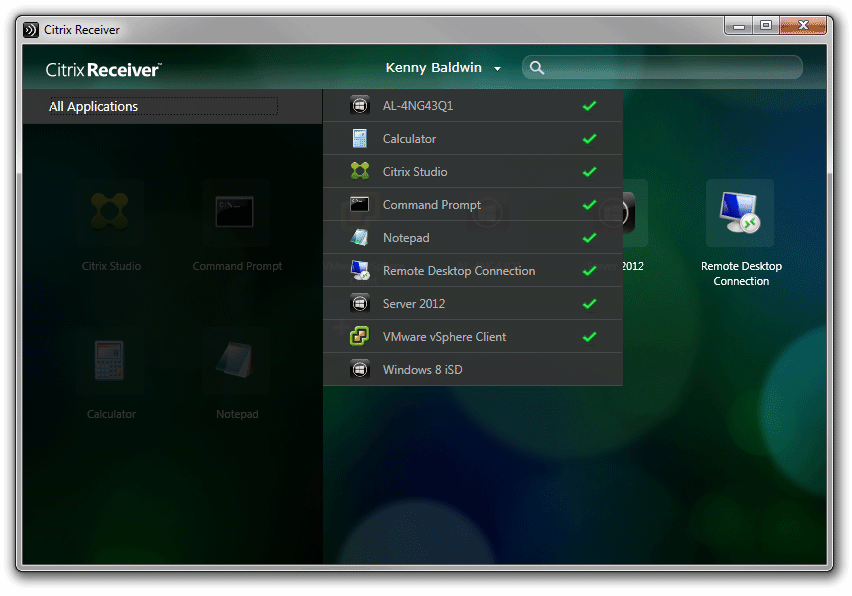
Citrix’s current preferred method of displaying shortcuts to end-users is using Receiver 3/4 to connect to a StoreFront Store, which uses the ‘Dazzle’ framework to present shortcuts:

receiverwindow

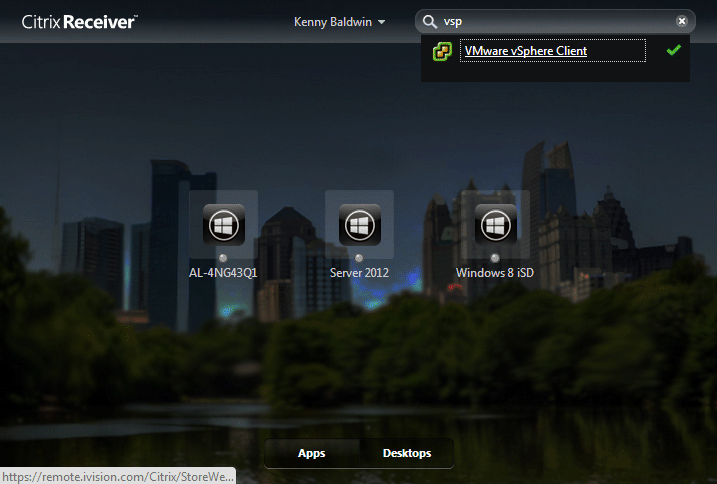
The StoreWeb StoreFront site aims to provide the same look and feel for users that aren’t enumerating via the ‘Receiver’ agent:

receiverweb

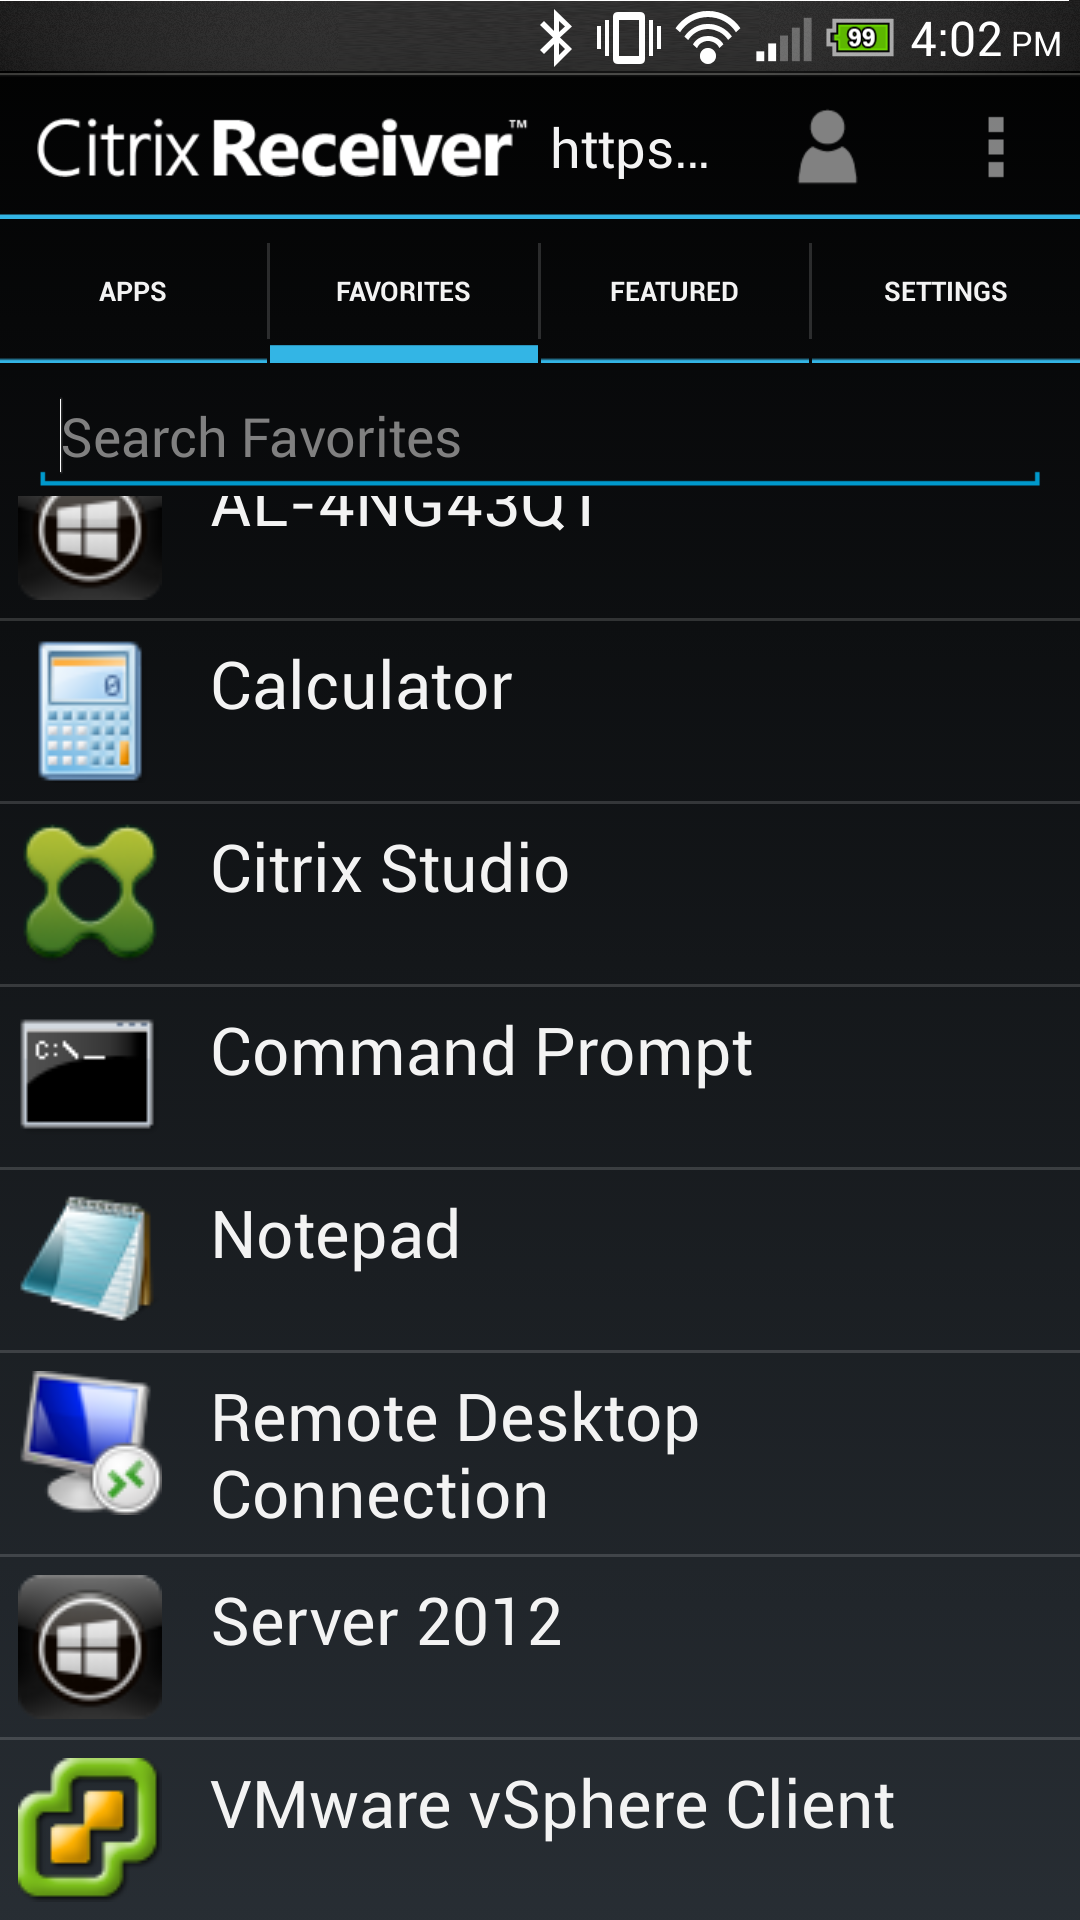
Connecting from mobile receivers maintains this consistency of favorite resources:

androidreceiver

I could go on and on about the technical details of enumeration, but am out of time for today. I encourage readers to check out my previous post on the XML broker for a technical example of NFuse transactions.

In my next post I go into more detail about how enumerated resources are brokered to the receiver.

XenDesktop 7 Session Launch – Part 1, Authentication

The process of enumerating, brokering, and connecting to a XenDesktop resource involves quite a few moving parts, and can be a daunting task to troubleshoot for someone who isn’t familiar with the product. There are several key components involved in the session launch process including authentication, enumeration, registration, ticketing, and display/session handling.

In this post I’d like to briefly explain how the Citrix Receiver authenticates to a XenDesktop 7 application or desktop. To keep it simple, I’m only going to talk about StoreFront (no WI) and XenDesktop (no XenApp/IMA). So just Receiver <> StoreFront <> XenDesktop.

The first step to launching a XenDesktop session is to authenticate to the StoreFront Store that the XenDesktop resource is connected to. In this step, a user connects to the StoreFront server and:

  1. Authenticates to a StoreFront virtual directory via Citrix Receiver:
    • The Receiver is connecting to a StoreFront Store, StoreWeb, StoreDesktopAppliance, or PNAgent IIS virtual directory. IIS allows anonymous authentication since the StoreFront .NET services (Citrix.Storefront.exe & Citrix.StoreFront.PrivilegedService.exe) handle authentication:

storefront-IIS

    • To configure a StoreFront server’s authentication methods, use the Citrix Studio MMC to open the Authentication TreeNode of the Citrix StoreFront deployment. Here you can specify which authentication methods to allow on Stores hosted by that server:

storefront-authmethods

    • There are four authentication methods available as of StoreFront 2.0:
      • User name and password: Similar to windows basic auth in IIS, or explicit authentication in Citrix Web Interface Server.Prompts the user to enter their credentials at logon.
        • In this scenario, the broker passes the user’s credentials to the target ICA server on behalf of the client
      • Domain Pass-through: Similar to Integrated Authentication in IIS, and
        • Allows Receiver for Windows endpoints automatically log on using the local session’s logged on user domain account (via NTLM)
        • In this scenario, the client sends credentials (via ssonsvr.exe) directly to the target ICA server
        • For pass-through authentication to work, you must use the /includesson switch when installing Receiver (per CTX133982), which tells the meta-installer to include the ‘SSON’ component (ssonsvr.exe) that is needed to capture the user’s domain credentials at logon. Receiver relies on the SSON component to send the user’s domain credentials to the StoreFront server’s StoreWeb (via browser), Store (via Receiver), or legacy PNAgent (via Online Plugin / Receiver Enterprise) virtual directory.
          • There is currently a bug with XenDesktop 7 published desktops using pass-through authentication to provide ‘FlexCast’ functionality (enumerate and launch published apps from the published desktop) where ssonsvr.exe wouldn’t run (crashed at login) because pnsson.dll wasn’t playing nice with the ICA stack at session logon.
          • Citrix has provided a provisional test-fix to customers with an open case, and will soon be releasing a public hotfix. As of this post, pass-through authentication doesn’t work on XenDesktop 7 published desktops running Receiver 3/4 without this fix in place.
      • Smart Card: Allows smart card pass-through
        • Thankfully I don’t work with this method very often, so I’ll refrain from digging in. Just know that it’s required if smart-cards are used in the environment
      • Pass-through from NetScaler Gateway: Allows a NetScaler Gateway virtual server to handle user authentication on behalf of the user
        • Requires Set-BrokerSite -TrustRequestsSentToTheXmlServicePort $true to be set on the DDC/XML broker)
        • Use the Configure Delegated Authentication option to specify that the NetScaler send logon credentials directly to the remote Windows session

delegatedauth

    • There are also client-side registry values that control whether or not to allow pass-through authentication, and can even lock down the feature to only work with StoreFront sites in specified Internet Explorer Security Zones (aka Client Selective Trust). The easiest way to adjust this is to use the ADM template in %ProgramFiles%\Citrix\ICA Client\Configuration\icaclient.adm

Image

In my next post on XD7 session launch I’ll talk about resource enumeration, including details about the virtual XML broker and XenDesktop broker services.

XenApp/PVS Global Farm Overview

Since there was a lot of interest in the last Visio I posted, I thought I’d share another.

These diagrams outline high level overviews of a global XenApp w/PVS deployment, with XenApp zones and PVS sites in each datacenter. Each XenApp zone has two data collectors/XML brokers, PVS-Streamed OU-based worker groups. Each geographic region has a corresponding StoreFront Store (directed by host name):

XenAppGlobal


The PVS farm configuration is very similar, consisting of sites in each datacenter to stream XenApp workers for each XenApp zone in that datacenter, with the master database homed in the US datacenter:

PVSGlobal


The intent of these overviews are mainly to demonstrate how the XenApp and PVS farms interact in a global zone/site architecture. I’ll share some overview diagrams of XenApp zones and PVS sites in another post. Hope you enjoy!

Citrix Receiver for Windows 4.0.1 – Goodbye unnecessary logon prompts!

For those of you out there who are delivering XenApp/XenDesktop through StoreFront, you should definitely make sure to update your Receiver for Windows 4 clients to the latest 4.0.1 hotfix. While this update only contains one fix, it solves a very visible, miserable, and annoying problem.

If you’ve ever connected to a StoreFront Store via Receiver 4.0 through a remote site, you’ve probably seen this window pop up every 10 minutes or so:

Image

Receiver 4.0.1 addresses this very annoying behavior by only prompting for credentials after the expiration timeout period if and when a resource is launched through Receiver.

I’m sure many of you already knew about this fix, but I thought I’d help to spread the word in hopes of sparing others from this frustration on Receiver 4.0 RTM.

SiteDiag v1.2 for XD7

I think I’ve gotten SiteDiag working pretty well for XD7 now, and feel comfortable to share it as a stable release. I also did some basic testing on XD5, and there doesn’t appear to be any noticeable regressions. As of version 1.2 (10/2/13) I added application icons into the tool using the Get-BrokerIcon cmdlet to convert the Base64 strings to images in the TreeView.

I’ll continue working to build out the functionality of the tool on XD7, so stay tuned for updates as progress is made.

Click here to download the latest stable build.

SiteDiagXD7

XenDesktop 7 Service Instances – What’s New?

Since XenDesktop 7 was built using the same service framework architecture as XenDesktop 5 (aka the ‘FlexCast Management Architecture’), the additional functionality introduced in XD7 was added as services, each with multiple service instances. These services are handled much in the same way as XenDesktop 5, and XenDesktop 7 sites use version 2 of the Citrix.Broker.Admin PowerShell SDK to return information on registered service instances using the cmdlets of the same name as XD5 (Get-ConfigRegisteredServiceInstance, Register-ConfigServiceInstance, etc.).

In XenDesktop 5, each DDC in a site has 5 services, with 12 total service instances that correspond to the various WCF endpoints used by each service. If the DDC is also running the Citrix License Server, there would be a total of 13 instances. For this reason, it’s a fairly straightforward process to find and register missing service instances.

XenDesktop 7 is quite different in this regard. Since it has optional FMA services, such as StoreFront, the number of service instances in any given site depends on which components are installed, and whether or not SSL-is in use.

For example, my single-DDC site running StoreFront 2.0 with SSL encryption has 10 services with 43 total service instances:

XenDesktop 7 Services

If StoreFront wasn’t installed, for example, there would be at least three less services (some of the Broker services would likely not be registered). There are also duplicate service instances for SSL encrypted services, such as the virtual STA service. Here’s a quick PoSH script to tell you what service instances are registered in your site (for XD5 & XD7):

asnp citrix.Broker*
Get-ConfigRegisteredServiceInstance -AdminAddress na-xd-01 | %{ 
"ServiceType: " + $_.ServiceType + " Address: " + $_.Address; $count++}
"Total Instances: " + $count

You could take this a step further to see how many instances are in each of the 10 possible service types:

New-Alias grsi Get-ConfigRegisteredserviceInstance
 $acct = grsi -AdminAddress na-xd-01 -serviceType Acct; "$($acct.Count) ADIdentity service instances"
 $admin = grsi -serviceType Admin ; "$($admin.count) Delegated Admin service instances"
 $broker = grsi -serviceType Broker; "$($broker.count) Broker service instances"
 $config = grsi -serviceType Config; "$($config.count) Configuration service instances"
 $envtest = grsi -serviceType EnvTest; "$($envtest.count) Environment Test service instances"
 $hyp = grsi -serviceType Hyp; "$($hyp.count) Hosting Unit service instances"
 $log = grsi -serviceType Log; "$($log.count) Configuration Logging service instances"
 $monitor = grsi -serviceType Monitor; "$($monitor.count) Monitor service instances"
 $prov = grsi -serviceType Prov; "$($prov.count) Machine Creation service instances"
 $sf = grsi -serviceType Sf; "$($sf.count) StoreFront service instances"
 "$($acct.Count + $admin.Count + $broker.Count + $config.Count + $envtest.Count + $hyp.Count + $log.Count + $monitor.Count + $prov.Count + $sf.Count) Total service instances"
XenDesktop 7 Service Instance Count

XenDesktop 7 Service Instance Count

Because of this nuance, I’m working on a more intelligent way of enumerating and validating service instance registrations in SiteDiag for XD7. Hopefully these scripts are helpful in illustrating the difference between XD5 & XD7. Also, here’s the latest nightly build of SiteDiag that has the beginnings of the additional logic needed to properly count, and fix, registered service instances in a XenDesktop 7 site.

XenDesktop 7 – Environment Test Service

If you’ve had a chance to review the XenDesktop 7 PowerShell SDK documentation, you might have noticed a few new snap-ins that provide the site interactions for the new services included with XenDesktop 7 (as part of the FlexCast Management Architecture). These new snapins are the designated as V1 on the cmdlet help site, and include StoreFront, Delegated Admin, Configuration Logging, Environment Tests, and Monitoring.

Out of these new services, the Environment Test Service sounds the most appealing to me, as it provides a framework to run pre-defined tests and test suites against a XenDesktop 7 site. However, I found that the SDK documentation didn’t provide much/any guidance on using this snap-in, so I thought I’d share a quick rundown on the meat of this new service, along with some sample scripts using the main cmdlets.

The most basic function of this service is to run predefined tests against various site components, configurations, and workflows. As of XD7 RTM, there are 201 individual TestID’s, which can be returned by running the Get-EnvTestDefinition cmdlet:

TestId 
------ 
Host_CdfEnabled 
Host_FileBasedLogging 
Host_DatabaseCanBeReached 
Host_DatabaseVersionIsRequiredVersion 
Host_XdusPresentInDatabase 
Host_RecentDatabaseBackup 
Host_SchemaNotModified 
Host_SnapshotIsolationState 
Host_SqlServerVersion 
Host_FirewallPortsOpen 
Host_UrlAclsCorrect 
Host_CheckBootstrapState 
Host_ValidateStoredCsServiceInstances 
Host_RegisteredWithConfigurationService 
Host_CoreServiceConnectivity 
Host_PeersConnectivity 
Host_Host_Connection_HypervisorConnected 
Host_Host_Connection_MaintenanceMode...

The tests are broken down into several functional groups that align with the various broker services, including Host, Configuration, MachineCreation, etc, and are named as such. For example, the test to verify that the site database can be connected to by the Configuration service is called Configuration_DatabaseCanBeReached.

Each test has a description of it’s function, and a test scope that dictates what type of object(s) can be tested. Tests can be executed against components and objects in the site according to the TestScope and/or TargetObjectType, and are executed by the service Synchronously or Aynchronously, depending on their InteractionModel. You can view all of the details about a test by passing the TestID to the Get-EnvTestDefinition cmdlet; for example:

PS C:> Get-EnvTestDefinition -TestId Configuration_DatabaseCanBeReached

Description : Test the connection details can be used to 
 connect successfully to the database.
DisplayName : Test the database can be reached.
InteractionModel : Synchronous
TargetObjectType : 
TestId : Configuration_DatabaseCanBeReached
TestScope : ServiceInstance
TestSuiteIds : {Infrastructure}

TestSuites are groups of tests executed in succession to validate groups of component, as well as their interactions and workflows. The Get-EnvTestSuite cmdlet returns a list of test suite definitions, and can be used to find out what tests a suite is comprised of. To get a list of TestSuiteIDs, for example, you can run a Get-EnvTestSuite | Select TestSuiteID, which returns all of the available test suites:

TestSuiteId 
----------- 
Infrastructure 
DesktopGroup 
Catalog 
HypervisorConnection 
HostingUnit 
MachineCreation_ProvisioningScheme_Basic 
MachineCreation_ProvisioningScheme_Collaboration 
MachineCreation_Availability 
MachineCreation_Identity_State 
MachineCreation_VirtualMachine_State 
ADIdentity_IdentityPool_Basic 
ADIdentity_IdentityPool_Provisioning 
ADIdentity_WhatIf 
ADIdentity_Identity_Available 
ADIdentity_Identity_State

Each of these suites can be queried using the same cmdlet, and passing the -TestSuiteID of the suite in question. Let’s take DesktopGroup as an example:

PS C:\> Get-EnvTestSuiteDefinition -TestSuiteId DesktopGroup

TestSuiteId         Tests 
-----------                  ----- 
DesktopGroup   Check hypervisor connection, Check connection maintenance mode, Ch...

One thing you’ll notice with the results of this cmdlet is that the list of tests are truncated, which is a result of the default stdout formatting in the PowerShell console. For that reason, my preferred method of looking at objects with large strings (ie descriptions) in PowerShell, is to view them in a graphical ISE (PowerGUI is my preference) and explore the objects in the ‘Variables’ pane.

For example, if you store the results of  Get-EnvTestSuiteDefinition -TestSuiteId DesktopGroup into a variable ($dgtest) in PowerGUI, each Test object that comprises the test suite can be inspected individually:

The DesktopGroup EnvTestSuite object

The DesktopGroup EnvTestSuite object

To start a test task, use the Start-EnvTestTask, passing the TestID or, alternatively, the TestSuiteID, and a target object (as needed). For example:

PS C:> Start-EnvTestTask -TestId Configuration_DatabaseCanBeReached

Active : False
ActiveElapsedTime : 11
CompletedTests : 1
CompletedWorkItems : 11
CurrentOperation : 
DateFinished : 9/16/2013 11:33:31 PM
DateStarted : 9/16/2013 11:33:20 PM
DiscoverRelatedObjects : True
DiscoveredObjects : {}
ExtendedProperties : {}
Host : 
LastUpdateTime : 9/16/2013 11:33:31 PM
Metadata : {}
MetadataMap : {}
Status : Finished
TaskExpectedCompletion : 
TaskId : 03f5480d-68e8-410a-9da4-5e65d96ac393
TaskProgress : 100
TerminatingError : 
TestIds : {Configuration_DatabaseCanBeReached}
TestResults : {Configuration_DatabaseCanBeReached}
TestSuiteIds : {}
TotalPendingTests : 1
TotalPendingWorkItems : 11
Type : EnvironmentTestRun

Once you know what tests there are, what they do, and what types of results to expect, health check scripts can easily be created using this service. Combinations of tests and test suites can, and should, be leveraged as needed to systematically validate XenDesktop 7 site components and functionality.

I plan on using these cmdlets to some extent in SiteDiag, and expect to get some good use out of this new service in the field. I’m interested to hear from anyone else who’s started using this snap-in, and if they’ve come up with any useful scripts.

NetScaler Gateway VPX v10.1 with StoreFront v2.0 – Encrypt and Theme!

I just finished up on a XenApp 6.5 upgrade where I replaced a single 2008R2 server running a DMZ’d CSG v3.2 SSL-proxied Citrix Web Interface v5.3 ‘Direct’ site with a NetScaler Gateway 10.1 Access Gateway virtual server and a StoreFront v2.0 Store.

This post is meant to share some tips on setting up and customizing a Citrix Receiver <> NetScaler Gateway <> StoreFront deployment. Before I get into the thick of it, I thought I’d share the following high-level topology of the environment I was working with:

XenApp65_SharedHostedDesktopDelivery

This scenario consists of WAN-connected Citrix Receivers accessing the XenApp farm via a NetScaler Gateway Access Gateway VPN fronted StoreFront Store. The NetScaler Gateway Access Gateway virtual server provides AD-auth via an LDAP Authentication policy, and replaces the SSL-Proxied ICA & HTTP traffic that the Secure Gateway server previously handled (EOL’d since ‘06!, yet running on Win2008R2??). The NG-AG virtual server also acts as the landing page for web browsers, and as such has it’s own visual style that can (and SHOULD) be customized. Receiver connections are passed through to the Store virtual directory, and all other connections (web browsers) are directed to the StoreWeb virtual directory.

One major consideration I found in this topology is that if your StoreFront ‘Store’ is not SSL-encyrpted, Citrix Receiver for Windows 3.1 and later will not work without tweaking a few client-side registry values (see CTX134341), even though the NetScaler Gateway session is encrypted. That said, a resultant consideration of securing the StoreFront site is that you need to be sure that the NetScaler trusts the StoreFront server’s SSL certificate.

To do this you need to install any of the StoreFront server’s certificate chain certs on the NetScaler (here’s a good Citrix blog on the topic) and make sure the Access Gateway session policy profile’s ‘Web Interface Address’ uses the same name that the StoreFront server’s certificate was issued to, and that the NetScaler can resolve the name via DNS. The other pieces of getting this setup working are pretty easy, thanks mostly in part to the foolproof NetScaler Gateway setup wizard (eDocs link), and StoreFront’s ‘Add NetScaler Gateway Appliance’ wizard (eDocs). As long as your SSL is working properly, this is a fairly painless install.

Once I got the site up and running, I immediately wanted to customize the NetScaler Gateway VPN web interface to make it look like the StoreWeb site that browser users are redirected to. Out of the box, the NG-AG site is themed with the old (boring) CAG visual style, which is themed to look like the old WI 5.0-5.3 black & blue sites. Since this page is proxying and for the StoreFront site, is makes for a very awkward, time-machinish, experience to login to the black and blue site, and land in StoreFront’s newer green bubble land!

I didn’t look hard to find Jeff Sani’s blog article that I’ve referenced many times before, which provides step-by-step instructions on applying the StoreFront look and feel to a NetScaler’s Access Gateway. After running through this, I decided to change the the logo and background, and referenced Terry D’s blog on customizing a StoreFront site by way of custom CSS. I used WinSCP and PuTTY to make the changes, and pretty quickly had a nice looking landing page to front the StoreFront Store:

CustomLandingPage

I then did the same on the StoreFront server using NotePad++, and was able to give the customer a customized and consistent look and by adding the following custom.style.css to the c:\inetpub\wwwroot\Citrix\StoreWeb\contrib folder of the StoreFront server:

body { background-image: url("custom.jpg");
  background-color: #262638;}
#credentialupdate-logonimage, #logonbox-logoimage 
{ background-image: url("custom.png");
  width: 180px;
  height: 101px;
  right: 63%;}
#.myapps-name 
{ font-weight: bold; color: #000; }

CustomStoreFrontWeb

Well, that’s about all the time I have for today. I hope someone finds this post helpful in producing a functional, and visually consistent, NetScaler Gateway fronted StoreFront deployment!

Exploring ShareFile’s ‘StorageZones’ Services

I was looking for more information on what makes a ShareFile StorageZone ‘tick’, and couldn’t find much that got into the nuts and bolts of this great feature. This post is intended to share some general information about the various StorageZones controller services, including their basic functionality, and some hidden configuration settings.

For the scope of this post, I’m going to focus on the three Windows services that are installed as part of a StorageZone v2.1 Controller. Each service is installed off the root of the IIS site as follows:

  • File Cleanup Service – Citrix\StorageCenter\SCFileCleanSvc\FileDeleteService.exe
  • File Copy Service – Citrix\StorageCenter\SCFileCopySvc\FileCopyService.exe
  • Management Service – Citrix\StorageCenter\s3uploader\S3UploaderService.exe

In each of these directories are the service’s .NET .config file, which can be modified to enable logging, and adjust hidden configuration settings. For example, if you open FileDeleteService.exe.config, you’ll see the following XML by default:

<?xml version="1.0"?>
<configuration>
   <appSettings>
       <add key="ProducerTimer" value="24"/> <!--Time interval in hours-->
       <add key="DeleteTimer" value="24"/> <!--Time interval in hours-->
       <add key="DeleteTimer" value="24"/> <!--Time interval in hours-->
       <add key="Period" value="7"/> <!--No. of days to keep data blob in active storage after deletion-->
       <add key="logFile" value="C:\inetpub\wwwroot\Citrix\StorageCenter\SC\logs\delete_YYYYMM.log"/>
       <add key="enable-extended-logging" value="0"/>
       <add key="BatchSize" value="5000"/></appSettings>
<startup><supportedRuntime version="v4.0" sku=".NETFramework,Version=v4.0"/></startup></configuration>

As you might have guessed, setting enable-extended-logging  to 1 will enable verbose logging after the service is restarted, writing to the specified logFile path. This setting is the same for the other services, and can come in handy when troubleshooting issues with a StorageZone.

In order to really understand what these services were doing, I decided to poke through the source code by decompiling the services’ assemblies using a free utility called DotPeek. Here’s a summary of what I found for each service’s functionality within a StorageZone Controller.

File Cleanup Service (FileDeleteService)

The name says it all here, as this service’s sole responsibility is managing data deletion from the storagezone storage repository. Since all of the data stored by ShareFile is in BLOB format, deleting a file through the ShareFile front-end doesn’t actually delete it from the storage; it simply ‘de-references’ the data, and marks it as ‘expired’.

This ‘expired’ data will remain in the storage repository until it’s ‘cleaned up’ by the File Cleanup Service. This is why if you look at a folder’s recycle bin, you’ll see the files are still listed and available for recovery until the configurable cleanup period lapses (7 days by default).

Citrix recommends configuring this cleanup period to match the backup schedule of your storage device so that data is removed shortly before or after they’re backed up. This design also allows for data to be recovered even if it’s not in the recycle bin, by using the “Recover Files” function in the StorageZone section of ShareFile’s Admin page.

Here are the .config extended settings for this service, along with their default values:

  • ProducerTimer = 24 Time interval in hours 
  • DeleteTimer = 24  Time interval in hours
  • Period = 7 Number of days to keep data in active storage after deletion

File Copy Service (SCFileCopySvc)

This service is what allows the StorageZones controller to communicate with ShareFile’s cloud infrastructure (by way of the ShareFile API), and allows users to upload and download files directly to and from a customer’s on-premise storage.

When a file is uploaded, ShareFile’s servers connect to the controller through this service to initiate an HTTP(S) POST request, allowing the data to be stored directly to the StorageZone. The service also converts files to and from the ShareFile’s proprietary format, converting files to BLOB data for uploads, and converting BLOB data back to the original file for downloads.

The service also has a configurable timer value (the default is 10 seconds key=”CopyTimer” value=”10000″ ) that controls how often retries are attempted for jobs that previously failed due to connectivity issues.

Management Service (S3Uploader)

Last but not least, the poorly named Management Service, which only really ‘manages’ transferring files to and from Amazon’s S3 cloud storage service. This service uses Amazon’s AWS SDK for .NET to take care of the data transfer, and is what allows you to migrate data to and from ShareFile’s storage, and the StorageZone.

There are a couple of configurable settings for this service as well; here they are with their default values:

  • httpMethod = https Transport method; secure or non-secure
  • HeartBeat-Interval = 5 Interval in minutes
  • Recovery-Interval = 3600 Interval in seconds

Well, I hope this post is useful for anyone who is using, or planning on using, ShareFile’s StorageZones feature. Feel free to share any other insights or thoughts in the comments!

ShareFile StorageZones Connector 2.0 Install Woes

I was recently tasked with implementing ShareFile Enterprise, and am executing on a design that entails the use of the StorageZones feature. In case you’re not familiar, StorageZones allows organizations to provide access to on-premise (private cloud) storage via ShareFile’s web portal, enterprise sync tool, the Citrix Receiver, and mobile access applications. In order to enable this feature, the ‘StorageZones Controller’ service (an ASP.NET web application) needed to be installed on an IIS7 server running .NET 4.5.

This sounds pretty simple, right? Wrong. The installation did not work out of the box, and I spent many more cycles than I should have troubleshooting it. In this post I want to explain how I got from start to finish with a seemingly simple process that became a complex ordeal due to lack of specific steps in the product’s documentation. Hopefully this post helps others running into this issue, which I hope I’m not the only one! 🙂

When I pulled up the installation instructions on Citrix eDocs for the StorageZones Controller 2.0 web service, I found them to be sparse on details. Here’s what’s currently published at http://support.citrix.com/proddocs/topic/sharefile-storagezones-20/sf-install-storagezones.html:

  1. Download and install the StorageZones Controller software:
    1. From the ShareFile download page at http://www.citrix.com/downloads/sharefile.html, log on and download the StorageZones Controller 2.0 installer.
      Note: Installing StorageZones Controller changes the Default Web Site on the server to the installation path of the controller.
    2. On the server where you want to install StorageZones Controller, run StorageCenter.msi. The ShareFile StorageZones Controller Setup wizard starts.
    3. Respond to the prompts and then click Finish. The StorageZones Controller console opens.

After following these ‘3 easy steps’, I quickly ran into several missing pre-requisites which required manual intervention; before being able to move past step 2, I had to:

  • Install Microsoft .NET Framework 4.5 (download link)
  • Add the Web Server (IIS7) Role Service

Following a reboot I was able to run the StorageZones Controller (SZC) installer, which required another reboot after it finished. After THAT reboot, the login page came up with a BIG RED error when I opened the SZC login page:

HTTP Error 500.19 – Internal Server Error

The requested page cannot be accessed because the related configuration data for the page is invalid.

Confounded, I turned to Google to hunt any known issues that might have been seen elsewhere, and couldn’t find any. There was a generic ASP.NET post on StackOverflow where someone found a mis-configured side-by-side, but I assumed mine was fine since it was a clean install. I then looked further into the following error details:

This configuration section cannot be used at this path. This happens when the section is locked at a parent level. Locking is either set by default (overrideModeDefault=”Deny”), or set explicitly by a location tag with overrideMode=”Deny” or the legacy allowOverride=”false”.

I tried playing with some .configs per other suggestions on MSDN (changing allowOverride=”false” to “true”), nothing of which yielded anything different from the 500.19 error. After getting nowhere fast for about 20-30 minutes I called support to see if they had seen this problem and/or knew what I was doing wrong.

The first number I dialed (800-4CITRIX) took triage almost 10 minutes to tell me that I needed to call another number (8004413453). I called the other number and was quickly connected to a customer service rep. However, the rep had no technical knowledge about the product I was installing, took down some details on the error message, and told me that an escalation resource would reach out soon.

With it already being late in the day, I decided to just move on to something else while I waited to hear back. The next day I was contacted by the escalation resource, and hopped on a GoToAssist for them to help me get to the console. They ensured me that we’d get it resolved, and proceeded to validate my installation, and do some basic break/fix tasks (re-install, reboot, etc.).

I started to become frustrated after what should have taken minutes quickly turned into many minutes, and eventually close to two hours of re-installing, rebooting (two times, every time), and various other poking and prodding. For example, after adding the ASP.NET role service, we started getting a totally different error message (404.17 Not Found), and started modifying .configs and adding/removing role services.

Near the end of the call (and the subsequent reason for the end of the call) the support representative insisted that the problem was being caused by installing the service with a user account other than localhost\administratorThis was after I already humored him and created, and installed with, a local administrator account (localhost\sharefile) because he stated that a Domain Admin account wouldn’t work even though it was part of the Local Administrators group, and wasn’t supported for this installation (which I eventually determined is not at all true). He also stated that ‘a lot of the steps aren’t documented’, which was beyond frustrating.

It was at that point I decided that I was getting nowhere even faster with support, and told him that I needed to end the call. After arguing that it would be fixed by simply installing with the localhost\administrator user account, I finally convinced him that I would figure it out offline since I wasn’t close to buying his unfounded assertion. After the call was over, I went back to eDocs to review the ‘System Requirements‘ section of the documentation and make sure I wasn’t missing something. Here’s what was listed for the web server pre-requisites:

  • Windows Server 2008 Standard/Datacenter R2, SP1
  • Install on a dedicated server or virtual machine. A high availability production environment requires a minimum of two servers with StorageZones installed.
  • Use a publicly-resolvable Internet hostname (not an IP address).
  • Enable the Web Server (IIS) role.
  • Install ASP.NET 4.5.
  • In the IIS Manager ISAPI and CGI Restrictions, verify that the ASP.NET 4.5 Restrictions value is Allow.
  • Enable SSL for communications with ShareFile.
  • If you are not using DMZ proxy servers, install a public SSL certificate on the IIS service.
  • Recommended as a best practice: Remove or disable the HTTP binding to the StorageZone controller.
  • Allow inbound TCP requests on port 443 through the Windows firewall.
  • Open port 80 on localhost (for the server health check).

The steps that I was stuck on were surely related to the items in this list that aren’t very specific. Take Install ASP.NET 4.5 for example; To someone that has never installed ASP.NET 4.5, this step is unspecific, and lacks any semblance of detail. While searching for clues on what was causing the 500.19 issue, I recalled seeing the following command to ‘Register’ ASP.NET 4.5 (4.0.30319) on this Stack Overflow thread:

%WINDIR%\Microsoft.NET\Framework\v4.0.30319\aspnet_regiis.exe -i

I decided to run this command and refresh the login page, at which point I got a new BIG RED error on what should have been the login page. This time it was a 404.2 Not Found error. Based on the error message, I started investigating the other pre-requisite that wasn’t very clear in terms of steps, and isn’t even relevant if the ASP.NET v4 extensions weren’t properly registered:

In the IIS Manager ISAPI and CGI Restrictions, verify that the ASP.NET 4.5 Restrictions value is Allow.

I found and opened the ISAPI and CGI Restrictions feature in the IIS management console, which can be found in the IIS section of the server-level node. I then found that while the ASP.NET v2 extensions were set to ‘Allow’, the v4 extensions were set to ‘Deny’. I set both 32-bit and 64-bit extensions to ‘Allow’, and was then able to get to the login page (great success!); whew..

And so, something that should have taken a couple of minutes ended up taking a couple of hours. Hopefully I saved somebody somewhere a headache (or a couple of hours) by doing the ShareFile product and support team a solid, and sharing clear steps that should have either been handled by the installer, or at least the technical writer who published this lackluster, detail lacking, setup guide.