Windows 8.1 DPI Scaling Causes ‘older’ Applications to be scaled/blurred

Since Windows 8.1 reached GA today, I loaded it up first thing this morning on my Ativ Book 7 to enjoy the much anticipated tweaks that make this Ultrabook even more ultra! However, once I got the update installed, I opened a few applications, including Chrome, and a XenDesktop 7 ICA session using Receiver for Windows and immediately noticed that these apps were blurrier than the desktop or Modern Apps.

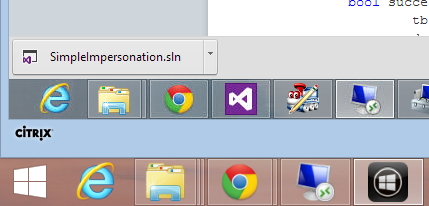
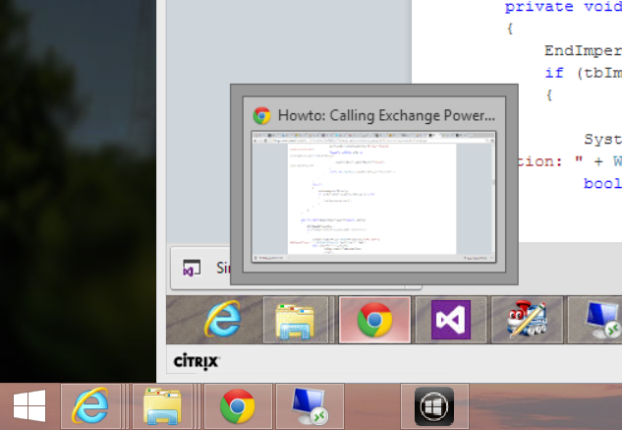
As you can see in this screen clip, there’s a slight blur on the seamless ICA desktop (110%ish scaled), as is the CDViewer taskbar icon:

Image

I quickly found that Microsoft decided to enable dynamic display scaling on non DPI Aware programs for high-DPI displays. If you’re interested (like I was) to know more about why Microsoft made this decision in 8.1, you should check out this blog which goes into detail on the topic.

The short of it is that the ‘..additional scaling capability provides two distinct advantages for high-DPI displays on Windows 8.1:

  1. UI can scale larger which makes readability better and touch/mouse interactions easier.
  2. 200% scaling enables pixel-doubling for up-scaling which provides a clear and crisp appearance for images, graphics, and text.

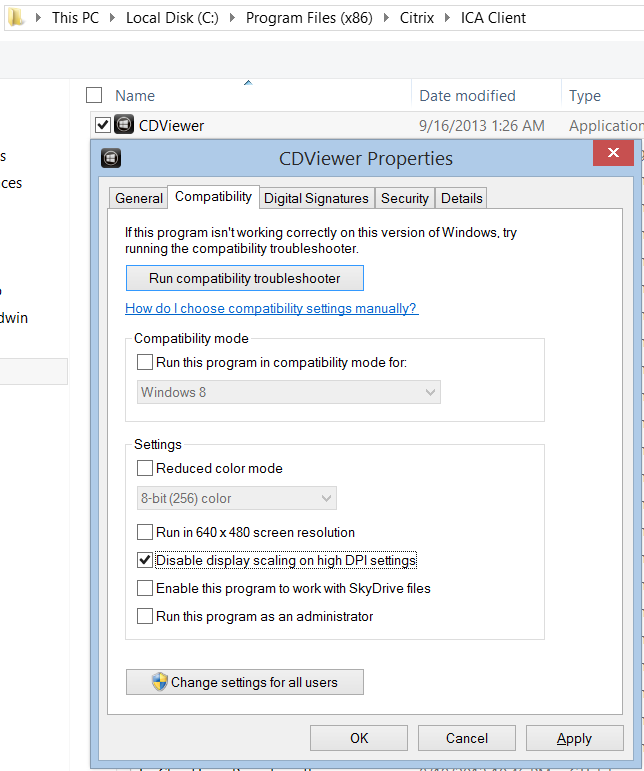
Since the Ativ 7 crams a 1080p display into a 13.3″ panel, it falls under the category of a high DPI display at about 165 PPI. To change this behavior for a particular application, you have to adjust the executable’s compatibility settings to ‘Disable display scaling on high DPI settings’:

Disable Display scaling on large DPI displays

Disable display scaling on high DPI settings

By doing this for CDViewer.exe, for example, I was able to get the ‘Desktop Viewer’ to launch in native DPI, which is blur free (and displayed in normal DPI). If I need to get a more readable/usable DPI, I can always adjust the same settings on the virtual desktop side:

sharp

This setting can be also be disabled via the registry by setting an AppCompatFlags\Layers Reg_SZ value named as the executable in question, with the string set to HIGHDPIAWARE (in HKEY_CURRENT_USER\Software\Microsoft\Windows NT\CurrentVersion\AppCompatFlags\Layers):

UseDPIScaling

You can also disable DPI scaling for all applications on a particular display by checking the ‘Let me choose one scaling level for all my displays’ in the ‘Display’ control panel item, and setting the scaling ratio to 100% (Smaller):

The only caveat to this approach is that DPI scaling is also disabled for Explorer, so the taskbar and desktop will be small as well.

Thanks for the thought Microsoft, but please give us an option to do without this feature!

Citrix Receiver for Windows 4.0.1 – Goodbye unnecessary logon prompts!

For those of you out there who are delivering XenApp/XenDesktop through StoreFront, you should definitely make sure to update your Receiver for Windows 4 clients to the latest 4.0.1 hotfix. While this update only contains one fix, it solves a very visible, miserable, and annoying problem.

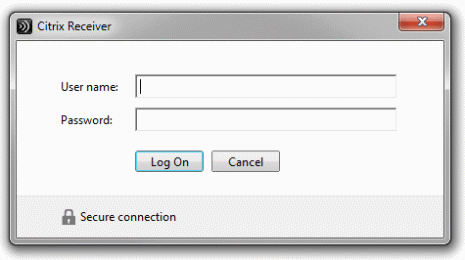
If you’ve ever connected to a StoreFront Store via Receiver 4.0 through a remote site, you’ve probably seen this window pop up every 10 minutes or so:

Image

Receiver 4.0.1 addresses this very annoying behavior by only prompting for credentials after the expiration timeout period if and when a resource is launched through Receiver.

I’m sure many of you already knew about this fix, but I thought I’d help to spread the word in hopes of sparing others from this frustration on Receiver 4.0 RTM.

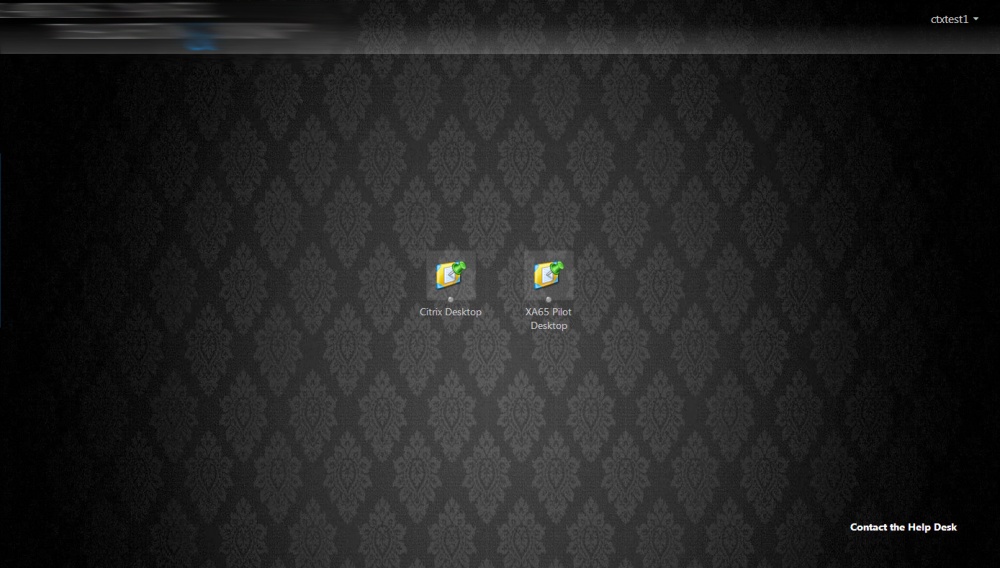
NetScaler Gateway VPX v10.1 with StoreFront v2.0 – Encrypt and Theme!

I just finished up on a XenApp 6.5 upgrade where I replaced a single 2008R2 server running a DMZ’d CSG v3.2 SSL-proxied Citrix Web Interface v5.3 ‘Direct’ site with a NetScaler Gateway 10.1 Access Gateway virtual server and a StoreFront v2.0 Store.

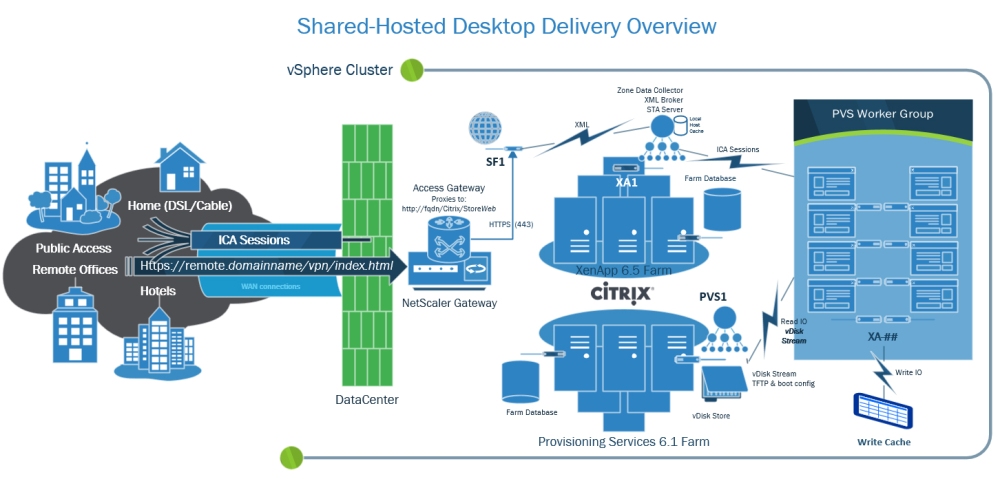
This post is meant to share some tips on setting up and customizing a Citrix Receiver <> NetScaler Gateway <> StoreFront deployment. Before I get into the thick of it, I thought I’d share the following high-level topology of the environment I was working with:

XenApp65_SharedHostedDesktopDelivery

This scenario consists of WAN-connected Citrix Receivers accessing the XenApp farm via a NetScaler Gateway Access Gateway VPN fronted StoreFront Store. The NetScaler Gateway Access Gateway virtual server provides AD-auth via an LDAP Authentication policy, and replaces the SSL-Proxied ICA & HTTP traffic that the Secure Gateway server previously handled (EOL’d since ‘06!, yet running on Win2008R2??). The NG-AG virtual server also acts as the landing page for web browsers, and as such has it’s own visual style that can (and SHOULD) be customized. Receiver connections are passed through to the Store virtual directory, and all other connections (web browsers) are directed to the StoreWeb virtual directory.

One major consideration I found in this topology is that if your StoreFront ‘Store’ is not SSL-encyrpted, Citrix Receiver for Windows 3.1 and later will not work without tweaking a few client-side registry values (see CTX134341), even though the NetScaler Gateway session is encrypted. That said, a resultant consideration of securing the StoreFront site is that you need to be sure that the NetScaler trusts the StoreFront server’s SSL certificate.

To do this you need to install any of the StoreFront server’s certificate chain certs on the NetScaler (here’s a good Citrix blog on the topic) and make sure the Access Gateway session policy profile’s ‘Web Interface Address’ uses the same name that the StoreFront server’s certificate was issued to, and that the NetScaler can resolve the name via DNS. The other pieces of getting this setup working are pretty easy, thanks mostly in part to the foolproof NetScaler Gateway setup wizard (eDocs link), and StoreFront’s ‘Add NetScaler Gateway Appliance’ wizard (eDocs). As long as your SSL is working properly, this is a fairly painless install.

Once I got the site up and running, I immediately wanted to customize the NetScaler Gateway VPN web interface to make it look like the StoreWeb site that browser users are redirected to. Out of the box, the NG-AG site is themed with the old (boring) CAG visual style, which is themed to look like the old WI 5.0-5.3 black & blue sites. Since this page is proxying and for the StoreFront site, is makes for a very awkward, time-machinish, experience to login to the black and blue site, and land in StoreFront’s newer green bubble land!

I didn’t look hard to find Jeff Sani’s blog article that I’ve referenced many times before, which provides step-by-step instructions on applying the StoreFront look and feel to a NetScaler’s Access Gateway. After running through this, I decided to change the the logo and background, and referenced Terry D’s blog on customizing a StoreFront site by way of custom CSS. I used WinSCP and PuTTY to make the changes, and pretty quickly had a nice looking landing page to front the StoreFront Store:

CustomLandingPage

I then did the same on the StoreFront server using NotePad++, and was able to give the customer a customized and consistent look and by adding the following custom.style.css to the c:\inetpub\wwwroot\Citrix\StoreWeb\contrib folder of the StoreFront server:

body { background-image: url("custom.jpg");
  background-color: #262638;}
#credentialupdate-logonimage, #logonbox-logoimage 
{ background-image: url("custom.png");
  width: 180px;
  height: 101px;
  right: 63%;}
#.myapps-name 
{ font-weight: bold; color: #000; }

CustomStoreFrontWeb

Well, that’s about all the time I have for today. I hope someone finds this post helpful in producing a functional, and visually consistent, NetScaler Gateway fronted StoreFront deployment!

Exploring ShareFile’s ‘StorageZones’ Services

I was looking for more information on what makes a ShareFile StorageZone ‘tick’, and couldn’t find much that got into the nuts and bolts of this great feature. This post is intended to share some general information about the various StorageZones controller services, including their basic functionality, and some hidden configuration settings.

For the scope of this post, I’m going to focus on the three Windows services that are installed as part of a StorageZone v2.1 Controller. Each service is installed off the root of the IIS site as follows:

  • File Cleanup Service – Citrix\StorageCenter\SCFileCleanSvc\FileDeleteService.exe
  • File Copy Service – Citrix\StorageCenter\SCFileCopySvc\FileCopyService.exe
  • Management Service – Citrix\StorageCenter\s3uploader\S3UploaderService.exe

In each of these directories are the service’s .NET .config file, which can be modified to enable logging, and adjust hidden configuration settings. For example, if you open FileDeleteService.exe.config, you’ll see the following XML by default:

<?xml version="1.0"?>
<configuration>
   <appSettings>
       <add key="ProducerTimer" value="24"/> <!--Time interval in hours-->
       <add key="DeleteTimer" value="24"/> <!--Time interval in hours-->
       <add key="DeleteTimer" value="24"/> <!--Time interval in hours-->
       <add key="Period" value="7"/> <!--No. of days to keep data blob in active storage after deletion-->
       <add key="logFile" value="C:\inetpub\wwwroot\Citrix\StorageCenter\SC\logs\delete_YYYYMM.log"/>
       <add key="enable-extended-logging" value="0"/>
       <add key="BatchSize" value="5000"/></appSettings>
<startup><supportedRuntime version="v4.0" sku=".NETFramework,Version=v4.0"/></startup></configuration>

As you might have guessed, setting enable-extended-logging  to 1 will enable verbose logging after the service is restarted, writing to the specified logFile path. This setting is the same for the other services, and can come in handy when troubleshooting issues with a StorageZone.

In order to really understand what these services were doing, I decided to poke through the source code by decompiling the services’ assemblies using a free utility called DotPeek. Here’s a summary of what I found for each service’s functionality within a StorageZone Controller.

File Cleanup Service (FileDeleteService)

The name says it all here, as this service’s sole responsibility is managing data deletion from the storagezone storage repository. Since all of the data stored by ShareFile is in BLOB format, deleting a file through the ShareFile front-end doesn’t actually delete it from the storage; it simply ‘de-references’ the data, and marks it as ‘expired’.

This ‘expired’ data will remain in the storage repository until it’s ‘cleaned up’ by the File Cleanup Service. This is why if you look at a folder’s recycle bin, you’ll see the files are still listed and available for recovery until the configurable cleanup period lapses (7 days by default).

Citrix recommends configuring this cleanup period to match the backup schedule of your storage device so that data is removed shortly before or after they’re backed up. This design also allows for data to be recovered even if it’s not in the recycle bin, by using the “Recover Files” function in the StorageZone section of ShareFile’s Admin page.

Here are the .config extended settings for this service, along with their default values:

  • ProducerTimer = 24 Time interval in hours 
  • DeleteTimer = 24  Time interval in hours
  • Period = 7 Number of days to keep data in active storage after deletion

File Copy Service (SCFileCopySvc)

This service is what allows the StorageZones controller to communicate with ShareFile’s cloud infrastructure (by way of the ShareFile API), and allows users to upload and download files directly to and from a customer’s on-premise storage.

When a file is uploaded, ShareFile’s servers connect to the controller through this service to initiate an HTTP(S) POST request, allowing the data to be stored directly to the StorageZone. The service also converts files to and from the ShareFile’s proprietary format, converting files to BLOB data for uploads, and converting BLOB data back to the original file for downloads.

The service also has a configurable timer value (the default is 10 seconds key=”CopyTimer” value=”10000″ ) that controls how often retries are attempted for jobs that previously failed due to connectivity issues.

Management Service (S3Uploader)

Last but not least, the poorly named Management Service, which only really ‘manages’ transferring files to and from Amazon’s S3 cloud storage service. This service uses Amazon’s AWS SDK for .NET to take care of the data transfer, and is what allows you to migrate data to and from ShareFile’s storage, and the StorageZone.

There are a couple of configurable settings for this service as well; here they are with their default values:

  • httpMethod = https Transport method; secure or non-secure
  • HeartBeat-Interval = 5 Interval in minutes
  • Recovery-Interval = 3600 Interval in seconds

Well, I hope this post is useful for anyone who is using, or planning on using, ShareFile’s StorageZones feature. Feel free to share any other insights or thoughts in the comments!

ShareFile StorageZones Connector 2.0 Install Woes

I was recently tasked with implementing ShareFile Enterprise, and am executing on a design that entails the use of the StorageZones feature. In case you’re not familiar, StorageZones allows organizations to provide access to on-premise (private cloud) storage via ShareFile’s web portal, enterprise sync tool, the Citrix Receiver, and mobile access applications. In order to enable this feature, the ‘StorageZones Controller’ service (an ASP.NET web application) needed to be installed on an IIS7 server running .NET 4.5.

This sounds pretty simple, right? Wrong. The installation did not work out of the box, and I spent many more cycles than I should have troubleshooting it. In this post I want to explain how I got from start to finish with a seemingly simple process that became a complex ordeal due to lack of specific steps in the product’s documentation. Hopefully this post helps others running into this issue, which I hope I’m not the only one! 🙂

When I pulled up the installation instructions on Citrix eDocs for the StorageZones Controller 2.0 web service, I found them to be sparse on details. Here’s what’s currently published at http://support.citrix.com/proddocs/topic/sharefile-storagezones-20/sf-install-storagezones.html:

  1. Download and install the StorageZones Controller software:
    1. From the ShareFile download page at http://www.citrix.com/downloads/sharefile.html, log on and download the StorageZones Controller 2.0 installer.
      Note: Installing StorageZones Controller changes the Default Web Site on the server to the installation path of the controller.
    2. On the server where you want to install StorageZones Controller, run StorageCenter.msi. The ShareFile StorageZones Controller Setup wizard starts.
    3. Respond to the prompts and then click Finish. The StorageZones Controller console opens.

After following these ‘3 easy steps’, I quickly ran into several missing pre-requisites which required manual intervention; before being able to move past step 2, I had to:

  • Install Microsoft .NET Framework 4.5 (download link)
  • Add the Web Server (IIS7) Role Service

Following a reboot I was able to run the StorageZones Controller (SZC) installer, which required another reboot after it finished. After THAT reboot, the login page came up with a BIG RED error when I opened the SZC login page:

HTTP Error 500.19 – Internal Server Error

The requested page cannot be accessed because the related configuration data for the page is invalid.

Confounded, I turned to Google to hunt any known issues that might have been seen elsewhere, and couldn’t find any. There was a generic ASP.NET post on StackOverflow where someone found a mis-configured side-by-side, but I assumed mine was fine since it was a clean install. I then looked further into the following error details:

This configuration section cannot be used at this path. This happens when the section is locked at a parent level. Locking is either set by default (overrideModeDefault=”Deny”), or set explicitly by a location tag with overrideMode=”Deny” or the legacy allowOverride=”false”.

I tried playing with some .configs per other suggestions on MSDN (changing allowOverride=”false” to “true”), nothing of which yielded anything different from the 500.19 error. After getting nowhere fast for about 20-30 minutes I called support to see if they had seen this problem and/or knew what I was doing wrong.

The first number I dialed (800-4CITRIX) took triage almost 10 minutes to tell me that I needed to call another number (8004413453). I called the other number and was quickly connected to a customer service rep. However, the rep had no technical knowledge about the product I was installing, took down some details on the error message, and told me that an escalation resource would reach out soon.

With it already being late in the day, I decided to just move on to something else while I waited to hear back. The next day I was contacted by the escalation resource, and hopped on a GoToAssist for them to help me get to the console. They ensured me that we’d get it resolved, and proceeded to validate my installation, and do some basic break/fix tasks (re-install, reboot, etc.).

I started to become frustrated after what should have taken minutes quickly turned into many minutes, and eventually close to two hours of re-installing, rebooting (two times, every time), and various other poking and prodding. For example, after adding the ASP.NET role service, we started getting a totally different error message (404.17 Not Found), and started modifying .configs and adding/removing role services.

Near the end of the call (and the subsequent reason for the end of the call) the support representative insisted that the problem was being caused by installing the service with a user account other than localhost\administratorThis was after I already humored him and created, and installed with, a local administrator account (localhost\sharefile) because he stated that a Domain Admin account wouldn’t work even though it was part of the Local Administrators group, and wasn’t supported for this installation (which I eventually determined is not at all true). He also stated that ‘a lot of the steps aren’t documented’, which was beyond frustrating.

It was at that point I decided that I was getting nowhere even faster with support, and told him that I needed to end the call. After arguing that it would be fixed by simply installing with the localhost\administrator user account, I finally convinced him that I would figure it out offline since I wasn’t close to buying his unfounded assertion. After the call was over, I went back to eDocs to review the ‘System Requirements‘ section of the documentation and make sure I wasn’t missing something. Here’s what was listed for the web server pre-requisites:

  • Windows Server 2008 Standard/Datacenter R2, SP1
  • Install on a dedicated server or virtual machine. A high availability production environment requires a minimum of two servers with StorageZones installed.
  • Use a publicly-resolvable Internet hostname (not an IP address).
  • Enable the Web Server (IIS) role.
  • Install ASP.NET 4.5.
  • In the IIS Manager ISAPI and CGI Restrictions, verify that the ASP.NET 4.5 Restrictions value is Allow.
  • Enable SSL for communications with ShareFile.
  • If you are not using DMZ proxy servers, install a public SSL certificate on the IIS service.
  • Recommended as a best practice: Remove or disable the HTTP binding to the StorageZone controller.
  • Allow inbound TCP requests on port 443 through the Windows firewall.
  • Open port 80 on localhost (for the server health check).

The steps that I was stuck on were surely related to the items in this list that aren’t very specific. Take Install ASP.NET 4.5 for example; To someone that has never installed ASP.NET 4.5, this step is unspecific, and lacks any semblance of detail. While searching for clues on what was causing the 500.19 issue, I recalled seeing the following command to ‘Register’ ASP.NET 4.5 (4.0.30319) on this Stack Overflow thread:

%WINDIR%\Microsoft.NET\Framework\v4.0.30319\aspnet_regiis.exe -i

I decided to run this command and refresh the login page, at which point I got a new BIG RED error on what should have been the login page. This time it was a 404.2 Not Found error. Based on the error message, I started investigating the other pre-requisite that wasn’t very clear in terms of steps, and isn’t even relevant if the ASP.NET v4 extensions weren’t properly registered:

In the IIS Manager ISAPI and CGI Restrictions, verify that the ASP.NET 4.5 Restrictions value is Allow.

I found and opened the ISAPI and CGI Restrictions feature in the IIS management console, which can be found in the IIS section of the server-level node. I then found that while the ASP.NET v2 extensions were set to ‘Allow’, the v4 extensions were set to ‘Deny’. I set both 32-bit and 64-bit extensions to ‘Allow’, and was then able to get to the login page (great success!); whew..

And so, something that should have taken a couple of minutes ended up taking a couple of hours. Hopefully I saved somebody somewhere a headache (or a couple of hours) by doing the ShareFile product and support team a solid, and sharing clear steps that should have either been handled by the installer, or at least the technical writer who published this lackluster, detail lacking, setup guide.

Adding RAM to a PVS ‘Streamed’ XenDesktop catalog in vSphere

I was working on a PVS deployment recently and needed to quickly add some RAM to ~200 PVS streamed VMs. To automate this task, I put together the following PoSH script that combines PowerCLI and the XenDesktop PoSH SDK to add RAM to all machines in a particular desktop group:

###################################################################
#
# Change-VM_Memory_CPU_Count.ps1
#
# -MemoryMB the amount of Memory you want 
#  to add or remove from the VM in MB
# -MemoryOption Add/Remove
# -CPUCount the amount of vCPU's you want 
#  to add or remove from the VM
# -CPUOption Add/Remove
# -DesktopGroup the XenDesktop Desktop Group to run against
# -AdminAddress host name of the XenDesktop DDC to run against
#
# Example:
# .\Change-VM_Memory_CPU_Count.ps1 -vCenter vmvcatl05 -MemoryMB 1024 -MemoryOption Add -DesktopGroup 'All User Windows 7' -AdminAddress CTXXDATL01
#

#
####################################################################

param(
    [parameter(Mandatory = $true)]
    [string[]]$vCenter,
    [int]$MemoryMB,
    [string]$MemoryOption,
    [int]$CPUCount,
    [string]$CPUOption,
	[string]$DesktopGroup,
	[string]$AdminAddress
)    

function PowerOff-VM{
    param([string] $vm)

    Shutdown-VMGuest -VM (Get-VM $vm) -Confirm:$false | Out-Null
    Write-Host "Shutdown $vm"
    do {
        $status = (get-VM $vm).PowerState
    }until($status -eq "PoweredOff")
    return "OK"
}

function PowerOn-VM{
    param( [string] $vm)

    if($vm -eq ""){    Write-Host "Please enter a valild VM name"}

    if((Get-VM $vm).powerstate -eq "PoweredOn"){
        Write-Host "$vm is already powered on"}

    else{
        Start-VM -VM (Get-VM $vm) -Confirm:$false | Out-Null
        Write-Host "Starting $vm"
        do {
            $status = (Get-vm $vm | Get-View).Guest.ToolsRunningStatus
        }until($status -eq "guestToolsRunning")
        return "OK"
    }
}

function Change-VMMemory{
    param([string]$vmName, [int]$MemoryMB, [string]$Option)
    if($vmName -eq ""){
        Write-Host "Please enter a VM Name"
        return
    }
    if($MemoryMB -eq ""){
        Write-Host "Please enter an amount of Memory in MB"
        return
    }
    if($Option -eq ""){
        Write-Host "Please enter an option to add or remove memory"
        return
    }	
    $vm = Get-VM $vmName    
    $CurMemoryMB = ($vm).MemoryMB

    if($vm.Powerstate -eq "PoweredOn"){
        Write-Host "The VM must be Powered Off to continue"
        return
    }

    if($Option -eq "Add"){
        $NewMemoryMB = $CurMemoryMB + $MemoryMB
    }
    elseif($Option -eq "Remove"){
        if($MemoryMB -ge $CurMemoryMB){
            Write-Host "The amount of memory entered is greater or equal than 
            the current amount of memory allocated to this VM"
            return
        }
        $NewMemoryMB = $CurMemoryMB - $MemoryMB
    }

    $vm | Set-VM -MemoryMB $NewMemoryMB -Confirm:$false
    Write-Host "The new configured amount of memory is"(Get-VM $VM).MemoryMB
}

function Change-VMCPUCount{
    param([string]$vmName, [int]$NumCPU, [string]$Option)
    if($vmName -eq ""){
        Write-Host "Please enter a VM Name"
        return
    }
    if($NumCPU -eq ""){
        Write-Host "Please enter the number of vCPU's you want to add"
        return
    }
    if($Option -eq ""){
        Write-Host "Please enter an option to add or remove vCPU"
        return
    }

    $vm = Get-VM $vmName    
    $CurCPUCount = ($vm).NumCPU

    if($vm.Powerstate -eq "PoweredOn"){
        Write-Host "The VM must be Powered Off to continue"
        return
    }

    if($Option -eq "Add"){
        $NewvCPUCount = $CurCPUCount + $NumCPU
    }
    elseif($Option -eq "Remove"){
        if($NumCPU -ge $CurCPUCount){
            Write-Host "The number of vCPU's entered is higher or equal 
            than the current number of vCPU's allocated to this VM"
            return
        }
        $NewvCPUCount = $CurCPUCount - $NumCPU
    }

    $vm | Set-VM -NumCPU $NewvCPUCount -Confirm:$false
    Write-Host "The new configured number of vCPU's is"(Get-VM $VM).NumCPU
}

#######################################################################################
# Main script
#######################################################################################

$VIServer = Connect-VIServer $vCenter
If ($VIServer.IsConnected -ne $true){
    Write-Host "error connecting to $vCenter" -ForegroundColor Red
    exit
}

if($MemoryMB -or $CPUCount -ne "0"){
    foreach ($vm in get-brokerdesktop -DesktopGroupName $DesktopGroup -AdminAddress $AdminAddress -PowerState Off)
	{	
		$vmwvm = Get-VM -Name $vm.HostedMachineName
		if ($vmwvm.MemoryMB -lt 4000)
		{
        	if($MemoryMB -ne "0"){
	            if($MemoryOption -eq " ") {Write-Host "Please enter an option to add or remove memory"}
	            else
				{					
	                Change-VMMemory $vm.HostedMachineName $MemoryMB $MemoryOption					
	        	}    
			}
        }

        if($CPUCount -ne "0"){
            if($CPUOption -eq " ") {Write-Host "Please enter an option to add or remove cpu"}
            else{
                Change-VMCPUCount $vmName $CPUCount $CPUOption
            }
        }

    }
}

Disconnect-VIServer -Confirm:$false

XML Broker Health Check

I saw an interesting question in the Citrix support forum today, and thought I’d share. Scott Curtsinger asked the following:

Does anyone know what the easiest way is to check the health of the XML service on XenDesktop 5.6? I’m seeing a lot of information on the web for XenApp but not very much for XenDesktop beyond leveraging devices like a NetScaler.

My first instinct is that this could easily be done via PowerShell, so I did a quick search and found this blog post by Jason Pettys. I also found this great article on working with the Citrix XML service, and quickly put together the following script which I tested against my XenDesktop 5.6 XML broker:

$url = "http://localhost/scripts/wpnbr.dll"
$parameters = '<?xml version="1.0" encoding="utf-8"?><!DOCTYPE NFuseProtocol SYSTEM "NFuse.dtd"><NFuseProtocol version="5.1"><RequestCapabilities></RequestCapabilities></NFuseProtocol>'
$http_request = New-Object -ComObject Msxml2.XMLHTTP
$http_request.open('POST', $url, $false)
$http_request.setRequestHeader("Content-type", "text/xml")
$http_request.setRequestHeader("Content-length", $parameters.Length)
$http_request.setRequestHeader("Connection", "close")
$http_request.send($parameters)
$http_request.statusText
$http_request.responseText

Running this script in PowerShell on my XML broker returned the following list of capabilities, which is a good indication that the XML broker is up and running:

<?xml version="1.0" encoding="UTF-8"?> <!DOCTYPE NFuseProtocol SYSTEM "NFuse.dtd"> <NFuseProtocol version="5.1"> <ResponseCapabilities> <CapabilityId>separate-credentials-validation</CapabilityId> <CapabilityId>multi-image-icons</CapabilityId> <CapabilityId>launch-reference</CapabilityId> <CapabilityId>user-identity</CapabilityId> <CapabilityId>full-icon-data</CapabilityId> <CapabilityId>full-icon-hash</CapabilityId> <CapabilityId>accepts-client-identity-for-power-off</CapabilityId> <CapabilityId>session-sharing</CapabilityId> </ResponseCapabilities> </NFuseProtocol>

This simple script lays a nice foundation to perform XML broker health checks via PoSH. I then took the script a little bit further to test some other XML requests:

param($server, $port)
if ($port){$port = 80}
$creds = Get-Credential
$domainuser= $creds.UserName.Split('\')
$domain = $domainuser[0]
$user = $domainuser[1]
[String]$pw = [Runtime.InteropServices.Marshal]::PtrToStringAuto([Runtime.InteropServices.Marshal]::SecureStringToBSTR($creds.Password))
$nwINFO = Get-WmiObject -ComputerName $env:COMPUTERNAME Win32_NetworkAdapterConfiguration | Where-Object { $_.IPAddress -ne $null }
$ip = $nwINFO.IPAddress
$fqdn = $nwINFO.DNSHostName
$xmlcreds = '<Credentials><UserName>' + $user + '</UserName><Password encoding="cleartext">' + $pw + '</Password><Domain Type="NT">' + $domain + '</Domain></Credentials>'
$envelope = '<?xml version="1.0" encoding="utf-8"?><!DOCTYPE NFuseProtocol SYSTEM "NFuse.dtd"><NFuseProtocol version="5.1">'
$clienttype = '<ClientType>ica30</ClientType>'
$clientdetails = '<ClientName>' + $env:COMPUTERNAME + '</ClientName><ClientAddress addresstype="dot">' + $ip[0] + '</ClientAddress>'
function request ($parameters)
{
 $http_request = New-Object -ComObject Msxml2.XMLHTTP
 $http_request.open('POST', $url, $false)
 $http_request.setRequestHeader("Content-type", "text/xml")
 $http_request.setRequestHeader("Content-length", $parameters.Length)
 $http_request.setRequestHeader("Connection", "close")
 $http_request.send($parameters)
 $http_request.statusText
 $http_request.responseText
}
$url = "http://" + $server + ":" + $port + "/scripts/wpnbr.dll"
$capabilities = request ($envelope + '<RequestCapabilities></RequestCapabilities></NFuseProtocol>')
if (!$capabilities[1].contains('error'))
{
 $testcreds = request ($envelope + '<RequestValidateCredentials>' + $xmlcreds + '</RequestValidateCredentials></NFuseProtocol>')
 if (!$testcreds[1].contains('bad'))
 {
 $appdatareq = request ($envelope + '<RequestAppData><Scope traverse="subtree"></Scope><DesiredDetails>rade-offline-mode</DesiredDetails><ServerType>all</ServerType>' + $clienttype + '<ClientType>content</ClientType>' + $xmlcreds + $clientdetails + '</RequestAppData></NFuseProtocol>')
 $app = $appdatareq[1] -split "<FName>"
 $app = $app[1] -split "</FName>"
 $launchreq = request ($envelope + '<RequestAddress><Name><AppName>' + $app[0] + '</AppName></Name>' + $clientdetails + '<ServerAddress addresstype="dns-port"></ServerAddress>' + $xmlcreds + $clienttype + '</RequestAddress></NFuseProtocol>')
 $launchreq
 }
}

This script takes the server and port, prompts for the credentials that you’re testing (password is sent in clear text), and sends a RequestCapabilities request, followed by RequestValidateCredentials, RequestAppData, and RequestAddress requests. To avoid dependencies on NFuse.dtd, I used a -split on the XML results of the RequestAppData results to get the ‘friendly name’ of the first application returned by RequestAppData, which I used for the RequestAddress post.

From here I’m going to develop a C# service that can monitor the XML service, though I’d like to figure out how to encode the password into the ‘ctx1’ format so that I’m not sending it in clear text.