XenDesktop Session Launch Hypervisor Interactions

I got an email recently asking if I knew whether or not a XenDesktop site takes a hosting unit’s load or availability into consideration when brokering session launch requests, especially reconnects to desktops that were ‘In Use’ when a host goes down. This question was posed in the context of Desktop Groups with catalogs that are spread across multiple hosting units.

The simple answer to this question is no. XenDesktop’s interactions with the hypervisor (via the Hypervisor Abstaction Layer) were always intended to be used for power action/status, and MCS/PVS related cloning activities. When a XenDesktop site selects a ‘worker’ to fulfill a session launch request, it only looks at the worker’s registration status, and not that of the host that the worker guest VM is running on.

That said, the selection process for the next available worker is determined via stored procedures. To find out what the ‘next available’ worker is going to be in a XenDesktop 5.x site, you can run following T-SQL against the database, specifying the Desktop Group UID in the first line:

declare @DesktopGroupUid int = 1
declare @Readiness int = 3
declare @Uid int

 update Top(1) chb_State.Workers
 set @Uid = W.Uid
from chb_State.Workers W
            with (readpast,
                  index(IX_Workers_DesktopGroupUid_Usage_DynamicSequence))
         where DesktopGroupUid = @DesktopGroupUid
           and LaunchReadiness >= @Readiness
           and SinBinReleaseTime is null;select * from chb_State.WorkerNames
where Uid = @Uid
go

This script will return the name of the machine that the site will use to satisfy the next pooled-random session launch request to the specified desktop group, and doesn’t care what’s going on with the hosting unit where the worker lives. The site is only concerned with the worker’s registration state, and could care less if the power state of the VM is On, Off, or Unknown, much less does it care about the load of the hosting unit where that machine is running.

To that point, if a worker continues to register when a hosting unit connection becomes inaccessible (vCenter is down, but not the ESX host, for example), the desktop will still be available for session launch, but not for power management. This scenario can cause problems, such as ‘tainted’ workers that don’t get powered off after use, and end up in the unfortunate sounding ‘SinBin’. This process is only temporary, and is only corrected after the machine is rebooted by the XenDesktop site (check out the CTX article I wrote for more info).

As far as a scenario where a session was ‘In Use’ when the host goes down, the broker reaper site service will eventually clean up the failed worker when the ‘DDC Ping’ times out (controlled by the ‘HeartbeatPeriodMs’ value on the DDC running the reaper service). So, by default, you could potentially get into a situation where reconnects for ‘In Use’ session will keep selecting the failed worker until the reaper cleans it up. While this shouldn’t take longer than 5 minutes with the default heartbeat value, it may cause problems if there are frequent outages or service interruptions between geographically dispersed datacenters.

To work around the ~5 minute functionality gap of hosting unit availability awareness, as it relates to session launch anyways, one could easily trigger a XenDesktop PoSH script in the event of an outage (and the reverse when the outage is recovered) to toggle the ‘maintenance mode’ flag on any workers on a failed host. I’d like to hope that the XenDesktop product team has at least considered the potential for expanding the site’s visibility into the status of a guest VM’s host, and would love to see ‘smarter’ brokering logic such as thing in future releases.
XenDesktop 7 – First Thoughts

Citrix hosted an amazing event last week, and outlined a distinct roadmap of their 2013 strategy. They placed a strong emphasis on mobility with some updates to their Zenprise acquisition (XenMobile, aka Worx), and announced the first implementation of Project Avalon in the form of ‘XenDesktop 7’. Since I’ve spent a lot of time with XenDesktop (both IMA and Storm based) and XenApp, I thought I’d share my general impression of XenDesktop 7 as it relates to achieving the goals set forth by Avalon.

First off, the unification of XenDesktop and XenApp was a necessary evil based on Citrix’s decision to combine the management and provisioning of  ‘desktops’ & ‘servers’ (SBC and VDI) within the same console. Through what Citrix is calling the ‘FlexCast Management Architecture’ (Storm+RDS), they are replacing ‘IMA’, which was used for all versions of XenApp, as well as XenDesktop versions prior to Rhone (Barossa, Sonoma, Rioja, Bordeaux, Medoc, etc.).

This change is a great move in terms of farm design, scalability, and stability. In my opinion, the Storm framework is easier to install, troubleshoot, and support than IMA (written in .NET, readable database, excellent SDK, better logging, etc), and should be familiar to anyone who has worked with XenDesktop 5.x. The site is just as dependent on availability of the central database as in XD5 (no local host cache), which means no zones, data collectors, or any other sort of ‘master’ server (the database is the master). All of the same ICA/HDX functionality is still there (plus any new additions), as is the policy engine and brokering functionality.

I’m not too fond of the licensing model which provides published Windows client OS in the least expensive edition, whereas Windows server OS requires a more expensive license. I suppose that’s representative of Citrix choosing to call Excalibur XenDesktop instead of XenApp, though I never really thought of this distinction since I assumed it was called XenDesktop because they used the Storm site architecture (now called FMA). I’m also concerned about feature parity with XenApp, and am sure there will be more than a few features that either don’t live up to XenApp, or just aren’t there yet.

At the end of the day I’m excited about XenDesktop 7, as it provides an easier product to sell. There’s no more worrying about whether or not you need to publish apps from Windows client or server OS (besides the licensing), and all of the management and provisioning (except for Provisioning Services :)) is done in a central console. The new Director looks fantastic, and the refreshed Studio is much more responsive and elegant than that of XenDesktop 5. Also, my SiteDiag tool (Site Checker v2.0) was designed to run on the Excalibur tech preview, and I’ll be sure to get it working for XenDesktop 7 once its released.

I get the feeling that the rest of the Citrix community is generally as excited about XenDesktop 7 as I am, but I guess we’ll see how it plays out once we start implementing it!

PVS Write Cache Monitor

I was recently working on a PVS deployment where we wanted to monitor and alert on target devices that were exceeding 70% write cache utilization. Since there wasn’t a way to do this in the PVS console, I dug into the PVS PoSH SDK to find a way to do this programatically.

After some research I came up with the following script that will check all target devices in a PVS farm, and send an email alert listing any machines that are using 70%+ of their write cache (adjustable via the $threshold variable):

$pass = cat .\securestring.txt | ConvertTo-SecureString
$mycred = New-Object -TypeName System.Management.Automation.PSCredential -ArgumentList "domain\admin",$pass
$message = @()
$threshold = 70

function get-value{
param([string]$strText="",[string]$strDelimiter="")
return $strText.SubString($strText.IndexOf($strDelimiter)+2)
}
function get-name{
param([string]$strText="",[string]$strDelimiter="")
return $strText.SubString(0,$strText.IndexOf($strDelimiter))
}
Add-PSSnapin McliPS* -ErrorAction SilentlyContinue
$all = @()
$obj = New-Object System.Collections.ArrayList
$lines = Mcli-Get DeviceInfo -f ServerName,ServerIpConnection,DeviceName,SiteName,CollectionName,Active,Status,diskLocatorName
for($i=0;$i -lt $lines.length;$i++){
	if(($lines[$i].length -gt 0) -and ($lines[$i].contains(":")) -and -not ($lines[$i] -match "Executing: Get "))
	{
		$name = get-name -strText $lines[$i] -strDelimiter ":"
		$value = get-value -strText $lines[$i] -strDelimiter ":"
		if ($name -eq "status" -and $value.Length -le 0)
		{
			$value = "0"
		}
		if ($value.Contains(",") -and $name -eq "status")
		{
		$obj | Add-Member -membertype noteproperty -name $name -Value $value.Split(",")[1]
		}else{
		$obj | Add-Member -membertype noteproperty -name $name -Value $value
		}
		}
		if($lines[$i].contains("#") -or (($i+1) -eq $lines.length)){
		$all += $obj
		$obj = New-Object psObject
		}
	}

foreach ($item in $all)
{
	if ([int] $item.status -gt $threshold)
	{
		$message += $item
	}
}
$message = $message | Where-Object -FilterScript { ([int] $_.status -gt 0) -and ([int]$_.status -le 100) } | Sort-Object {[int] $_.status} -descending | Format-Table @{Expression={$_.deviceName};Label="Device"}, @{Expression={$_.status};Label="RAM Cache Used (%)"}
function sendMail{

     Write-Host "Sending Email"

     #SMTP server name
     $smtpServer = "mail.domain.com"

     #Creating a Mail object
     $msg = new-object Net.Mail.MailMessage

     #Creating SMTP server object
     $smtp = new-object Net.Mail.SmtpClient($smtpServer)
	 $smtp.Credentials = $mycred

     #Email structure 
     $msg.From = "[email protected]"
     $msg.ReplyTo = "[email protected]"
     $msg.To.Add("[email protected]")
     $msg.subject = "PVS Write Cache $($threshold)%+ Utilization: " + $summary
	 $msg.body = Out-String -InputObject $message
	 $msg.priority = "High"

     #Sending email 
     $smtp.Send($msg)

}
if ($message.Count -gt 0)
{
	sendMail
}

Adding RAM to a PVS ‘Streamed’ XenDesktop catalog in vSphere

I was working on a PVS deployment recently and needed to quickly add some RAM to ~200 PVS streamed VMs. To automate this task, I put together the following PoSH script that combines PowerCLI and the XenDesktop PoSH SDK to add RAM to all machines in a particular desktop group:

###################################################################
#
# Change-VM_Memory_CPU_Count.ps1
#
# -MemoryMB the amount of Memory you want 
#  to add or remove from the VM in MB
# -MemoryOption Add/Remove
# -CPUCount the amount of vCPU's you want 
#  to add or remove from the VM
# -CPUOption Add/Remove
# -DesktopGroup the XenDesktop Desktop Group to run against
# -AdminAddress host name of the XenDesktop DDC to run against
#
# Example:
# .\Change-VM_Memory_CPU_Count.ps1 -vCenter vmvcatl05 -MemoryMB 1024 -MemoryOption Add -DesktopGroup 'All User Windows 7' -AdminAddress CTXXDATL01
#

#
####################################################################

param(
    [parameter(Mandatory = $true)]
    [string[]]$vCenter,
    [int]$MemoryMB,
    [string]$MemoryOption,
    [int]$CPUCount,
    [string]$CPUOption,
	[string]$DesktopGroup,
	[string]$AdminAddress
)    

function PowerOff-VM{
    param([string] $vm)

    Shutdown-VMGuest -VM (Get-VM $vm) -Confirm:$false | Out-Null
    Write-Host "Shutdown $vm"
    do {
        $status = (get-VM $vm).PowerState
    }until($status -eq "PoweredOff")
    return "OK"
}

function PowerOn-VM{
    param( [string] $vm)

    if($vm -eq ""){    Write-Host "Please enter a valild VM name"}

    if((Get-VM $vm).powerstate -eq "PoweredOn"){
        Write-Host "$vm is already powered on"}

    else{
        Start-VM -VM (Get-VM $vm) -Confirm:$false | Out-Null
        Write-Host "Starting $vm"
        do {
            $status = (Get-vm $vm | Get-View).Guest.ToolsRunningStatus
        }until($status -eq "guestToolsRunning")
        return "OK"
    }
}

function Change-VMMemory{
    param([string]$vmName, [int]$MemoryMB, [string]$Option)
    if($vmName -eq ""){
        Write-Host "Please enter a VM Name"
        return
    }
    if($MemoryMB -eq ""){
        Write-Host "Please enter an amount of Memory in MB"
        return
    }
    if($Option -eq ""){
        Write-Host "Please enter an option to add or remove memory"
        return
    }	
    $vm = Get-VM $vmName    
    $CurMemoryMB = ($vm).MemoryMB

    if($vm.Powerstate -eq "PoweredOn"){
        Write-Host "The VM must be Powered Off to continue"
        return
    }

    if($Option -eq "Add"){
        $NewMemoryMB = $CurMemoryMB + $MemoryMB
    }
    elseif($Option -eq "Remove"){
        if($MemoryMB -ge $CurMemoryMB){
            Write-Host "The amount of memory entered is greater or equal than 
            the current amount of memory allocated to this VM"
            return
        }
        $NewMemoryMB = $CurMemoryMB - $MemoryMB
    }

    $vm | Set-VM -MemoryMB $NewMemoryMB -Confirm:$false
    Write-Host "The new configured amount of memory is"(Get-VM $VM).MemoryMB
}

function Change-VMCPUCount{
    param([string]$vmName, [int]$NumCPU, [string]$Option)
    if($vmName -eq ""){
        Write-Host "Please enter a VM Name"
        return
    }
    if($NumCPU -eq ""){
        Write-Host "Please enter the number of vCPU's you want to add"
        return
    }
    if($Option -eq ""){
        Write-Host "Please enter an option to add or remove vCPU"
        return
    }

    $vm = Get-VM $vmName    
    $CurCPUCount = ($vm).NumCPU

    if($vm.Powerstate -eq "PoweredOn"){
        Write-Host "The VM must be Powered Off to continue"
        return
    }

    if($Option -eq "Add"){
        $NewvCPUCount = $CurCPUCount + $NumCPU
    }
    elseif($Option -eq "Remove"){
        if($NumCPU -ge $CurCPUCount){
            Write-Host "The number of vCPU's entered is higher or equal 
            than the current number of vCPU's allocated to this VM"
            return
        }
        $NewvCPUCount = $CurCPUCount - $NumCPU
    }

    $vm | Set-VM -NumCPU $NewvCPUCount -Confirm:$false
    Write-Host "The new configured number of vCPU's is"(Get-VM $VM).NumCPU
}

#######################################################################################
# Main script
#######################################################################################

$VIServer = Connect-VIServer $vCenter
If ($VIServer.IsConnected -ne $true){
    Write-Host "error connecting to $vCenter" -ForegroundColor Red
    exit
}

if($MemoryMB -or $CPUCount -ne "0"){
    foreach ($vm in get-brokerdesktop -DesktopGroupName $DesktopGroup -AdminAddress $AdminAddress -PowerState Off)
	{	
		$vmwvm = Get-VM -Name $vm.HostedMachineName
		if ($vmwvm.MemoryMB -lt 4000)
		{
        	if($MemoryMB -ne "0"){
	            if($MemoryOption -eq " ") {Write-Host "Please enter an option to add or remove memory"}
	            else
				{					
	                Change-VMMemory $vm.HostedMachineName $MemoryMB $MemoryOption					
	        	}    
			}
        }

        if($CPUCount -ne "0"){
            if($CPUOption -eq " ") {Write-Host "Please enter an option to add or remove cpu"}
            else{
                Change-VMCPUCount $vmName $CPUCount $CPUOption
            }
        }

    }
}

Disconnect-VIServer -Confirm:$false

XML Broker Health Check

I saw an interesting question in the Citrix support forum today, and thought I’d share. Scott Curtsinger asked the following:

Does anyone know what the easiest way is to check the health of the XML service on XenDesktop 5.6? I’m seeing a lot of information on the web for XenApp but not very much for XenDesktop beyond leveraging devices like a NetScaler.

My first instinct is that this could easily be done via PowerShell, so I did a quick search and found this blog post by Jason Pettys. I also found this great article on working with the Citrix XML service, and quickly put together the following script which I tested against my XenDesktop 5.6 XML broker:

$url = "http://localhost/scripts/wpnbr.dll"
$parameters = '<?xml version="1.0" encoding="utf-8"?><!DOCTYPE NFuseProtocol SYSTEM "NFuse.dtd"><NFuseProtocol version="5.1"><RequestCapabilities></RequestCapabilities></NFuseProtocol>'
$http_request = New-Object -ComObject Msxml2.XMLHTTP
$http_request.open('POST', $url, $false)
$http_request.setRequestHeader("Content-type", "text/xml")
$http_request.setRequestHeader("Content-length", $parameters.Length)
$http_request.setRequestHeader("Connection", "close")
$http_request.send($parameters)
$http_request.statusText
$http_request.responseText

Running this script in PowerShell on my XML broker returned the following list of capabilities, which is a good indication that the XML broker is up and running:

<?xml version="1.0" encoding="UTF-8"?> <!DOCTYPE NFuseProtocol SYSTEM "NFuse.dtd"> <NFuseProtocol version="5.1"> <ResponseCapabilities> <CapabilityId>separate-credentials-validation</CapabilityId> <CapabilityId>multi-image-icons</CapabilityId> <CapabilityId>launch-reference</CapabilityId> <CapabilityId>user-identity</CapabilityId> <CapabilityId>full-icon-data</CapabilityId> <CapabilityId>full-icon-hash</CapabilityId> <CapabilityId>accepts-client-identity-for-power-off</CapabilityId> <CapabilityId>session-sharing</CapabilityId> </ResponseCapabilities> </NFuseProtocol>

This simple script lays a nice foundation to perform XML broker health checks via PoSH. I then took the script a little bit further to test some other XML requests:

param($server, $port)
if ($port){$port = 80}
$creds = Get-Credential
$domainuser= $creds.UserName.Split('\')
$domain = $domainuser[0]
$user = $domainuser[1]
[String]$pw = [Runtime.InteropServices.Marshal]::PtrToStringAuto([Runtime.InteropServices.Marshal]::SecureStringToBSTR($creds.Password))
$nwINFO = Get-WmiObject -ComputerName $env:COMPUTERNAME Win32_NetworkAdapterConfiguration | Where-Object { $_.IPAddress -ne $null }
$ip = $nwINFO.IPAddress
$fqdn = $nwINFO.DNSHostName
$xmlcreds = '<Credentials><UserName>' + $user + '</UserName><Password encoding="cleartext">' + $pw + '</Password><Domain Type="NT">' + $domain + '</Domain></Credentials>'
$envelope = '<?xml version="1.0" encoding="utf-8"?><!DOCTYPE NFuseProtocol SYSTEM "NFuse.dtd"><NFuseProtocol version="5.1">'
$clienttype = '<ClientType>ica30</ClientType>'
$clientdetails = '<ClientName>' + $env:COMPUTERNAME + '</ClientName><ClientAddress addresstype="dot">' + $ip[0] + '</ClientAddress>'
function request ($parameters)
{
 $http_request = New-Object -ComObject Msxml2.XMLHTTP
 $http_request.open('POST', $url, $false)
 $http_request.setRequestHeader("Content-type", "text/xml")
 $http_request.setRequestHeader("Content-length", $parameters.Length)
 $http_request.setRequestHeader("Connection", "close")
 $http_request.send($parameters)
 $http_request.statusText
 $http_request.responseText
}
$url = "http://" + $server + ":" + $port + "/scripts/wpnbr.dll"
$capabilities = request ($envelope + '<RequestCapabilities></RequestCapabilities></NFuseProtocol>')
if (!$capabilities[1].contains('error'))
{
 $testcreds = request ($envelope + '<RequestValidateCredentials>' + $xmlcreds + '</RequestValidateCredentials></NFuseProtocol>')
 if (!$testcreds[1].contains('bad'))
 {
 $appdatareq = request ($envelope + '<RequestAppData><Scope traverse="subtree"></Scope><DesiredDetails>rade-offline-mode</DesiredDetails><ServerType>all</ServerType>' + $clienttype + '<ClientType>content</ClientType>' + $xmlcreds + $clientdetails + '</RequestAppData></NFuseProtocol>')
 $app = $appdatareq[1] -split "<FName>"
 $app = $app[1] -split "</FName>"
 $launchreq = request ($envelope + '<RequestAddress><Name><AppName>' + $app[0] + '</AppName></Name>' + $clientdetails + '<ServerAddress addresstype="dns-port"></ServerAddress>' + $xmlcreds + $clienttype + '</RequestAddress></NFuseProtocol>')
 $launchreq
 }
}

This script takes the server and port, prompts for the credentials that you’re testing (password is sent in clear text), and sends a RequestCapabilities request, followed by RequestValidateCredentials, RequestAppData, and RequestAddress requests. To avoid dependencies on NFuse.dtd, I used a -split on the XML results of the RequestAppData results to get the ‘friendly name’ of the first application returned by RequestAppData, which I used for the RequestAddress post.

From here I’m going to develop a C# service that can monitor the XML service, though I’d like to figure out how to encode the password into the ‘ctx1’ format so that I’m not sending it in clear text.

Citrix ‘Local App Access’ Explained

I wanted to share some details on this feature that was introduced in XenApp 6.5 that I don’t think many people are aware of, even though the changes that were introduced to support it affect anyone using Reciever 3.X, XenDesktop 5.5+, and XenApp 6.5. In this post I’m going to attempt to explain the basic functionality that ‘Local App Access’ (LAA) provides, and the basics of how it works.

If any of you are familiar with RES software, they’ve been providing a platform agnostic ‘Reverse Seamless’ functionality for some time via their Virtual Desktop Extender product. Here’s a short video that gives you a good idea of what the challenges reverse seamless aims to solve:

As you can see, the purpose of a ‘reverse seamless’ window is to give users the ability to run local application windows within a remote desktop session. In XenApp 6.5 and XenDesktop 5.5+, this functionality is built-in by way of processes running on the client (redirector.exe) AND server (revseamlesslauncher.exe & vdaredirector.exe) that enumerate, launch, and handle local windows within a published desktop session.

The easiest way to see this functionality in action is to follow the steps listed in the Quick Start Guide for Local App Access and Integrating Local User Applications in XenApp 6.5. The gist of it is that published desktops that are presented using the Citrix ‘Desktop Viewer’, can be ‘Local App Access’ enabled by setting an ICA parameter, and allowing the virtual channel on the client side, which is disabled by default.

Once everything is configured and the ‘Local App’ shortcut is available on the desktop, you should be able to double click the LAA application to run it seamlessly within the published desktop session. The reason that the ‘Desktop Viewer’ is required is that it’s responsible for managing the Z-order of the LAA app within the seamless published desktop window.

The way that Citrix is able to present ‘reverse seamless’ windows is not that different from how they present regular ‘seamless’ windows, which is by injecting API hooks into all client side processes, which allows them to inject the necessary identifiers for Desktop Viewer to be able to detect and handle the window within the ICA session.

Another major feature included with LAA is the ability to redirect URLs to the local internet browser which is automatically launched as a reverse seamless window by way of an IE browser helper object that’s installed on both the client and server. This is useful for instances where a local browser can overcome challenges of screen painting, such as rich media that can’t otherwise be redirected, or security/location nuances that require the browser to be running on the client endpoint device.

I hope this brief rundown of LAA was useful, definitely let me know if you have any trouble getting it to work in your environment.

XenDesktop SiteDiag (aka Site Checker v2.0)

Introduction to XenDesktop SiteDiag featuring WorkerDiag

Latest stable build available for download here

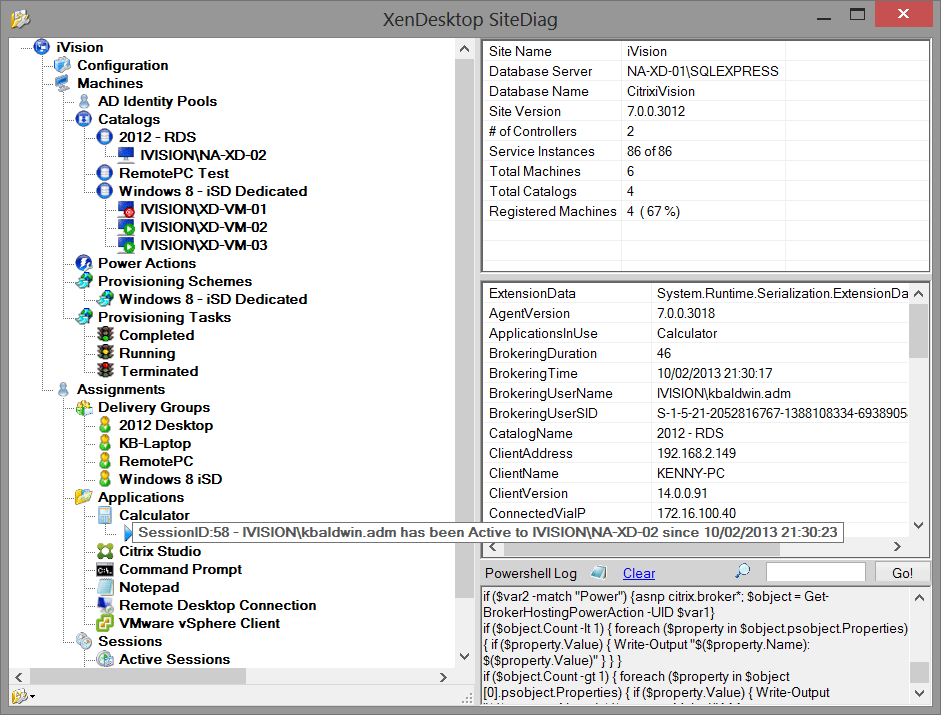
SiteDiag is my reworking of the original Site Checker tool that I developed while I was working on the XenDesktop Global Escalation team at Citrix. The purpose of this tool is to provide administrators and consultants with a utility to help diagnose issues with, and configure advanced/PoSH-only settings of a XenDesktop 5.x Site.

SiteDiag

SiteDiag was designed to have a look and feel similar to that of Desktop Studio, though it lacks certain functionality such as provisioning or assigning cloned vms. Since its a multi threaded winform that runs powershell scripts in a pipeline runspace, it’s pretty quick to use, and certainly more responsive than Studio. The main purpose of this tool is to view and modify site settings that aren’t otherwise displayed in Desktop Studio.

SiteDiagXD7

Some of the advanced settings that aren’t available in Desktop Studio are:

  • Check and fix issues with XenDesktop Site Services on all DDCs in a site
  • Enable service logging for each service on every DDC
  • Delete VM & PVD Storage
  • View & Cancel power actions
  • Edit advanced desktop group settings (all idle pool settings, logoff/disconnect power actions, WillShutDownAfterUse, etc.)
  • Display all details about almost any object clicked in the TreeView (ADIdentity pools, provisioning schemes, etc.)
  • View active/disconnected sessions by state
  • Enumerate a site to text file
  • Search for any element in a site

The tool also provides the following functionality as Desktop Studio, but is a MUCH faster alternative to the XD5.x MMC snapin:

  • Execute power actions
  • Enable/disable maintenance mode
  • Cancel/clear provisioning tasks (can run bulk actions)
  • Disconnect active sessions, logoff disconnected sessions

I’m currently working with Carl Webster to finish up the XenDesktop 5.x PowerShell documentation script, after which I plan to include in this tool. Also, I recently added remote connect functionality, though it’s only been tested by myself to this point, and requires the PowerShell SDK and required domain rights to access the DDC server.

WorkerDiag

I came up with this tool for a specific environment I was working on where the customer was experiencing intermittent registration issues among 10000+ static-assigned VMs spanning four XenDesktop ‘hosts’. The main purpose of this utility is to display key data points about VMs, or ‘workers’, that are unregistered from the XenDesktop site.

WorkerDiag
XenDesktop WorkerDiag

The biggest advantage of using this tool over Desktop Director is that it queries up to date WMI data points that are combined with XenDesktop PowerShell SDK results. For example, being able to see why certain machines were powered off, and comparing that to the WMI uptime can help to characterize power issues in a larger environment. I also added items such as displaying the VM’s ‘ListOfDDCs’ registry value, and check to see if the perfmon counter library is corrupt. All of the colums are movable, sortable, and hideable, and the results can be exported to CSV for reporting.

I’ll continue to update this page as I modify & expand this tool’s features and add compatibility with the next version of XenDesktop. Please let me know if you have any questions, comments, or concerns about these utilities.

-Kenny

NetScaler Bootcamp

The most advanced cloud network platform.

The most advanced cloud network platform.

A few of us at iVision just completed a two day NetScaler bootcamp led by Richard Nash at my old office in Alpharetta. With access to a hands-on learning lab, we were able to gain a solid understanding of Netscaler fundamentals.

Day one started with a lecture that covered core topics, including the following key features:

  • TCP Connection Multiplexing
  • Load Balancing
  • SQL Load Balancing (DataStream)
  • Compression
  • Clustering
  • High Availability
  • SSL Acceleration
  • Attack Defense
  • SSL VPN
  • Application Firewall
  • Global Server Load Balancing
  • Caching

We then worked through several scenarios in the learning lab. Being new to NetScaler, I was impressed with how well the Java UI performed, and was quite pleased with it’s functionality and ease of use. The main menu was a bit scary looking at first, but once I navigated through the categories a few times, I was able to quickly find the settings I needed to configure.

The day one lab gave us a good understanding of the steps needed to setup a NetScaler VPX HA pair for load balancing, content switching, and SSL Offload. Generating the SSL cert was a hassle as it always is,  but fortunately the lab was already equipped with a Certificate server.

On day two of the bootcamp, we spent time working with HTTP header modification, port redirection, and URL transformation. We also covered DataStream SQL load balancing and rate limiting, which was very impressive functionality to configure and see in action. Database responders, token-based load balancing, and integrated SQL caching really rounded out the lab.

Unfortunately we didn’t get to cover Access Gateway, but I took some time to review Bill Hackley’s step by step instructions on the Citrix Blogs, which I was able to fairly easily implement in my lab environment. I was pretty satisfied with this training, and believe our team is much better equipped to lead many successful implementations with the foundation that this two day crash course provided!

-Kenny

First post – A little bit about me

Greetings, and welcome to my blog! My name is Kenny Baldwin, and I work as a Senior Citrix Consultant with iVision in Atlanta GA. I spent the last few years prior to iVision working as an Escalation Engineer for Citrix Systems, during which time my main area of focus was troubleshooting advanced technical issues reported by enterprise customers and Citrix partners alike. I’m MCSE/CCIA/Security+ certified, and have been in the field for over 10 years. I’m an Atlanta native, and have a wife and two daughters (1 & 3).

I’ve been working with Citrix products since 2009, and was fortunate to be able to spend a lot of time working with source code to help isolate and resolve customer reported bugs. During my time at Citrix I learned about many advanced debugging and troubleshooting techniques, with a focus on XenDesktop and XenApp issues. I gained a deep understanding of the inner workings of HDX, brokering, session launch, and site architecture, developing tools and scripts along the way. Working at Citrix also helped me to increase my understanding of Windows internals, as well as administering and troubleshooting the various supported hypervisor platforms.

I presented at TechEdge 2010 on HDX Flash as well as troubleshooting XenDesktop, and was awarded the ‘Services Hero 2012’ distinction for providing ‘world-class’ technical support. If you’ve ever worked with XenDesktop 5.x, you might be familiar with the ‘Site Checker‘ tool, which I created mostly out of necessity while supporting the product. I’ve been a major contributor to the XenDesktop support forum and visit CitrixIRC.com much less often than I’d like to.

Now that I’m a consultant with a Citrix partner, my main focus will be designing and implementing Citrix solutions. I hope to combine my unique understanding of XenDesktop and XenApp with iVision’s field-proven delivery assurance model to provide world-class Citrix solutions to our customers.

My hope is that this blog will give me an outlet to share my experiences with XenDesktop and XenApp including various tips, tricks, scripts, how-to’s, and troubleshooting tools for other Citrix professionals.

Thanks for stopping by, and may you find some Zen in your Xen! 🙂

-Kenny