Nitro C# APIs for Command Center – Scripting with PowerShell
In my previous post on the Nitro APIs for NetScaler I shared some PowerShell examples for interacting with a NetScaler using the Nitro C# API SDK in PowerShell. I wanted to share some similar tips and samples for scripting with the Command Center APIs, which has quite a few more gotchas than the NetScaler APIs (in my opinion :).
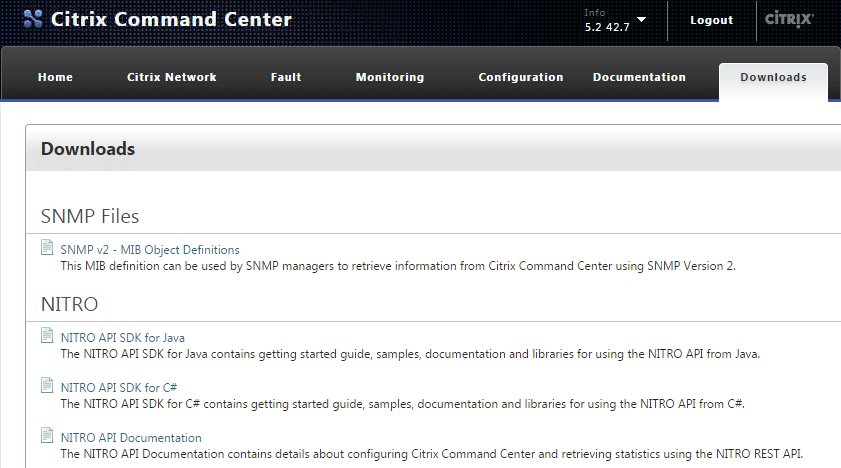
Loading the Command Center version of the Nitro C# framework in PowerShell is about the same as the NetScaler. Just like on the NetScaler, the needed assemblies can be found at the ‘Downloads’ section on the Command Center web console:
Download and extract the tarball to your scripting environment’s working directory. Next, add the Command Center Nitro .NET framework into your runspace using the Add-Type cmdlet:
Add-Type -Path .\newtonsoft.json.dll
Add-Type -Path .\cmdctr_nitro.dll
The last requirement, which is not needed with the NetScaler APIs, is to copy ccapi.xml to your $HOME directory:
Copy-Item -Path .\ccapi.xml -Destination $HOME
If you don’t have this file in your $HOME directory you’ll get an exception when attempting to connect to the server. To do so, use com.citrix.cmdctr.nitro.service.nitro_service.login(UserName, Password):
$Credentials = Get-Credential
$nitrosession = new-object com.citrix.cmdctr.nitro.service.nitro_service($ccserver,8443,"https")
$nitrosession.login($Credentials.GetNetworkCredential().UserName, $Credentials.GetNetworkCredential().Password)
Once logged in the class heirarchy is very similar to the NetScaler APIs. Let’s look at a couple of examples of what you can do from here with some code snips along the way.
The primary reason that I wanted to write a script against Command Center was to run batches of tasks against a list of NetScalers and variables. In the script I took two such csv lists as parameters loop on each to execute the tasks sequentially against each NetScaler in the list.In this example I’ll show you how to run a custom task and passing values to populate the task’s ‘UserInput’ variables.
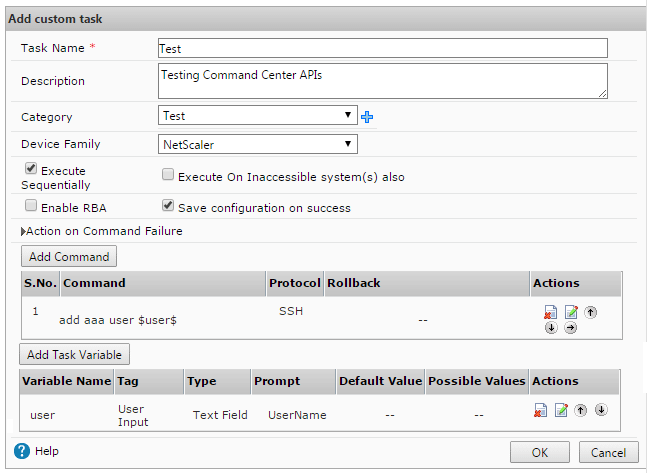
First, create a custom task in Command Center, in this example we’ll add a user that’s passed as a variable $user$:
In your PowerShell runspace load the following cmdctr.nitro.resource.configuration objects; ns_task_execution_data to get the task’s UserInput values, an ns_task of the task that will be executed, and a scheduler_data to specify how it should be execute:
$taskname = "Test"
$user = "User1"
$nsip = "10.0.0.1"
$task = New-Object com.citrix.cmdctr.nitro.resource.configuration.ns_task_execution_data
$taskdetails = [com.citrix.cmdctr.nitro.resource.configuration.ns_task]::get($nitrosession, $taskname)
$taskschedule = New-Object com.citrix.cmdctr.nitro.resource.configuration.scheduler_data
$taskschedule.recurr_type = "no_reccur"
From here we’ll need to put the user variable into the $task.user_input_props property. To do this you’ll need to build an explicit Dictionary[System.String,System.String] object:
$userinputprops = New-Object "System.Collections.Generic.Dictionary``2[System.String,System.String]"
Next, assign the user name variable taskdetails.task_variable_list[0].name dictionary entry. Note that the format is very specific here, most notably explicit single quotes around $UserInput$ to make sure the $’s stay in the string:
$userinputprops['$UserInput$' + $taskdetails.task_variable_list[0].name] = $user)
Since there’s only one variable in this task, we can set the $task.user_input_props property using ns_taskexecution_data.set_user_input_props(), but would otherwise do a for loop on the $taskdetails.task_variable[] array to assign multiple variables:
$task.set_user_input_props($userinputprops)
Now fill out a few other task properties, including the user who ran the job, an annotation notating the computer it was executed from, the target NetScaler IP to run the task against
$task.task_name = $taskdetails.name
$task.executed_by = ($Credentials.UserName).Split('\')[1]
$task.scheduler_data = $taskschedule
$task.annotation = "Nitro automated task executed from $($env:COMPUTERNAME)"
$task.device_list = $nsip
Then execute the task using the execute() method of the ns_task_execution_data class, passing the $task object as the second parameter:
$task = [com.citrix.cmdctr.nitro.resource.configuration.ns_task_execution_data]::execute($nitrosession,$cctask)
This will start the task in Command Center, which can then be monitored by calling get() in ns_task_status:
$taskstatus = [com.citrix.cmdctr.nitro.resource.configuration.ns_task_status]::get($nitrosession, ($cctask.execution_ids)[0])
You can then do a while/start-sleep loop on $taskstatus.status to find out what happened:
Do { $taskstatus = [com.citrix.cmdctr.nitro.resource.configuration.ns_task_status]::get($nitrosession, ($cctask.execution_ids)[0])
Start-Sleep -Seconds 1 }
While ($taskstatus.status -match "Progress" -or $taskstatus.status -match "Queued")
Once the task is complete, check the status of what happened:
if ($taskstatus.status -eq "Success")
{ Write-Host "$($cctask.task_name) completed on $nsip" }
As always it’s a lot easier to deal with a success than a failure, here’s wait it takes to see what command failed, and what the error was, if the task faced a conflicting config:
if ($taskstatus.status -eq "Failed")
{
 $ccfilter = New-Object com.citrix.cmdctr.nitro.util.filtervalue
 $ccfilter.properties.Add("id",$taskstatus.taskexecution_id + "")
 $errorlog = [com.citrix.cmdctr.nitro.resource.configuration.command_log]::get_filtered($nit rosession,$ccfilter)
 $failedcmd = ($errorlog.output.Split("`n")[2] -replace "`n|`r").Split(':')[1]
 $failedmsg = ($errorlog.output.Split("`n")[3] -replace "`n|`r").Split(':')[1]
 Write-Host "$($cctask.task_name) failed at '$failedcmd', the error was '$failedmsg'"
}
I hope this example was useful and that you enjoyed a second Nitro boost for your Citrix scripting repertoire!


