XenDesktop 7 Session Launch – Part 1, Authentication

The process of enumerating, brokering, and connecting to a XenDesktop resource involves quite a few moving parts, and can be a daunting task to troubleshoot for someone who isn’t familiar with the product. There are several key components involved in the session launch process including authentication, enumeration, registration, ticketing, and display/session handling.

In this post I’d like to briefly explain how the Citrix Receiver authenticates to a XenDesktop 7 application or desktop. To keep it simple, I’m only going to talk about StoreFront (no WI) and XenDesktop (no XenApp/IMA). So just Receiver <> StoreFront <> XenDesktop.

The first step to launching a XenDesktop session is to authenticate to the StoreFront Store that the XenDesktop resource is connected to. In this step, a user connects to the StoreFront server and:

  1. Authenticates to a StoreFront virtual directory via Citrix Receiver:
    • The Receiver is connecting to a StoreFront Store, StoreWeb, StoreDesktopAppliance, or PNAgent IIS virtual directory. IIS allows anonymous authentication since the StoreFront .NET services (Citrix.Storefront.exe & Citrix.StoreFront.PrivilegedService.exe) handle authentication:

storefront-IIS

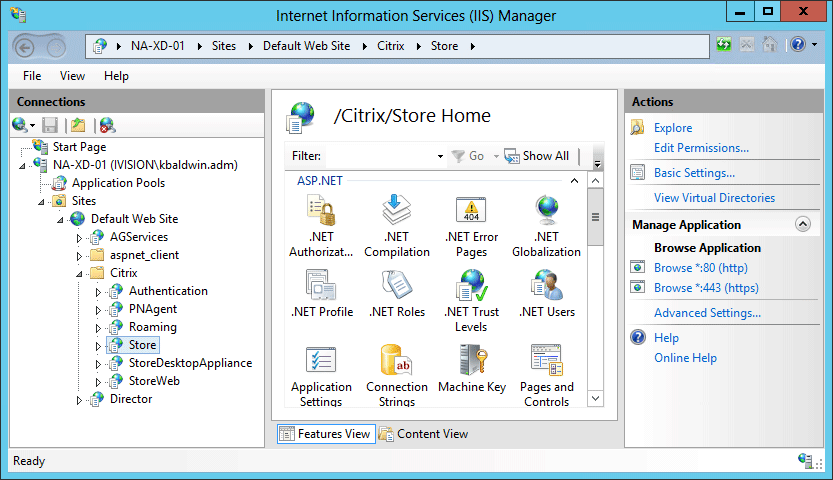
    • To configure a StoreFront server’s authentication methods, use the Citrix Studio MMC to open the Authentication TreeNode of the Citrix StoreFront deployment. Here you can specify which authentication methods to allow on Stores hosted by that server:

storefront-authmethods

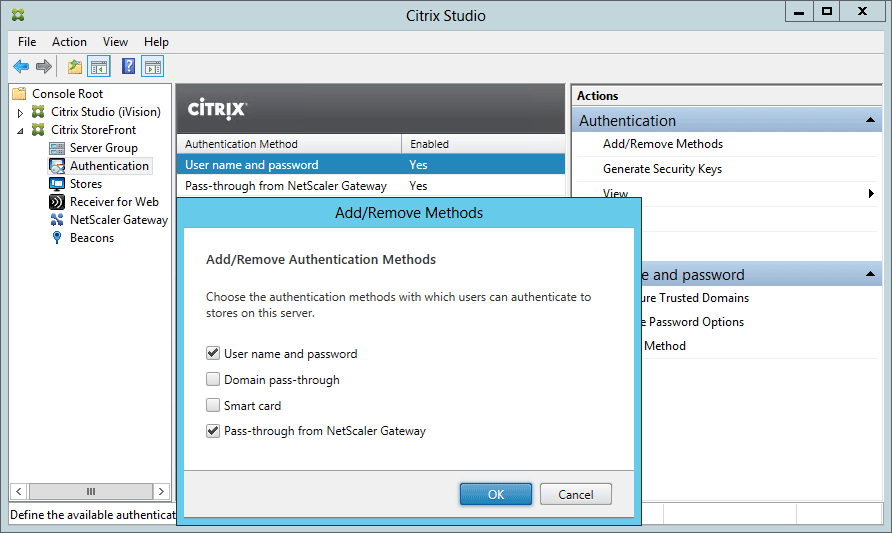
    • There are four authentication methods available as of StoreFront 2.0:
      • User name and password: Similar to windows basic auth in IIS, or explicit authentication in Citrix Web Interface Server.Prompts the user to enter their credentials at logon.
        • In this scenario, the broker passes the user’s credentials to the target ICA server on behalf of the client
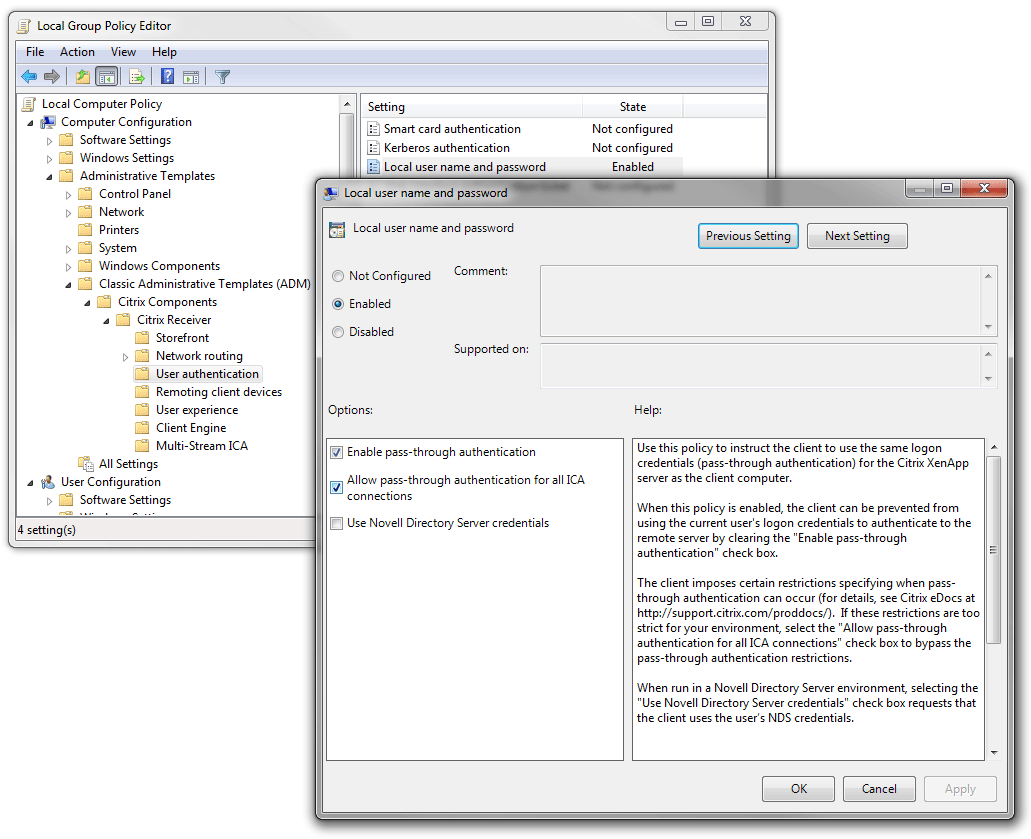
      • Domain Pass-through: Similar to Integrated Authentication in IIS, and
        • Allows Receiver for Windows endpoints automatically log on using the local session’s logged on user domain account (via NTLM)
        • In this scenario, the client sends credentials (via ssonsvr.exe) directly to the target ICA server
        • For pass-through authentication to work, you must use the /includesson switch when installing Receiver (per CTX133982), which tells the meta-installer to include the ‘SSON’ component (ssonsvr.exe) that is needed to capture the user’s domain credentials at logon. Receiver relies on the SSON component to send the user’s domain credentials to the StoreFront server’s StoreWeb (via browser), Store (via Receiver), or legacy PNAgent (via Online Plugin / Receiver Enterprise) virtual directory.
          • There is currently a bug with XenDesktop 7 published desktops using pass-through authentication to provide ‘FlexCast’ functionality (enumerate and launch published apps from the published desktop) where ssonsvr.exe wouldn’t run (crashed at login) because pnsson.dll wasn’t playing nice with the ICA stack at session logon.
          • Citrix has provided a provisional test-fix to customers with an open case, and will soon be releasing a public hotfix. As of this post, pass-through authentication doesn’t work on XenDesktop 7 published desktops running Receiver 3/4 without this fix in place.
      • Smart Card: Allows smart card pass-through
        • Thankfully I don’t work with this method very often, so I’ll refrain from digging in. Just know that it’s required if smart-cards are used in the environment
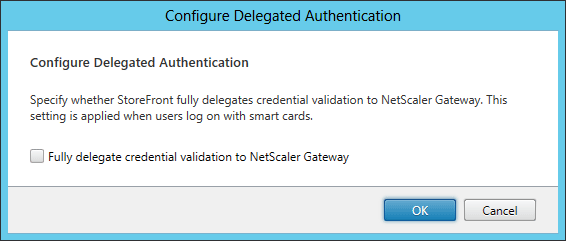
      • Pass-through from NetScaler Gateway: Allows a NetScaler Gateway virtual server to handle user authentication on behalf of the user
        • Requires Set-BrokerSite -TrustRequestsSentToTheXmlServicePort $true to be set on the DDC/XML broker)
        • Use the Configure Delegated Authentication option to specify that the NetScaler send logon credentials directly to the remote Windows session

delegatedauth

    • There are also client-side registry values that control whether or not to allow pass-through authentication, and can even lock down the feature to only work with StoreFront sites in specified Internet Explorer Security Zones (aka Client Selective Trust). The easiest way to adjust this is to use the ADM template in %ProgramFiles%\Citrix\ICA Client\Configuration\icaclient.adm

Image

In my next post on XD7 session launch I’ll talk about resource enumeration, including details about the virtual XML broker and XenDesktop broker services.

XenDesktop 7 Service Instances – What’s New?

Since XenDesktop 7 was built using the same service framework architecture as XenDesktop 5 (aka the ‘FlexCast Management Architecture’), the additional functionality introduced in XD7 was added as services, each with multiple service instances. These services are handled much in the same way as XenDesktop 5, and XenDesktop 7 sites use version 2 of the Citrix.Broker.Admin PowerShell SDK to return information on registered service instances using the cmdlets of the same name as XD5 (Get-ConfigRegisteredServiceInstance, Register-ConfigServiceInstance, etc.).

In XenDesktop 5, each DDC in a site has 5 services, with 12 total service instances that correspond to the various WCF endpoints used by each service. If the DDC is also running the Citrix License Server, there would be a total of 13 instances. For this reason, it’s a fairly straightforward process to find and register missing service instances.

XenDesktop 7 is quite different in this regard. Since it has optional FMA services, such as StoreFront, the number of service instances in any given site depends on which components are installed, and whether or not SSL-is in use.

For example, my single-DDC site running StoreFront 2.0 with SSL encryption has 10 services with 43 total service instances:

XenDesktop 7 Services

If StoreFront wasn’t installed, for example, there would be at least three less services (some of the Broker services would likely not be registered). There are also duplicate service instances for SSL encrypted services, such as the virtual STA service. Here’s a quick PoSH script to tell you what service instances are registered in your site (for XD5 & XD7):

asnp citrix.Broker*
Get-ConfigRegisteredServiceInstance -AdminAddress na-xd-01 | %{ 
"ServiceType: " + $_.ServiceType + " Address: " + $_.Address; $count++}
"Total Instances: " + $count

You could take this a step further to see how many instances are in each of the 10 possible service types:

New-Alias grsi Get-ConfigRegisteredserviceInstance
 $acct = grsi -AdminAddress na-xd-01 -serviceType Acct; "$($acct.Count) ADIdentity service instances"
 $admin = grsi -serviceType Admin ; "$($admin.count) Delegated Admin service instances"
 $broker = grsi -serviceType Broker; "$($broker.count) Broker service instances"
 $config = grsi -serviceType Config; "$($config.count) Configuration service instances"
 $envtest = grsi -serviceType EnvTest; "$($envtest.count) Environment Test service instances"
 $hyp = grsi -serviceType Hyp; "$($hyp.count) Hosting Unit service instances"
 $log = grsi -serviceType Log; "$($log.count) Configuration Logging service instances"
 $monitor = grsi -serviceType Monitor; "$($monitor.count) Monitor service instances"
 $prov = grsi -serviceType Prov; "$($prov.count) Machine Creation service instances"
 $sf = grsi -serviceType Sf; "$($sf.count) StoreFront service instances"
 "$($acct.Count + $admin.Count + $broker.Count + $config.Count + $envtest.Count + $hyp.Count + $log.Count + $monitor.Count + $prov.Count + $sf.Count) Total service instances"
XenDesktop 7 Service Instance Count

XenDesktop 7 Service Instance Count

Because of this nuance, I’m working on a more intelligent way of enumerating and validating service instance registrations in SiteDiag for XD7. Hopefully these scripts are helpful in illustrating the difference between XD5 & XD7. Also, here’s the latest nightly build of SiteDiag that has the beginnings of the additional logic needed to properly count, and fix, registered service instances in a XenDesktop 7 site.

XenDesktop 7 – Environment Test Service

If you’ve had a chance to review the XenDesktop 7 PowerShell SDK documentation, you might have noticed a few new snap-ins that provide the site interactions for the new services included with XenDesktop 7 (as part of the FlexCast Management Architecture). These new snapins are the designated as V1 on the cmdlet help site, and include StoreFront, Delegated Admin, Configuration Logging, Environment Tests, and Monitoring.

Out of these new services, the Environment Test Service sounds the most appealing to me, as it provides a framework to run pre-defined tests and test suites against a XenDesktop 7 site. However, I found that the SDK documentation didn’t provide much/any guidance on using this snap-in, so I thought I’d share a quick rundown on the meat of this new service, along with some sample scripts using the main cmdlets.

The most basic function of this service is to run predefined tests against various site components, configurations, and workflows. As of XD7 RTM, there are 201 individual TestID’s, which can be returned by running the Get-EnvTestDefinition cmdlet:

TestId 
------ 
Host_CdfEnabled 
Host_FileBasedLogging 
Host_DatabaseCanBeReached 
Host_DatabaseVersionIsRequiredVersion 
Host_XdusPresentInDatabase 
Host_RecentDatabaseBackup 
Host_SchemaNotModified 
Host_SnapshotIsolationState 
Host_SqlServerVersion 
Host_FirewallPortsOpen 
Host_UrlAclsCorrect 
Host_CheckBootstrapState 
Host_ValidateStoredCsServiceInstances 
Host_RegisteredWithConfigurationService 
Host_CoreServiceConnectivity 
Host_PeersConnectivity 
Host_Host_Connection_HypervisorConnected 
Host_Host_Connection_MaintenanceMode...

The tests are broken down into several functional groups that align with the various broker services, including Host, Configuration, MachineCreation, etc, and are named as such. For example, the test to verify that the site database can be connected to by the Configuration service is called Configuration_DatabaseCanBeReached.

Each test has a description of it’s function, and a test scope that dictates what type of object(s) can be tested. Tests can be executed against components and objects in the site according to the TestScope and/or TargetObjectType, and are executed by the service Synchronously or Aynchronously, depending on their InteractionModel. You can view all of the details about a test by passing the TestID to the Get-EnvTestDefinition cmdlet; for example:

PS C:> Get-EnvTestDefinition -TestId Configuration_DatabaseCanBeReached

Description : Test the connection details can be used to 
 connect successfully to the database.
DisplayName : Test the database can be reached.
InteractionModel : Synchronous
TargetObjectType : 
TestId : Configuration_DatabaseCanBeReached
TestScope : ServiceInstance
TestSuiteIds : {Infrastructure}

TestSuites are groups of tests executed in succession to validate groups of component, as well as their interactions and workflows. The Get-EnvTestSuite cmdlet returns a list of test suite definitions, and can be used to find out what tests a suite is comprised of. To get a list of TestSuiteIDs, for example, you can run a Get-EnvTestSuite | Select TestSuiteID, which returns all of the available test suites:

TestSuiteId 
----------- 
Infrastructure 
DesktopGroup 
Catalog 
HypervisorConnection 
HostingUnit 
MachineCreation_ProvisioningScheme_Basic 
MachineCreation_ProvisioningScheme_Collaboration 
MachineCreation_Availability 
MachineCreation_Identity_State 
MachineCreation_VirtualMachine_State 
ADIdentity_IdentityPool_Basic 
ADIdentity_IdentityPool_Provisioning 
ADIdentity_WhatIf 
ADIdentity_Identity_Available 
ADIdentity_Identity_State

Each of these suites can be queried using the same cmdlet, and passing the -TestSuiteID of the suite in question. Let’s take DesktopGroup as an example:

PS C:\> Get-EnvTestSuiteDefinition -TestSuiteId DesktopGroup

TestSuiteId         Tests 
-----------                  ----- 
DesktopGroup   Check hypervisor connection, Check connection maintenance mode, Ch...

One thing you’ll notice with the results of this cmdlet is that the list of tests are truncated, which is a result of the default stdout formatting in the PowerShell console. For that reason, my preferred method of looking at objects with large strings (ie descriptions) in PowerShell, is to view them in a graphical ISE (PowerGUI is my preference) and explore the objects in the ‘Variables’ pane.

For example, if you store the results of  Get-EnvTestSuiteDefinition -TestSuiteId DesktopGroup into a variable ($dgtest) in PowerGUI, each Test object that comprises the test suite can be inspected individually:

The DesktopGroup EnvTestSuite object

The DesktopGroup EnvTestSuite object

To start a test task, use the Start-EnvTestTask, passing the TestID or, alternatively, the TestSuiteID, and a target object (as needed). For example:

PS C:> Start-EnvTestTask -TestId Configuration_DatabaseCanBeReached

Active : False
ActiveElapsedTime : 11
CompletedTests : 1
CompletedWorkItems : 11
CurrentOperation : 
DateFinished : 9/16/2013 11:33:31 PM
DateStarted : 9/16/2013 11:33:20 PM
DiscoverRelatedObjects : True
DiscoveredObjects : {}
ExtendedProperties : {}
Host : 
LastUpdateTime : 9/16/2013 11:33:31 PM
Metadata : {}
MetadataMap : {}
Status : Finished
TaskExpectedCompletion : 
TaskId : 03f5480d-68e8-410a-9da4-5e65d96ac393
TaskProgress : 100
TerminatingError : 
TestIds : {Configuration_DatabaseCanBeReached}
TestResults : {Configuration_DatabaseCanBeReached}
TestSuiteIds : {}
TotalPendingTests : 1
TotalPendingWorkItems : 11
Type : EnvironmentTestRun

Once you know what tests there are, what they do, and what types of results to expect, health check scripts can easily be created using this service. Combinations of tests and test suites can, and should, be leveraged as needed to systematically validate XenDesktop 7 site components and functionality.

I plan on using these cmdlets to some extent in SiteDiag, and expect to get some good use out of this new service in the field. I’m interested to hear from anyone else who’s started using this snap-in, and if they’ve come up with any useful scripts.