XenApp PowerShell Scripting with Get-XASession

I was working on a PowerShell script in XenApp today to quickly view active sessions by user, server, application, and session duration. Having focused most of my PoSH time in recent years to the XenDesktop SDK, I was somewhat disappointed with the limited flexibility (and official documentation) of the XenApp SDK, specifically with the Get-XASession cmdlet.

My main complaint is that Get-XASession doesn’t have many ‘Required’ parameters, which means that queries are limited to a subset of session details:

Get-XASession

For example, if I want to find all sessions that are ‘Active’, I have to pipe the results of Get-XASession and evaluate each returned object. So, the following pipeline evaluation is required if you wanted to see all active sessions:

Get-XASession | Where-Object { $_.State -match 'Active'}

Using this as a foundation to find Active sessions, I took it a step further by using an input parameter (application name) to list sessions by application, and then formatted the output of the session details to get me what I’m looking for:

param ([String]$app)
foreach ($session in (Get-XASession | Where-Object { 
$_.BrowserName -match $app -and $_.State -match 'Active'} | 
select AccountName, ServerName, LogonTime, ConnectTime, CurrentTime, SessionID | 
Sort-Object LogonTime -Descending))
{
 $logon = (Get-Date) - $session.LogOnTime
 $connect = (Get-Date) - $session.ConnectTime
 "$($session.AccountName) logged on to $($session.ServerName) {0:00}:{1:00}:{2:00}" 
 -f $logon.Hours,$logon.Minutes,$logon.Seconds + " ago."
}

This script returns a active sessions by user name, connected to $app, the server on which it’s running, and the elapsed time (in ascending order) since they logged on (just subtract the $_.LogonTime date/time object from Get-Date). Notice how the $session object is compiled of properties of the sorted Get-XASession output by way of piping the output through several filters, which lets you create your own objects that can be easily manipulated and cross-referenced in the script. I also did some date/time formatting with {0:00}:{1:00}:{2:00}” -f $logon.Hours,$logon.Minutes,$logon.Seconds, though you can present this time duration in any way that makes sense.

Well, I hope this was worth a quick read, have a good weekend!

XenDesktop 7 Session Launch – Part 2, Enumeration

In my last post I talked about how the Citrix Receiver authenticates to a StoreFront server. In this post, I want to talk about resource enumeration with Citrix Receiver <> StoreFront <> XenDesktop deployments.

Before I go into the technical aspects of the way Citrix enumerates published resources, I want to briefly explain the history behind the Citrix XML Broker, as well as how the Citrix client enumerates published resources. In case anyone is interested in a broader history of Citrix, I encourage you to check out the 20 years of Citrix History publication that was published in 2009.

Citrix NFuse and the XML Portal Server

Back in 2000, Citrix signed a licensing deal with Sequoia Software (whom they later acquired in 2001) to integrate the NFuse as the foundation for providing an extensible application portal for MetaFrame. The XML Portal Server (XPS) technology was then built around NFuse to provide the ability to dynamically enumerate and present resources to end users. This integration was critical in giving Citrix the ability to stand apart from the competition (terminal services), and was the reason the next version of MetaFrame had the XP designation:
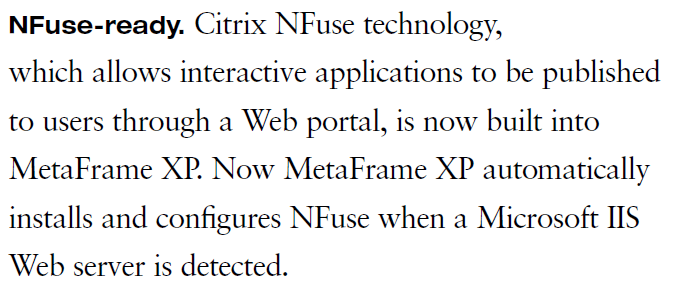
xpsnfuse

Since it’s introduction back in 2000, the NFuse protocol has remained at the core of every Citrix desktop/application virtualization product by way of the ‘XML Broker’ service. This service was included in all future releases, including all versions of XenApp & XenDesktop. Until XenDesktop 5 was released, the XML broker service ran as it’s own standalone service. During the XenDesktop ‘Storm’ site architecture rework (now called FMA, aka NOT IMA) the XenDesktop product team decided to relocate the XML broker service to run as a ‘virtual’ service by piggy-backing on the XenDesktop Broker service. Other than this move to virtualize the XML broker service, the service remains as NFuse capable as the XML broker service used in MetaFrame.

Because of the NFuse protocol, resource enumeration has remained compatible as MetaFrame evolved into XenDesktop. In other words, the old MetaFrame Web Interface Server would still enumerate published desktops from a XenDesktop 7 DDC, and a StoreFront 2.0 server would enumerate published applications from a MetaFrame XP XML broker service (theoretically at least!), as long as the requests are NFuse compatible.

One of the main reasons the NFuse protocol is so durable is that it’s able to negotiate capabilities. In this example, a StoreFront site contacts a XenDesktop XML broker to determine what capabilities it has, and what resources are published to the authenticated user:

enumeration

In this process, the web front-end server sends an XML message to the configured XML broker to request a list of capabilities. The XML broker then responds with an XML formatted list of the types of resources it has access to. StoreFront will then request any compatible resources for the the authenticated user account. The XML broker then works with the XenDesktop broker and controller services to find out what resources are assigned to the user. The enumerated resources are consumed by StoreFront and presented to the end user.  This figure from the NFuse Classic 1.7 is still mostly relevant, just different companion components:
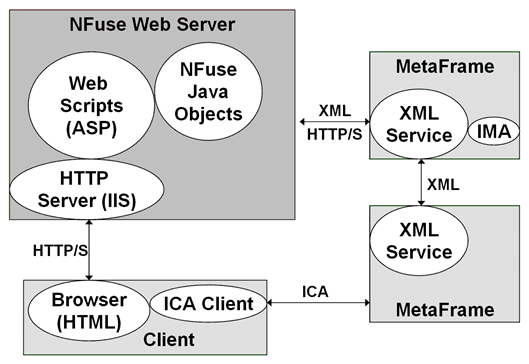
nfuse

StoreFront & Receiver

With Citrix Web Interface, the results of application enumeration were presented all at once to the authenticated user (optionally sorted into tabs and/or folders). In other words, all resources published to a user would be shown to them, though you could hide resources as needed. StoreFront with Receiver added the functionality that was originally introduced with Citrix Merchandising Server and Dazzle, which is to allow a user to pick their ‘favorite’ resources, providing Self-Service ‘App Store’ functionality and allowing a user’s favorite resources to follow them across multiple client devices and device types.

Prior to Dazzle/Receiver, applications were either enumerated in a web browser using a Web Interface ‘Web’ site, or enumerated directly by the Citrix client agent through a ‘Services’ site. In the past three years the Citrix client has evolved from the ‘Online Plug-in’ to the Receiver for Windows.

clients

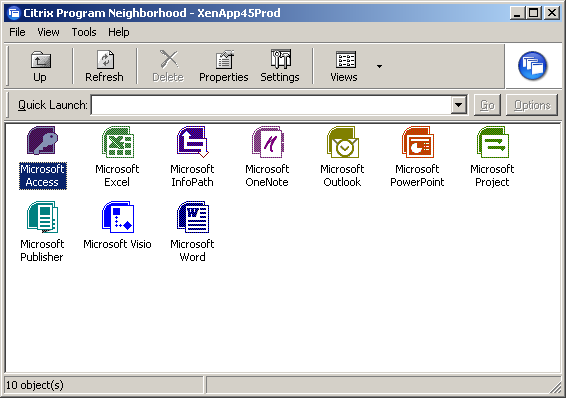
The concept of client-side agent enumeration began with the ‘Program Neighborhood’ client (pre Online Plug-in), which would access a Services site (hence the default name PNAgent), and looked like this:
Program-Neighborhood-12

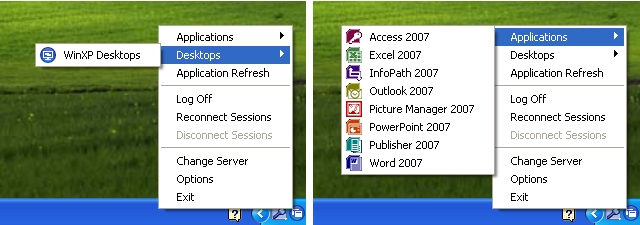
Until XenApp replaced Presentation Server, this was the way users would typically connect to applications, as the web portal wasn’t nearly as solid as the old WI server running in IE 5/6. By the time XenApp was released, Citrix decided to rework the ‘PNAgent’ to display resources as a system tray icon jump menu (which remains a fan favorite, quick, easy, intuitive) in what was first called the XenApp Plug-in, and later renamed to the Online Plug-in when XenDesktop was released:
DRXDBoth

However, around the time the Apple App Store was released, and Windows Vista changed some application UI design consideration, Citrix decided to create a self-service framework by way of Dazzle and Merchandising Server. As a result of this they decided to do away with the notification icon ‘jump-menu’ since it didn’t align with Microsoft’s general UI design recommendations for Windows Vista/7. When Receiver was launched, this legacy ‘PNAgent’ functionality was taken out of the standard ‘Receiver’, and moved to only be included in the ‘Enterprise’ flavor of the Receiver, which is really just a nice way to say that they’re accommodating ‘Enterprise’ customers who still want/need to use this legacy functionality.

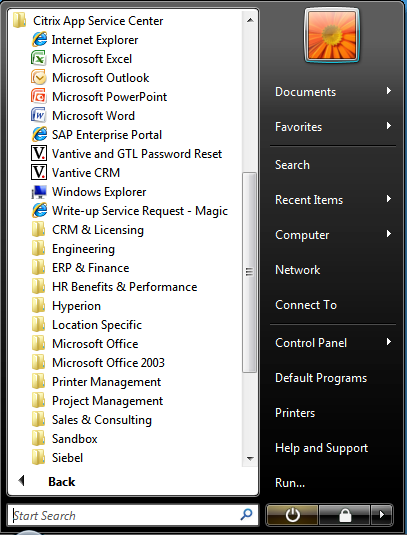
As of Receiver Enterprise (the black icon) PNAgent enumerated shortcuts are only available in the start-menu or desktop (according to the site/farm settings):
PNA

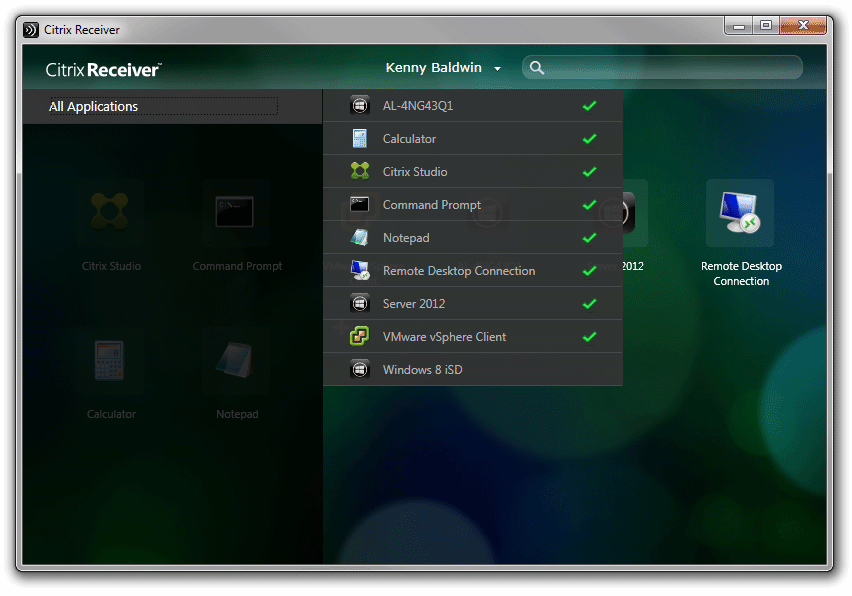
Citrix’s current preferred method of displaying shortcuts to end-users is using Receiver 3/4 to connect to a StoreFront Store, which uses the ‘Dazzle’ framework to present shortcuts:
receiverwindow

The StoreWeb StoreFront site aims to provide the same look and feel for users that aren’t enumerating via the ‘Receiver’ agent:
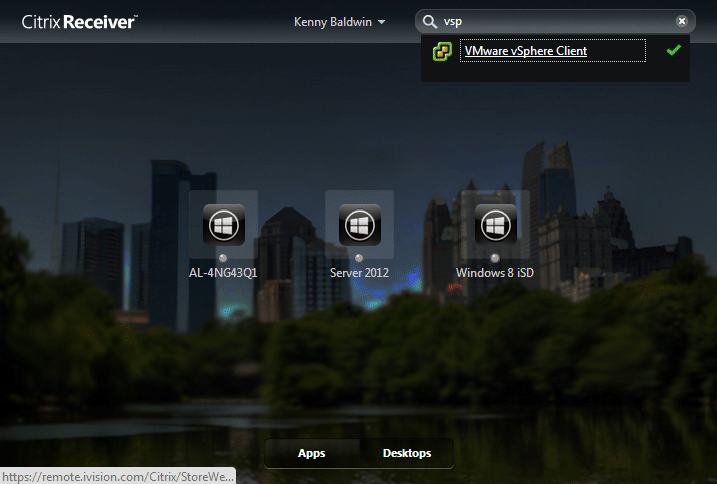
receiverweb

Connecting from mobile receivers maintains this consistency of favorite resources:
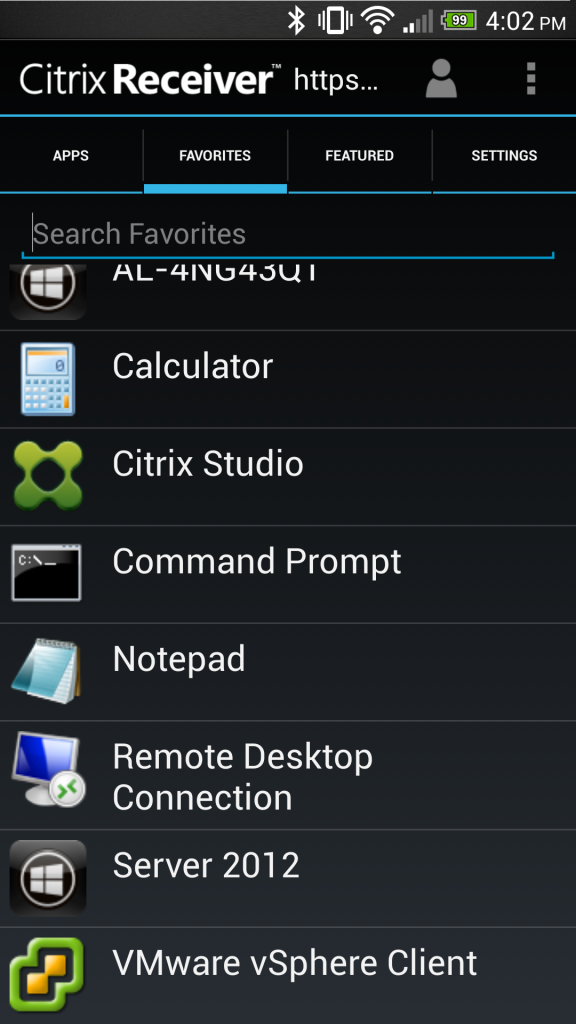
androidreceiver

I could go on and on about the technical details of enumeration, but am out of time for today. I encourage readers to check out my previous post on the XML broker for a technical example of NFuse transactions.

In my next post I go into more detail about how enumerated resources are brokered to the receiver.

XenApp/PVS Global Farm Overview

Since there was a lot of interest in the last Visio I posted, I thought I’d share another.

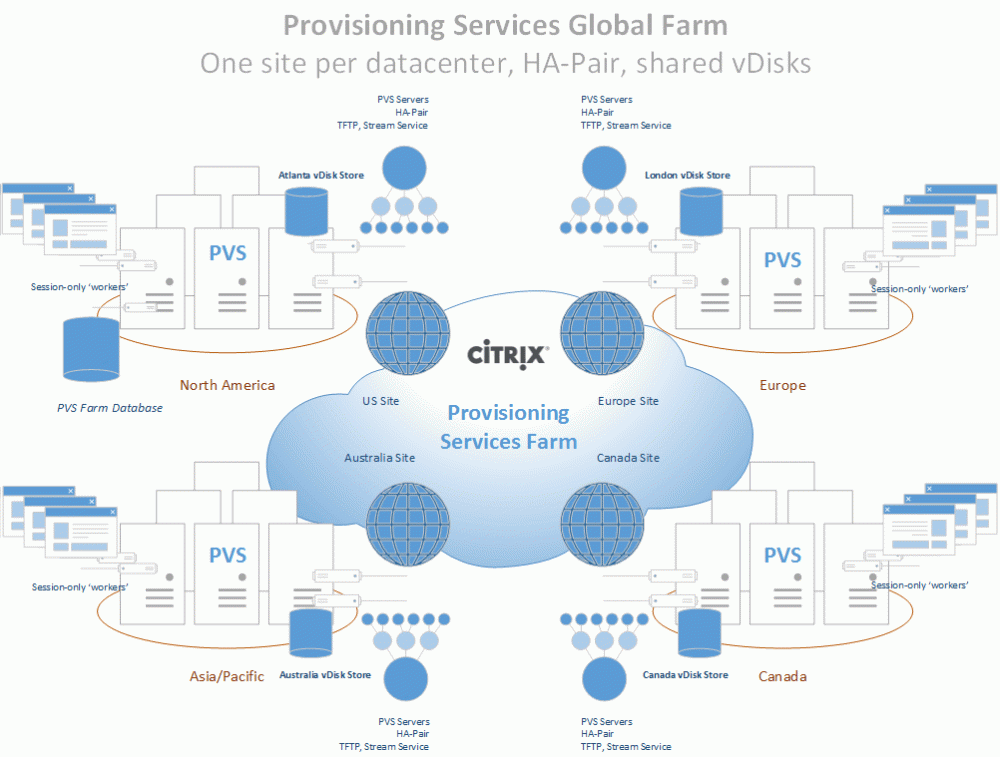
These diagrams outline high level overviews of a global XenApp w/PVS deployment, with XenApp zones and PVS sites in each datacenter. Each XenApp zone has two data collectors/XML brokers, PVS-Streamed OU-based worker groups. Each geographic region has a corresponding StoreFront Store (directed by host name):

XenAppGlobal


The PVS farm configuration is very similar, consisting of sites in each datacenter to stream XenApp workers for each XenApp zone in that datacenter, with the master database homed in the US datacenter:

PVSGlobal


The intent of these overviews are mainly to demonstrate how the XenApp and PVS farms interact in a global zone/site architecture. I’ll share some overview diagrams of XenApp zones and PVS sites in another post. Hope you enjoy!

NetScaler Gateway VPX v10.1 with StoreFront v2.0 – Encrypt and Theme!

I just finished up on a XenApp 6.5 upgrade where I replaced a single 2008R2 server running a DMZ’d CSG v3.2 SSL-proxied Citrix Web Interface v5.3 ‘Direct’ site with a NetScaler Gateway 10.1 Access Gateway virtual server and a StoreFront v2.0 Store.

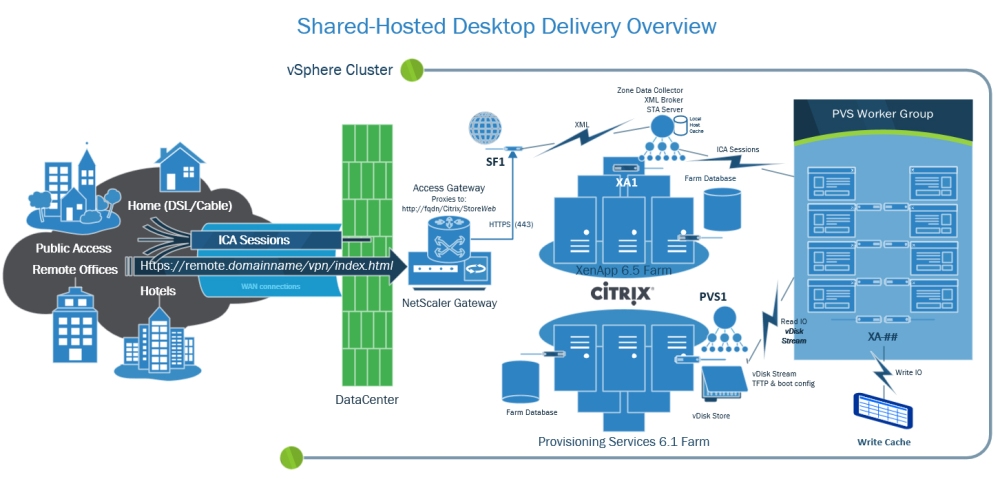
This post is meant to share some tips on setting up and customizing a Citrix Receiver <> NetScaler Gateway <> StoreFront deployment. Before I get into the thick of it, I thought I’d share the following high-level topology of the environment I was working with:

XenApp65_SharedHostedDesktopDelivery

This scenario consists of WAN-connected Citrix Receivers accessing the XenApp farm via a NetScaler Gateway Access Gateway VPN fronted StoreFront Store. The NetScaler Gateway Access Gateway virtual server provides AD-auth via an LDAP Authentication policy, and replaces the SSL-Proxied ICA & HTTP traffic that the Secure Gateway server previously handled (EOL’d since ‘06!, yet running on Win2008R2??). The NG-AG virtual server also acts as the landing page for web browsers, and as such has it’s own visual style that can (and SHOULD) be customized. Receiver connections are passed through to the Store virtual directory, and all other connections (web browsers) are directed to the StoreWeb virtual directory.

One major consideration I found in this topology is that if your StoreFront ‘Store’ is not SSL-encyrpted, Citrix Receiver for Windows 3.1 and later will not work without tweaking a few client-side registry values (see CTX134341), even though the NetScaler Gateway session is encrypted. That said, a resultant consideration of securing the StoreFront site is that you need to be sure that the NetScaler trusts the StoreFront server’s SSL certificate.

To do this you need to install any of the StoreFront server’s certificate chain certs on the NetScaler (here’s a good Citrix blog on the topic) and make sure the Access Gateway session policy profile’s ‘Web Interface Address’ uses the same name that the StoreFront server’s certificate was issued to, and that the NetScaler can resolve the name via DNS. The other pieces of getting this setup working are pretty easy, thanks mostly in part to the foolproof NetScaler Gateway setup wizard (eDocs link), and StoreFront’s ‘Add NetScaler Gateway Appliance’ wizard (eDocs). As long as your SSL is working properly, this is a fairly painless install.

Once I got the site up and running, I immediately wanted to customize the NetScaler Gateway VPN web interface to make it look like the StoreWeb site that browser users are redirected to. Out of the box, the NG-AG site is themed with the old (boring) CAG visual style, which is themed to look like the old WI 5.0-5.3 black & blue sites. Since this page is proxying and for the StoreFront site, is makes for a very awkward, time-machinish, experience to login to the black and blue site, and land in StoreFront’s newer green bubble land!

I didn’t look hard to find Jeff Sani’s blog article that I’ve referenced many times before, which provides step-by-step instructions on applying the StoreFront look and feel to a NetScaler’s Access Gateway. After running through this, I decided to change the the logo and background, and referenced Terry D’s blog on customizing a StoreFront site by way of custom CSS. I used WinSCP and PuTTY to make the changes, and pretty quickly had a nice looking landing page to front the StoreFront Store:

CustomLandingPage

I then did the same on the StoreFront server using NotePad++, and was able to give the customer a customized and consistent look and by adding the following custom.style.css to the c:\inetpub\wwwroot\Citrix\StoreWeb\contrib folder of the StoreFront server:

body { background-image: url("custom.jpg");
  background-color: #262638;}
#credentialupdate-logonimage, #logonbox-logoimage 
{ background-image: url("custom.png");
  width: 180px;
  height: 101px;
  right: 63%;}
#.myapps-name 
{ font-weight: bold; color: #000; }

CustomStoreFrontWeb

Well, that’s about all the time I have for today. I hope someone finds this post helpful in producing a functional, and visually consistent, NetScaler Gateway fronted StoreFront deployment!

PVS Write Cache Monitor

I was recently working on a PVS deployment where we wanted to monitor and alert on target devices that were exceeding 70% write cache utilization. Since there wasn’t a way to do this in the PVS console, I dug into the PVS PoSH SDK to find a way to do this programatically.

After some research I came up with the following script that will check all target devices in a PVS farm, and send an email alert listing any machines that are using 70%+ of their write cache (adjustable via the $threshold variable):

$pass = cat .\securestring.txt | ConvertTo-SecureString
$mycred = New-Object -TypeName System.Management.Automation.PSCredential -ArgumentList "domain\admin",$pass
$message = @()
$threshold = 70

function get-value{
param([string]$strText="",[string]$strDelimiter="")
return $strText.SubString($strText.IndexOf($strDelimiter)+2)
}
function get-name{
param([string]$strText="",[string]$strDelimiter="")
return $strText.SubString(0,$strText.IndexOf($strDelimiter))
}
Add-PSSnapin McliPS* -ErrorAction SilentlyContinue
$all = @()
$obj = New-Object System.Collections.ArrayList
$lines = Mcli-Get DeviceInfo -f ServerName,ServerIpConnection,DeviceName,SiteName,CollectionName,Active,Status,diskLocatorName
for($i=0;$i -lt $lines.length;$i++){
	if(($lines[$i].length -gt 0) -and ($lines[$i].contains(":")) -and -not ($lines[$i] -match "Executing: Get "))
	{
		$name = get-name -strText $lines[$i] -strDelimiter ":"
		$value = get-value -strText $lines[$i] -strDelimiter ":"
		if ($name -eq "status" -and $value.Length -le 0)
		{
			$value = "0"
		}
		if ($value.Contains(",") -and $name -eq "status")
		{
		$obj | Add-Member -membertype noteproperty -name $name -Value $value.Split(",")[1]
		}else{
		$obj | Add-Member -membertype noteproperty -name $name -Value $value
		}
		}
		if($lines[$i].contains("#") -or (($i+1) -eq $lines.length)){
		$all += $obj
		$obj = New-Object psObject
		}
	}

foreach ($item in $all)
{
	if ([int] $item.status -gt $threshold)
	{
		$message += $item
	}
}
$message = $message | Where-Object -FilterScript { ([int] $_.status -gt 0) -and ([int]$_.status -le 100) } | Sort-Object {[int] $_.status} -descending | Format-Table @{Expression={$_.deviceName};Label="Device"}, @{Expression={$_.status};Label="RAM Cache Used (%)"}
function sendMail{

     Write-Host "Sending Email"

     #SMTP server name
     $smtpServer = "mail.domain.com"

     #Creating a Mail object
     $msg = new-object Net.Mail.MailMessage

     #Creating SMTP server object
     $smtp = new-object Net.Mail.SmtpClient($smtpServer)
	 $smtp.Credentials = $mycred

     #Email structure 
     $msg.From = "[email protected]"
     $msg.ReplyTo = "[email protected]"
     $msg.To.Add("[email protected]")
     $msg.subject = "PVS Write Cache $($threshold)%+ Utilization: " + $summary
	 $msg.body = Out-String -InputObject $message
	 $msg.priority = "High"

     #Sending email 
     $smtp.Send($msg)

}
if ($message.Count -gt 0)
{
	sendMail
}

XML Broker Health Check

I saw an interesting question in the Citrix support forum today, and thought I’d share. Scott Curtsinger asked the following:

Does anyone know what the easiest way is to check the health of the XML service on XenDesktop 5.6? I’m seeing a lot of information on the web for XenApp but not very much for XenDesktop beyond leveraging devices like a NetScaler.

My first instinct is that this could easily be done via PowerShell, so I did a quick search and found this blog post by Jason Pettys. I also found this great article on working with the Citrix XML service, and quickly put together the following script which I tested against my XenDesktop 5.6 XML broker:

$url = "http://localhost/scripts/wpnbr.dll"
$parameters = '<?xml version="1.0" encoding="utf-8"?><!DOCTYPE NFuseProtocol SYSTEM "NFuse.dtd"><NFuseProtocol version="5.1"><RequestCapabilities></RequestCapabilities></NFuseProtocol>'
$http_request = New-Object -ComObject Msxml2.XMLHTTP
$http_request.open('POST', $url, $false)
$http_request.setRequestHeader("Content-type", "text/xml")
$http_request.setRequestHeader("Content-length", $parameters.Length)
$http_request.setRequestHeader("Connection", "close")
$http_request.send($parameters)
$http_request.statusText
$http_request.responseText

Running this script in PowerShell on my XML broker returned the following list of capabilities, which is a good indication that the XML broker is up and running:

<?xml version="1.0" encoding="UTF-8"?> <!DOCTYPE NFuseProtocol SYSTEM "NFuse.dtd"> <NFuseProtocol version="5.1"> <ResponseCapabilities> <CapabilityId>separate-credentials-validation</CapabilityId> <CapabilityId>multi-image-icons</CapabilityId> <CapabilityId>launch-reference</CapabilityId> <CapabilityId>user-identity</CapabilityId> <CapabilityId>full-icon-data</CapabilityId> <CapabilityId>full-icon-hash</CapabilityId> <CapabilityId>accepts-client-identity-for-power-off</CapabilityId> <CapabilityId>session-sharing</CapabilityId> </ResponseCapabilities> </NFuseProtocol>

This simple script lays a nice foundation to perform XML broker health checks via PoSH. I then took the script a little bit further to test some other XML requests:

param($server, $port)
if ($port){$port = 80}
$creds = Get-Credential
$domainuser= $creds.UserName.Split('\')
$domain = $domainuser[0]
$user = $domainuser[1]
[String]$pw = [Runtime.InteropServices.Marshal]::PtrToStringAuto([Runtime.InteropServices.Marshal]::SecureStringToBSTR($creds.Password))
$nwINFO = Get-WmiObject -ComputerName $env:COMPUTERNAME Win32_NetworkAdapterConfiguration | Where-Object { $_.IPAddress -ne $null }
$ip = $nwINFO.IPAddress
$fqdn = $nwINFO.DNSHostName
$xmlcreds = '<Credentials><UserName>' + $user + '</UserName><Password encoding="cleartext">' + $pw + '</Password><Domain Type="NT">' + $domain + '</Domain></Credentials>'
$envelope = '<?xml version="1.0" encoding="utf-8"?><!DOCTYPE NFuseProtocol SYSTEM "NFuse.dtd"><NFuseProtocol version="5.1">'
$clienttype = '<ClientType>ica30</ClientType>'
$clientdetails = '<ClientName>' + $env:COMPUTERNAME + '</ClientName><ClientAddress addresstype="dot">' + $ip[0] + '</ClientAddress>'
function request ($parameters)
{
 $http_request = New-Object -ComObject Msxml2.XMLHTTP
 $http_request.open('POST', $url, $false)
 $http_request.setRequestHeader("Content-type", "text/xml")
 $http_request.setRequestHeader("Content-length", $parameters.Length)
 $http_request.setRequestHeader("Connection", "close")
 $http_request.send($parameters)
 $http_request.statusText
 $http_request.responseText
}
$url = "http://" + $server + ":" + $port + "/scripts/wpnbr.dll"
$capabilities = request ($envelope + '<RequestCapabilities></RequestCapabilities></NFuseProtocol>')
if (!$capabilities[1].contains('error'))
{
 $testcreds = request ($envelope + '<RequestValidateCredentials>' + $xmlcreds + '</RequestValidateCredentials></NFuseProtocol>')
 if (!$testcreds[1].contains('bad'))
 {
 $appdatareq = request ($envelope + '<RequestAppData><Scope traverse="subtree"></Scope><DesiredDetails>rade-offline-mode</DesiredDetails><ServerType>all</ServerType>' + $clienttype + '<ClientType>content</ClientType>' + $xmlcreds + $clientdetails + '</RequestAppData></NFuseProtocol>')
 $app = $appdatareq[1] -split "<FName>"
 $app = $app[1] -split "</FName>"
 $launchreq = request ($envelope + '<RequestAddress><Name><AppName>' + $app[0] + '</AppName></Name>' + $clientdetails + '<ServerAddress addresstype="dns-port"></ServerAddress>' + $xmlcreds + $clienttype + '</RequestAddress></NFuseProtocol>')
 $launchreq
 }
}

This script takes the server and port, prompts for the credentials that you’re testing (password is sent in clear text), and sends a RequestCapabilities request, followed by RequestValidateCredentials, RequestAppData, and RequestAddress requests. To avoid dependencies on NFuse.dtd, I used a -split on the XML results of the RequestAppData results to get the ‘friendly name’ of the first application returned by RequestAppData, which I used for the RequestAddress post.

From here I’m going to develop a C# service that can monitor the XML service, though I’d like to figure out how to encode the password into the ‘ctx1’ format so that I’m not sending it in clear text.

Citrix ‘Local App Access’ Explained

I wanted to share some details on this feature that was introduced in XenApp 6.5 that I don’t think many people are aware of, even though the changes that were introduced to support it affect anyone using Reciever 3.X, XenDesktop 5.5+, and XenApp 6.5. In this post I’m going to attempt to explain the basic functionality that ‘Local App Access’ (LAA) provides, and the basics of how it works.

If any of you are familiar with RES software, they’ve been providing a platform agnostic ‘Reverse Seamless’ functionality for some time via their Virtual Desktop Extender product. Here’s a short video that gives you a good idea of what the challenges reverse seamless aims to solve:

As you can see, the purpose of a ‘reverse seamless’ window is to give users the ability to run local application windows within a remote desktop session. In XenApp 6.5 and XenDesktop 5.5+, this functionality is built-in by way of processes running on the client (redirector.exe) AND server (revseamlesslauncher.exe & vdaredirector.exe) that enumerate, launch, and handle local windows within a published desktop session.

The easiest way to see this functionality in action is to follow the steps listed in the Quick Start Guide for Local App Access and Integrating Local User Applications in XenApp 6.5. The gist of it is that published desktops that are presented using the Citrix ‘Desktop Viewer’, can be ‘Local App Access’ enabled by setting an ICA parameter, and allowing the virtual channel on the client side, which is disabled by default.

Once everything is configured and the ‘Local App’ shortcut is available on the desktop, you should be able to double click the LAA application to run it seamlessly within the published desktop session. The reason that the ‘Desktop Viewer’ is required is that it’s responsible for managing the Z-order of the LAA app within the seamless published desktop window.

The way that Citrix is able to present ‘reverse seamless’ windows is not that different from how they present regular ‘seamless’ windows, which is by injecting API hooks into all client side processes, which allows them to inject the necessary identifiers for Desktop Viewer to be able to detect and handle the window within the ICA session.

Another major feature included with LAA is the ability to redirect URLs to the local internet browser which is automatically launched as a reverse seamless window by way of an IE browser helper object that’s installed on both the client and server. This is useful for instances where a local browser can overcome challenges of screen painting, such as rich media that can’t otherwise be redirected, or security/location nuances that require the browser to be running on the client endpoint device.

I hope this brief rundown of LAA was useful, definitely let me know if you have any trouble getting it to work in your environment.