Citrix Receiver for Windows 4.0.1 – Goodbye unnecessary logon prompts!

For those of you out there who are delivering XenApp/XenDesktop through StoreFront, you should definitely make sure to update your Receiver for Windows 4 clients to the latest 4.0.1 hotfix. While this update only contains one fix, it solves a very visible, miserable, and annoying problem.

If you’ve ever connected to a StoreFront Store via Receiver 4.0 through a remote site, you’ve probably seen this window pop up every 10 minutes or so:

Image

Receiver 4.0.1 addresses this very annoying behavior by only prompting for credentials after the expiration timeout period if and when a resource is launched through Receiver.

I’m sure many of you already knew about this fix, but I thought I’d help to spread the word in hopes of sparing others from this frustration on Receiver 4.0 RTM.

SiteDiag v1.2 for XD7

I think I’ve gotten SiteDiag working pretty well for XD7 now, and feel comfortable to share it as a stable release. I also did some basic testing on XD5, and there doesn’t appear to be any noticeable regressions. As of version 1.2 (10/2/13) I added application icons into the tool using the Get-BrokerIcon cmdlet to convert the Base64 strings to images in the TreeView.

I’ll continue working to build out the functionality of the tool on XD7, so stay tuned for updates as progress is made.

Click here to download the latest stable build.

SiteDiagXD7

XenDesktop 7 Service Instances – What’s New?

Since XenDesktop 7 was built using the same service framework architecture as XenDesktop 5 (aka the ‘FlexCast Management Architecture’), the additional functionality introduced in XD7 was added as services, each with multiple service instances. These services are handled much in the same way as XenDesktop 5, and XenDesktop 7 sites use version 2 of the Citrix.Broker.Admin PowerShell SDK to return information on registered service instances using the cmdlets of the same name as XD5 (Get-ConfigRegisteredServiceInstance, Register-ConfigServiceInstance, etc.).

In XenDesktop 5, each DDC in a site has 5 services, with 12 total service instances that correspond to the various WCF endpoints used by each service. If the DDC is also running the Citrix License Server, there would be a total of 13 instances. For this reason, it’s a fairly straightforward process to find and register missing service instances.

XenDesktop 7 is quite different in this regard. Since it has optional FMA services, such as StoreFront, the number of service instances in any given site depends on which components are installed, and whether or not SSL-is in use.

For example, my single-DDC site running StoreFront 2.0 with SSL encryption has 10 services with 43 total service instances:

XenDesktop 7 Services

If StoreFront wasn’t installed, for example, there would be at least three less services (some of the Broker services would likely not be registered). There are also duplicate service instances for SSL encrypted services, such as the virtual STA service. Here’s a quick PoSH script to tell you what service instances are registered in your site (for XD5 & XD7):

asnp citrix.Broker*
Get-ConfigRegisteredServiceInstance -AdminAddress na-xd-01 | %{ 
"ServiceType: " + $_.ServiceType + " Address: " + $_.Address; $count++}
"Total Instances: " + $count

You could take this a step further to see how many instances are in each of the 10 possible service types:

New-Alias grsi Get-ConfigRegisteredserviceInstance
 $acct = grsi -AdminAddress na-xd-01 -serviceType Acct; "$($acct.Count) ADIdentity service instances"
 $admin = grsi -serviceType Admin ; "$($admin.count) Delegated Admin service instances"
 $broker = grsi -serviceType Broker; "$($broker.count) Broker service instances"
 $config = grsi -serviceType Config; "$($config.count) Configuration service instances"
 $envtest = grsi -serviceType EnvTest; "$($envtest.count) Environment Test service instances"
 $hyp = grsi -serviceType Hyp; "$($hyp.count) Hosting Unit service instances"
 $log = grsi -serviceType Log; "$($log.count) Configuration Logging service instances"
 $monitor = grsi -serviceType Monitor; "$($monitor.count) Monitor service instances"
 $prov = grsi -serviceType Prov; "$($prov.count) Machine Creation service instances"
 $sf = grsi -serviceType Sf; "$($sf.count) StoreFront service instances"
 "$($acct.Count + $admin.Count + $broker.Count + $config.Count + $envtest.Count + $hyp.Count + $log.Count + $monitor.Count + $prov.Count + $sf.Count) Total service instances"
XenDesktop 7 Service Instance Count

XenDesktop 7 Service Instance Count

Because of this nuance, I’m working on a more intelligent way of enumerating and validating service instance registrations in SiteDiag for XD7. Hopefully these scripts are helpful in illustrating the difference between XD5 & XD7. Also, here’s the latest nightly build of SiteDiag that has the beginnings of the additional logic needed to properly count, and fix, registered service instances in a XenDesktop 7 site.

XenDesktop 7 – Environment Test Service

If you’ve had a chance to review the XenDesktop 7 PowerShell SDK documentation, you might have noticed a few new snap-ins that provide the site interactions for the new services included with XenDesktop 7 (as part of the FlexCast Management Architecture). These new snapins are the designated as V1 on the cmdlet help site, and include StoreFront, Delegated Admin, Configuration Logging, Environment Tests, and Monitoring.

Out of these new services, the Environment Test Service sounds the most appealing to me, as it provides a framework to run pre-defined tests and test suites against a XenDesktop 7 site. However, I found that the SDK documentation didn’t provide much/any guidance on using this snap-in, so I thought I’d share a quick rundown on the meat of this new service, along with some sample scripts using the main cmdlets.

The most basic function of this service is to run predefined tests against various site components, configurations, and workflows. As of XD7 RTM, there are 201 individual TestID’s, which can be returned by running the Get-EnvTestDefinition cmdlet:

TestId 
------ 
Host_CdfEnabled 
Host_FileBasedLogging 
Host_DatabaseCanBeReached 
Host_DatabaseVersionIsRequiredVersion 
Host_XdusPresentInDatabase 
Host_RecentDatabaseBackup 
Host_SchemaNotModified 
Host_SnapshotIsolationState 
Host_SqlServerVersion 
Host_FirewallPortsOpen 
Host_UrlAclsCorrect 
Host_CheckBootstrapState 
Host_ValidateStoredCsServiceInstances 
Host_RegisteredWithConfigurationService 
Host_CoreServiceConnectivity 
Host_PeersConnectivity 
Host_Host_Connection_HypervisorConnected 
Host_Host_Connection_MaintenanceMode...

The tests are broken down into several functional groups that align with the various broker services, including Host, Configuration, MachineCreation, etc, and are named as such. For example, the test to verify that the site database can be connected to by the Configuration service is called Configuration_DatabaseCanBeReached.

Each test has a description of it’s function, and a test scope that dictates what type of object(s) can be tested. Tests can be executed against components and objects in the site according to the TestScope and/or TargetObjectType, and are executed by the service Synchronously or Aynchronously, depending on their InteractionModel. You can view all of the details about a test by passing the TestID to the Get-EnvTestDefinition cmdlet; for example:

PS C:> Get-EnvTestDefinition -TestId Configuration_DatabaseCanBeReached

Description : Test the connection details can be used to 
 connect successfully to the database.
DisplayName : Test the database can be reached.
InteractionModel : Synchronous
TargetObjectType : 
TestId : Configuration_DatabaseCanBeReached
TestScope : ServiceInstance
TestSuiteIds : {Infrastructure}

TestSuites are groups of tests executed in succession to validate groups of component, as well as their interactions and workflows. The Get-EnvTestSuite cmdlet returns a list of test suite definitions, and can be used to find out what tests a suite is comprised of. To get a list of TestSuiteIDs, for example, you can run a Get-EnvTestSuite | Select TestSuiteID, which returns all of the available test suites:

TestSuiteId 
----------- 
Infrastructure 
DesktopGroup 
Catalog 
HypervisorConnection 
HostingUnit 
MachineCreation_ProvisioningScheme_Basic 
MachineCreation_ProvisioningScheme_Collaboration 
MachineCreation_Availability 
MachineCreation_Identity_State 
MachineCreation_VirtualMachine_State 
ADIdentity_IdentityPool_Basic 
ADIdentity_IdentityPool_Provisioning 
ADIdentity_WhatIf 
ADIdentity_Identity_Available 
ADIdentity_Identity_State

Each of these suites can be queried using the same cmdlet, and passing the -TestSuiteID of the suite in question. Let’s take DesktopGroup as an example:

PS C:\> Get-EnvTestSuiteDefinition -TestSuiteId DesktopGroup

TestSuiteId         Tests 
-----------                  ----- 
DesktopGroup   Check hypervisor connection, Check connection maintenance mode, Ch...

One thing you’ll notice with the results of this cmdlet is that the list of tests are truncated, which is a result of the default stdout formatting in the PowerShell console. For that reason, my preferred method of looking at objects with large strings (ie descriptions) in PowerShell, is to view them in a graphical ISE (PowerGUI is my preference) and explore the objects in the ‘Variables’ pane.

For example, if you store the results of  Get-EnvTestSuiteDefinition -TestSuiteId DesktopGroup into a variable ($dgtest) in PowerGUI, each Test object that comprises the test suite can be inspected individually:

The DesktopGroup EnvTestSuite object

The DesktopGroup EnvTestSuite object

To start a test task, use the Start-EnvTestTask, passing the TestID or, alternatively, the TestSuiteID, and a target object (as needed). For example:

PS C:> Start-EnvTestTask -TestId Configuration_DatabaseCanBeReached

Active : False
ActiveElapsedTime : 11
CompletedTests : 1
CompletedWorkItems : 11
CurrentOperation : 
DateFinished : 9/16/2013 11:33:31 PM
DateStarted : 9/16/2013 11:33:20 PM
DiscoverRelatedObjects : True
DiscoveredObjects : {}
ExtendedProperties : {}
Host : 
LastUpdateTime : 9/16/2013 11:33:31 PM
Metadata : {}
MetadataMap : {}
Status : Finished
TaskExpectedCompletion : 
TaskId : 03f5480d-68e8-410a-9da4-5e65d96ac393
TaskProgress : 100
TerminatingError : 
TestIds : {Configuration_DatabaseCanBeReached}
TestResults : {Configuration_DatabaseCanBeReached}
TestSuiteIds : {}
TotalPendingTests : 1
TotalPendingWorkItems : 11
Type : EnvironmentTestRun

Once you know what tests there are, what they do, and what types of results to expect, health check scripts can easily be created using this service. Combinations of tests and test suites can, and should, be leveraged as needed to systematically validate XenDesktop 7 site components and functionality.

I plan on using these cmdlets to some extent in SiteDiag, and expect to get some good use out of this new service in the field. I’m interested to hear from anyone else who’s started using this snap-in, and if they’ve come up with any useful scripts.

NetScaler Gateway VPX v10.1 with StoreFront v2.0 – Encrypt and Theme!

I just finished up on a XenApp 6.5 upgrade where I replaced a single 2008R2 server running a DMZ’d CSG v3.2 SSL-proxied Citrix Web Interface v5.3 ‘Direct’ site with a NetScaler Gateway 10.1 Access Gateway virtual server and a StoreFront v2.0 Store.

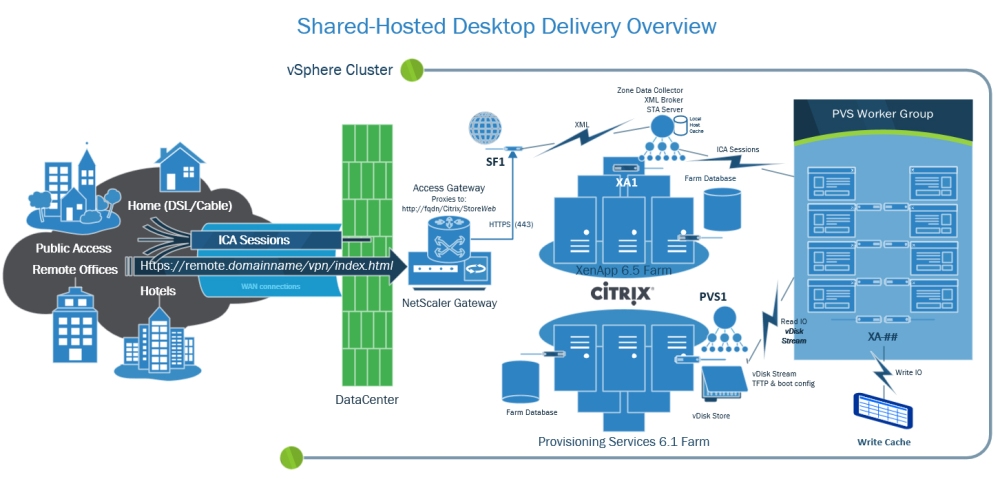
This post is meant to share some tips on setting up and customizing a Citrix Receiver <> NetScaler Gateway <> StoreFront deployment. Before I get into the thick of it, I thought I’d share the following high-level topology of the environment I was working with:

XenApp65_SharedHostedDesktopDelivery

This scenario consists of WAN-connected Citrix Receivers accessing the XenApp farm via a NetScaler Gateway Access Gateway VPN fronted StoreFront Store. The NetScaler Gateway Access Gateway virtual server provides AD-auth via an LDAP Authentication policy, and replaces the SSL-Proxied ICA & HTTP traffic that the Secure Gateway server previously handled (EOL’d since ‘06!, yet running on Win2008R2??). The NG-AG virtual server also acts as the landing page for web browsers, and as such has it’s own visual style that can (and SHOULD) be customized. Receiver connections are passed through to the Store virtual directory, and all other connections (web browsers) are directed to the StoreWeb virtual directory.

One major consideration I found in this topology is that if your StoreFront ‘Store’ is not SSL-encyrpted, Citrix Receiver for Windows 3.1 and later will not work without tweaking a few client-side registry values (see CTX134341), even though the NetScaler Gateway session is encrypted. That said, a resultant consideration of securing the StoreFront site is that you need to be sure that the NetScaler trusts the StoreFront server’s SSL certificate.

To do this you need to install any of the StoreFront server’s certificate chain certs on the NetScaler (here’s a good Citrix blog on the topic) and make sure the Access Gateway session policy profile’s ‘Web Interface Address’ uses the same name that the StoreFront server’s certificate was issued to, and that the NetScaler can resolve the name via DNS. The other pieces of getting this setup working are pretty easy, thanks mostly in part to the foolproof NetScaler Gateway setup wizard (eDocs link), and StoreFront’s ‘Add NetScaler Gateway Appliance’ wizard (eDocs). As long as your SSL is working properly, this is a fairly painless install.

Once I got the site up and running, I immediately wanted to customize the NetScaler Gateway VPN web interface to make it look like the StoreWeb site that browser users are redirected to. Out of the box, the NG-AG site is themed with the old (boring) CAG visual style, which is themed to look like the old WI 5.0-5.3 black & blue sites. Since this page is proxying and for the StoreFront site, is makes for a very awkward, time-machinish, experience to login to the black and blue site, and land in StoreFront’s newer green bubble land!

I didn’t look hard to find Jeff Sani’s blog article that I’ve referenced many times before, which provides step-by-step instructions on applying the StoreFront look and feel to a NetScaler’s Access Gateway. After running through this, I decided to change the the logo and background, and referenced Terry D’s blog on customizing a StoreFront site by way of custom CSS. I used WinSCP and PuTTY to make the changes, and pretty quickly had a nice looking landing page to front the StoreFront Store:

CustomLandingPage

I then did the same on the StoreFront server using NotePad++, and was able to give the customer a customized and consistent look and by adding the following custom.style.css to the c:\inetpub\wwwroot\Citrix\StoreWeb\contrib folder of the StoreFront server:

body { background-image: url("custom.jpg");
  background-color: #262638;}
#credentialupdate-logonimage, #logonbox-logoimage 
{ background-image: url("custom.png");
  width: 180px;
  height: 101px;
  right: 63%;}
#.myapps-name 
{ font-weight: bold; color: #000; }

CustomStoreFrontWeb

Well, that’s about all the time I have for today. I hope someone finds this post helpful in producing a functional, and visually consistent, NetScaler Gateway fronted StoreFront deployment!

Exploring ShareFile’s ‘StorageZones’ Services

I was looking for more information on what makes a ShareFile StorageZone ‘tick’, and couldn’t find much that got into the nuts and bolts of this great feature. This post is intended to share some general information about the various StorageZones controller services, including their basic functionality, and some hidden configuration settings.

For the scope of this post, I’m going to focus on the three Windows services that are installed as part of a StorageZone v2.1 Controller. Each service is installed off the root of the IIS site as follows:

  • File Cleanup Service – Citrix\StorageCenter\SCFileCleanSvc\FileDeleteService.exe
  • File Copy Service – Citrix\StorageCenter\SCFileCopySvc\FileCopyService.exe
  • Management Service – Citrix\StorageCenter\s3uploader\S3UploaderService.exe

In each of these directories are the service’s .NET .config file, which can be modified to enable logging, and adjust hidden configuration settings. For example, if you open FileDeleteService.exe.config, you’ll see the following XML by default:

<?xml version="1.0"?>
<configuration>
   <appSettings>
       <add key="ProducerTimer" value="24"/> <!--Time interval in hours-->
       <add key="DeleteTimer" value="24"/> <!--Time interval in hours-->
       <add key="DeleteTimer" value="24"/> <!--Time interval in hours-->
       <add key="Period" value="7"/> <!--No. of days to keep data blob in active storage after deletion-->
       <add key="logFile" value="C:\inetpub\wwwroot\Citrix\StorageCenter\SC\logs\delete_YYYYMM.log"/>
       <add key="enable-extended-logging" value="0"/>
       <add key="BatchSize" value="5000"/></appSettings>
<startup><supportedRuntime version="v4.0" sku=".NETFramework,Version=v4.0"/></startup></configuration>

As you might have guessed, setting enable-extended-logging  to 1 will enable verbose logging after the service is restarted, writing to the specified logFile path. This setting is the same for the other services, and can come in handy when troubleshooting issues with a StorageZone.

In order to really understand what these services were doing, I decided to poke through the source code by decompiling the services’ assemblies using a free utility called DotPeek. Here’s a summary of what I found for each service’s functionality within a StorageZone Controller.

File Cleanup Service (FileDeleteService)

The name says it all here, as this service’s sole responsibility is managing data deletion from the storagezone storage repository. Since all of the data stored by ShareFile is in BLOB format, deleting a file through the ShareFile front-end doesn’t actually delete it from the storage; it simply ‘de-references’ the data, and marks it as ‘expired’.

This ‘expired’ data will remain in the storage repository until it’s ‘cleaned up’ by the File Cleanup Service. This is why if you look at a folder’s recycle bin, you’ll see the files are still listed and available for recovery until the configurable cleanup period lapses (7 days by default).

Citrix recommends configuring this cleanup period to match the backup schedule of your storage device so that data is removed shortly before or after they’re backed up. This design also allows for data to be recovered even if it’s not in the recycle bin, by using the “Recover Files” function in the StorageZone section of ShareFile’s Admin page.

Here are the .config extended settings for this service, along with their default values:

  • ProducerTimer = 24 Time interval in hours 
  • DeleteTimer = 24  Time interval in hours
  • Period = 7 Number of days to keep data in active storage after deletion

File Copy Service (SCFileCopySvc)

This service is what allows the StorageZones controller to communicate with ShareFile’s cloud infrastructure (by way of the ShareFile API), and allows users to upload and download files directly to and from a customer’s on-premise storage.

When a file is uploaded, ShareFile’s servers connect to the controller through this service to initiate an HTTP(S) POST request, allowing the data to be stored directly to the StorageZone. The service also converts files to and from the ShareFile’s proprietary format, converting files to BLOB data for uploads, and converting BLOB data back to the original file for downloads.

The service also has a configurable timer value (the default is 10 seconds key=”CopyTimer” value=”10000″ ) that controls how often retries are attempted for jobs that previously failed due to connectivity issues.

Management Service (S3Uploader)

Last but not least, the poorly named Management Service, which only really ‘manages’ transferring files to and from Amazon’s S3 cloud storage service. This service uses Amazon’s AWS SDK for .NET to take care of the data transfer, and is what allows you to migrate data to and from ShareFile’s storage, and the StorageZone.

There are a couple of configurable settings for this service as well; here they are with their default values:

  • httpMethod = https Transport method; secure or non-secure
  • HeartBeat-Interval = 5 Interval in minutes
  • Recovery-Interval = 3600 Interval in seconds

Well, I hope this post is useful for anyone who is using, or planning on using, ShareFile’s StorageZones feature. Feel free to share any other insights or thoughts in the comments!