Checking ADC Settings via ADM

Since there seems to be a fair amount of interest in the ADM PowerShell module I shared, and because the recent release of the v19.4.0.34 (1904) of Citrix Workspace App uses a modern ‘Crypto Kit’ (see CTX250104) that requires ECDHE ciphers and ECC curve bindings, I thought I’d share a basic script that leverages ADM’s capabilities as an API proxy to check out NetScaler/ADC configurations.

Using the ADM.psm1 PowerShell module, the following script will generate a .csv list of every ADC in the ADM inventory’s Citrix Gateway vServer ECC curve bindings:

Param(
    [string]$ADMHost = "https://adm.domain.local",
    [string]$OutFile = ".\out.csv"
)
$RunningPath = Split-Path -parent $MyInvocation.MyCommand.Definition
Set-Location $RunningPath
Import-Module '.\ADM.psm1' -Force
$ADMSession = Connect-ADM $ADMHost (Get-Credential)
$Output = @()
foreach ($ADC in (Invoke-ADMNitro -ADMSession $ADMSession -OperationMethod GET -ResourceType ns).ns) 
{
    $vServers = (Invoke-ADMNitro -ADMSession $ADMSession -OperationMethod GET -ResourceType vpnvserver -ADCHost $ADC.ip_address).vpnvserver
    foreach ($vServer in $vServers)
    {
        $ECCBindings = (Invoke-ADMNitro -ADMSession $ADMSession -OperationMethod GET -ResourceType sslvserver_ecccurve_binding -ResourceName $vServer.name -ADCHost $ADC.ip_address).sslvserver_ecccurve_binding
        foreach ($Binding in $ECCBindings)
        {
            $ExportObject = New-Object PSCustomObject -Property @{
            'ADC Name' = $ADC.hostname
            'ECC Curve' = $Binding.ecccurvename
            'vServer' = $Binding.vservername 
            }
            $Output += $ExportObject
        }
    }    
}
$Output | Export-Csv $OutFile -NoTypeInformation
Invoke-Item $OutFile

If you were following along, and everything went well, your associated .csv viewer should show you the results:
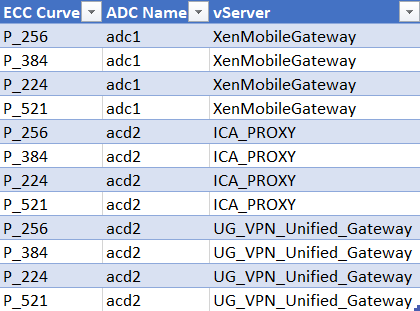
ecc_bindings

One of the great things about using ADM as an API proxy is that it takes care of organizing ADCs, which makes scripted interactions much more manageable, especially when you’re dealing with a global deployment of ADCs (i.e. ‘more than a few’).

Taking this further, if I wanted to only target a specific device group in the above query I could filter the ADC list by first getting the device_group object with name = “Group1”, which can be passed to Invoke-ADMNitro -Filters as a hashtable:

$Filter = @{
    name = "Group1"
}
$DeviceGroups = (Invoke-ADMNitro -ADMSession $ADMSession -OperationMethod GET -ResourceType device_group -Filters $Filter).device_group
foreach ($Device in $DeviceGroups.static_device_list_arr)
{	
    $vServers = (Invoke-ADMNitro -ADMSession $ADMSession -OperationMethod GET -ResourceType vpnvserver -ADCHost $Device).vpnvserver
    foreach ($vServer in $vServers)
    { ...

You can then use the array of device IP addresses, instead of all ADCs, to check against.

Similarly, you could do the same using by region or ‘Sites’ (e.g. Datacenters) if you’ve populated them in ADM, or using a wildcard match on the filter. If you’re ever unsure about what the ResourceName or filter should be, just open your F12 debug tools in Chrome and inspect the requests in the network tab:
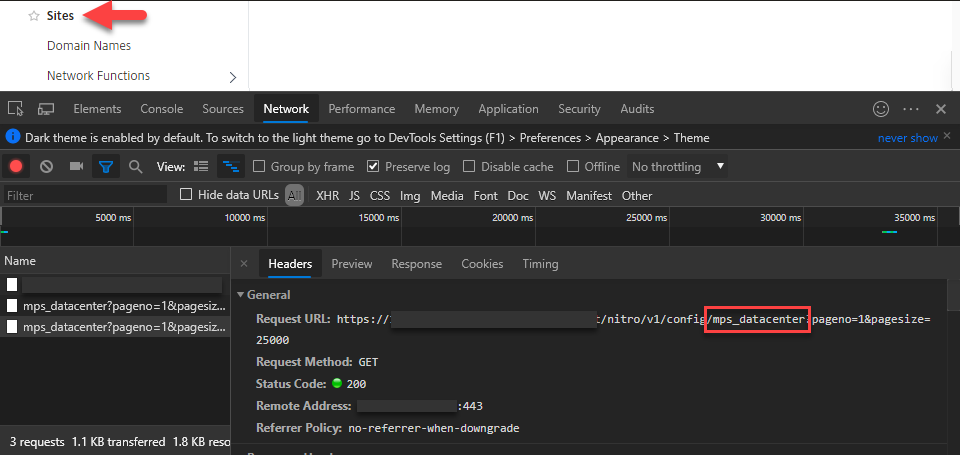
f12

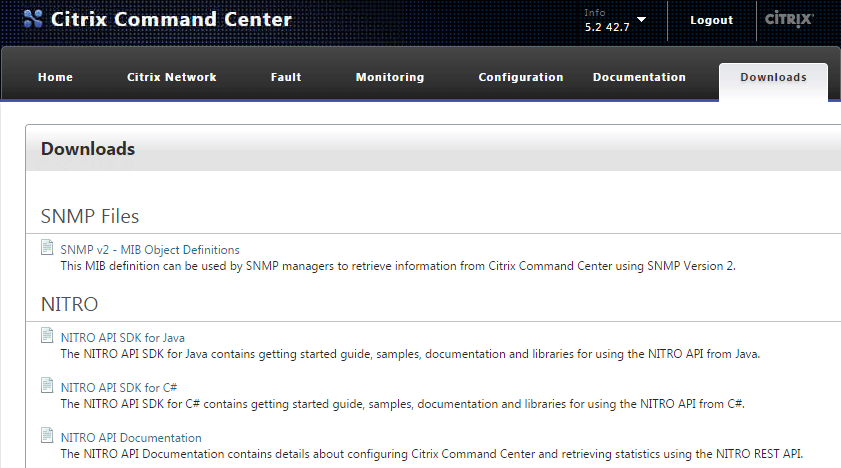
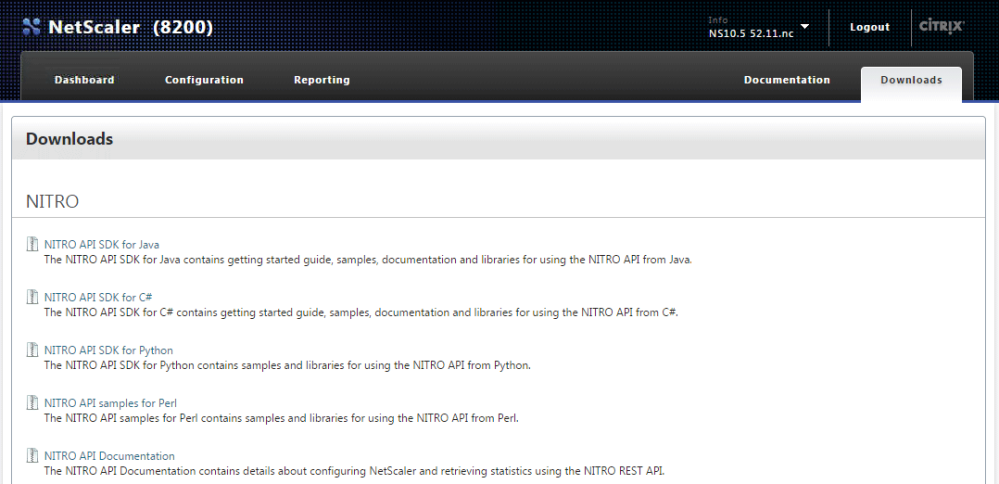
Similarly, you can always download the API docs and/or SDK from the ‘Downloads’ section in ADM, which I prefer to view the C# API SDK in DotPeek:
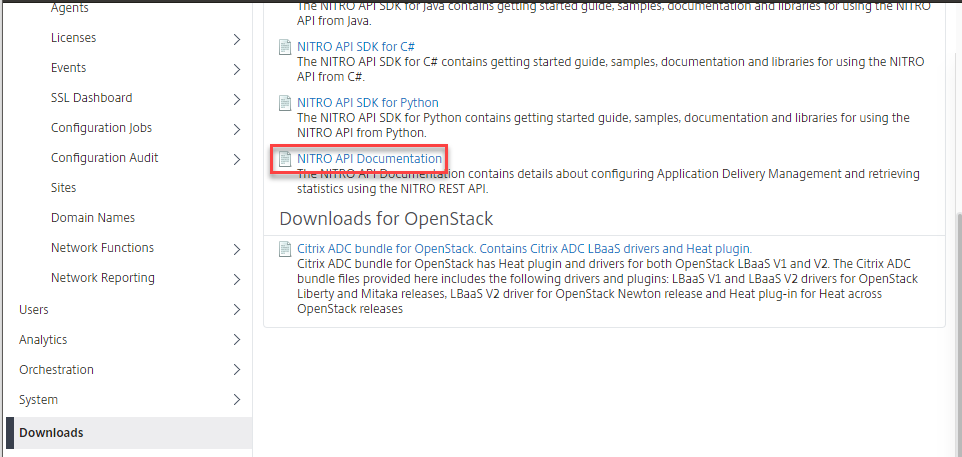
api_docs

Anyways, I’ll try to share other examples as I get time, but hopefully this was useful for someone out there!
PowerShell Module for Citrix ADM

I know it’s been a while since my last post, but I felt compelled to share a PowerShell module for Citrix ADM I wrote for interacting with Citrix Application Delivery Management appliances. The module uses Invoke-RestMethod to interface the Nitro REST APIs for ADM, and was inspired by the module that Citrix originally shared which was credited to Esther Barthel, and so thank you Esther for the foundation!

Basically, this module works much in the same was as the NetScaler version, and makes it easier to talk to an ADM and the ADCs that it manages by acting as an API Proxy to the ADCs. It also allows for advanced API operations such as uploading firmware, certificates, configuration jobs & templates, and pretty much anything else you can do in the GUI, for both ADM and ADCs.

Anyways, check out ADM.psm1 along with Sample.ps1 to get a feel for it (there’s also a readme), and hopefully this is helpful for others that manage ADMs and/or ADCs on a regular basis!

NetScaler Syntax Highlighting for Notepad++

This morning a colleague mentioned that it would be nice to have syntax highlighting for NetScaler configuration files in Notepad++,  so what better way to have one, then to make one!

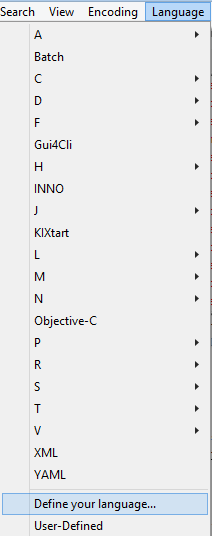
To use it save this .xml and load it in NPP by clicking ‘Language > Define your language…’:

Import User-Defined Language in Notepad++

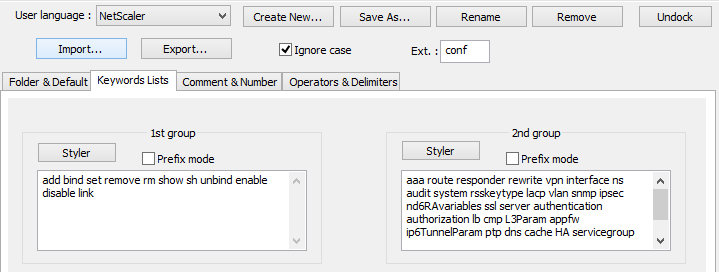
Then click ‘Import’ to load it up:

Import

Once loaded you should see most NetScaler syntax highlighted accordingly:

Sample Conf

Enjoy!

RDP-Proxy on NetScaler!

In case you weren’t paying attention (it was easy to miss) RDP-proxy is now available on the 10.5 enhancement branch! This feature appears to have been added as of the 10.5 51.1017.e.nc:

Users can connect with single sign-on to Remote Desktop (RDP) connections through NetScaler Gateway. [From Build 51.1017.e] [#422442]

That’s right, you can now configure NetScaler Gateway vServers to host RDP-proxy with CredSSP single-sign on. And it’s not all that difficult to set up; here’s the quick and dirty on doing so.

First, you’ll want to create your RDP profile under the NetScaler Gateway section in the GUI, or using the ‘add rdp profile’ command in the CLI:RDP Profile

RDP Profile CLI

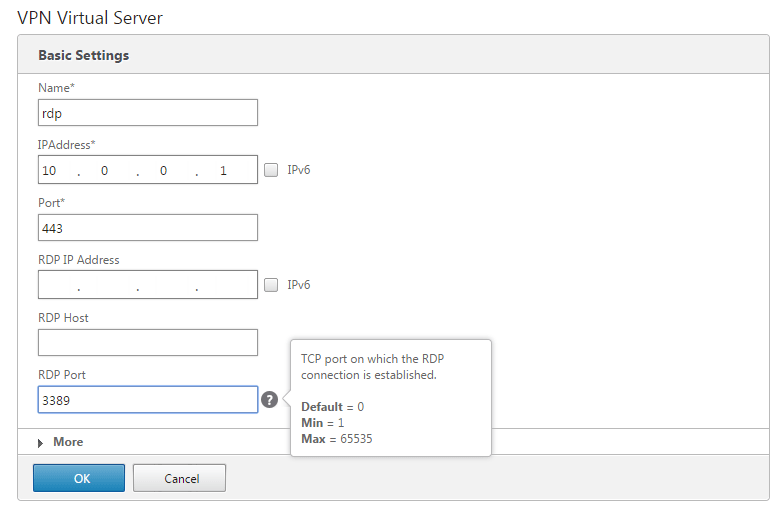
Assuming you can manage building a NetScaler Gateway vServer, there’s not much different here, you just need to specify the RDP IP (optional) and port:

rdp_proxy_vserver

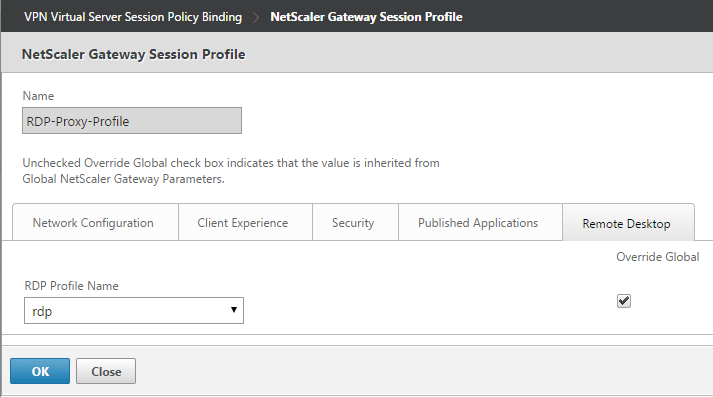
Next, specify the RDP profile in your NetScaler Gateway vServer’s session profile under the new ‘Remote Desktop’ tab:
RDP Session Profile


And that should take care of the configuration. Once configured you can launch RDP sessions by logging into the vServer and opening /rdpproxy/rdphostip:

rdp_launch

This will cause the NetScaler to generate a .rdp file that will look something like this:

redirectclipboard:i:0
redirectdrives:i:0
redirectprinters:i:1
keyboardhook:i:2
audiocapturemode:i:0
videoplaybackmode:i:1
negotiate security layer:i:1
enablecredsspsupport:i:1
authentication level:i:0
full address:s:rdp.desktopsandapps.com:3389
loadbalanceinfo:s:461346de68dd72323493ddd65585ae1b77bbdc1b1c61cafec567bcbbee5a9380

Notice the loadbalanceinfo parameter which is populated with a random string. This reference is used to validate the launch (a self-contained STA of sorts). Also, the enablecredsspsupport parameter instructs the NetScaler to attempt single sign-on to the target RDP host using CredSSP.

Well, that’s about all the time I have for now. Remember that this is in fact an ‘enhancement’ build, though it is now also included in the v11 main branch. Hopefully Citrix continues to improve this functionality as I’m sure they have customers everywhere who could benefit from native RDP-Proxy on the same ADC that’s serving up ICA-Proxy.. Enjoy!

Nitro C# APIs for Command Center – Scripting with PowerShell

In my previous post on the Nitro APIs for NetScaler I shared some PowerShell examples for interacting with a NetScaler using the Nitro C# API SDK in PowerShell. I wanted to share some similar tips and samples for scripting with the Command Center APIs, which has quite a few more gotchas than the NetScaler APIs (in my opinion :).

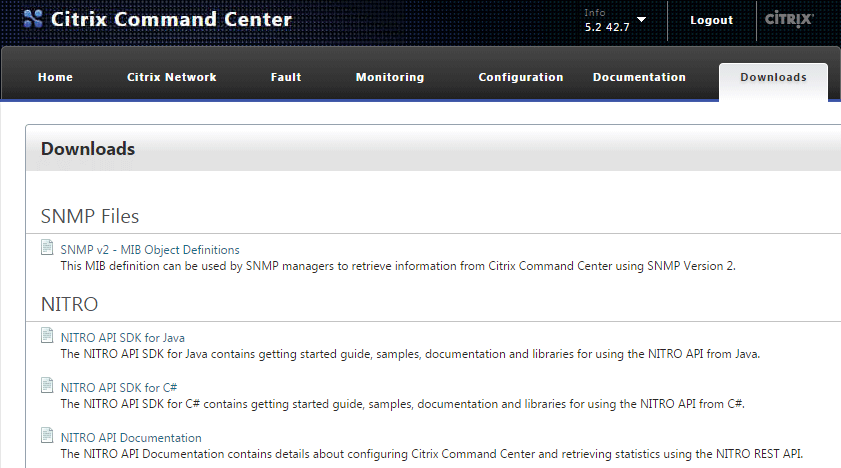
Loading the Command Center version of the Nitro C# framework in PowerShell is about the same as the NetScaler. Just like on the NetScaler, the needed assemblies can be found at the ‘Downloads’ section on the Command Center web console:

Command Center Downloads

Download and extract the tarball to your scripting environment’s working directory. Next, add the Command Center Nitro .NET framework into your runspace using the Add-Type cmdlet:

Add-Type -Path .\newtonsoft.json.dll
Add-Type -Path .\cmdctr_nitro.dll

The last requirement, which is not needed with the NetScaler APIs, is to copy ccapi.xml to your $HOME directory:

Copy-Item -Path .\ccapi.xml -Destination $HOME

If you don’t have this file in your $HOME directory you’ll get an exception when attempting to connect to the server. To do so, use com.citrix.cmdctr.nitro.service.nitro_service.login(UserName, Password):

$Credentials = Get-Credential
$nitrosession = new-object com.citrix.cmdctr.nitro.service.nitro_service($ccserver,8443,"https")
$nitrosession.login($Credentials.GetNetworkCredential().UserName, $Credentials.GetNetworkCredential().Password)

Once logged in the class heirarchy is very similar to the NetScaler APIs. Let’s look at a couple of examples of what you can do from here with some code snips along the way.

The primary reason that I wanted to write a script against Command Center was to run batches of tasks against a list of NetScalers and variables. In the script I took two such csv lists as parameters loop on each to execute the tasks sequentially against each NetScaler in the list.In this example I’ll show you how to run a custom task and passing values to populate the task’s ‘UserInput’ variables.

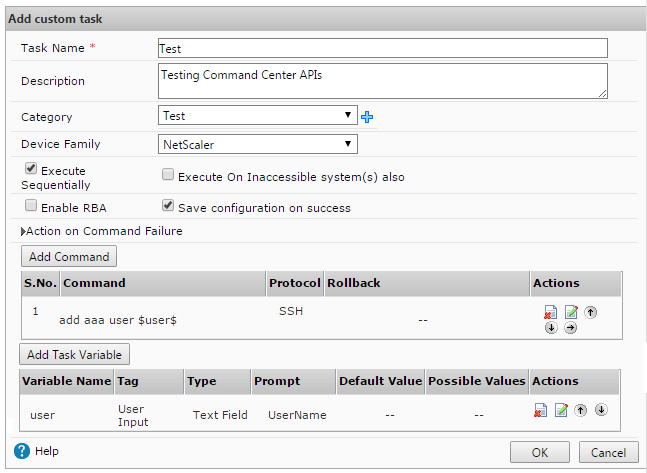
First, create a custom task in Command Center, in this example we’ll add a user that’s passed as a variable $user$:

Command Center Custom Task

In your PowerShell runspace load the following cmdctr.nitro.resource.configuration objects; ns_task_execution_data to get the task’s UserInput values, an ns_task of the task that will be executed, and a scheduler_data to specify how it should be execute:

$taskname = "Test"
$user = "User1"
$nsip = "10.0.0.1"
$task = New-Object com.citrix.cmdctr.nitro.resource.configuration.ns_task_execution_data
$taskdetails = [com.citrix.cmdctr.nitro.resource.configuration.ns_task]::get($nitrosession, $taskname)
$taskschedule = New-Object com.citrix.cmdctr.nitro.resource.configuration.scheduler_data
$taskschedule.recurr_type = "no_reccur"

From here we’ll need to put the user variable into the $task.user_input_props property. To do this you’ll need to build an explicit Dictionary[System.String,System.String] object:

$userinputprops = New-Object "System.Collections.Generic.Dictionary``2[System.String,System.String]"

Next, assign the user name variable taskdetails.task_variable_list[0].name dictionary entry. Note that the format is very specific here, most notably explicit single quotes around $UserInput$ to make sure the $’s stay in the string:

$userinputprops['$UserInput$' + $taskdetails.task_variable_list[0].name] = $user)

Since there’s only one variable in this task, we can set the $task.user_input_props property using ns_taskexecution_data.set_user_input_props(), but would otherwise do a for loop on the $taskdetails.task_variable[] array to assign multiple variables:

$task.set_user_input_props($userinputprops)

Now fill out a few other task properties, including the user who ran the job, an annotation notating the computer it was executed from, the target NetScaler IP to run the task against

$task.task_name = $taskdetails.name
$task.executed_by = ($Credentials.UserName).Split('\')[1]
$task.scheduler_data = $taskschedule
$task.annotation = "Nitro automated task executed from $($env:COMPUTERNAME)"
$task.device_list = $nsip

Then execute the task using the execute() method of the ns_task_execution_data class, passing the $task object as the second parameter:

$task = [com.citrix.cmdctr.nitro.resource.configuration.ns_task_execution_data]::execute($nitrosession,$cctask)

This will start the task in Command Center, which can then be monitored by calling get() in ns_task_status:

$taskstatus = [com.citrix.cmdctr.nitro.resource.configuration.ns_task_status]::get($nitrosession, ($cctask.execution_ids)[0])

You can then do a while/start-sleep loop on $taskstatus.status to find out what happened:

Do { $taskstatus = [com.citrix.cmdctr.nitro.resource.configuration.ns_task_status]::get($nitrosession, ($cctask.execution_ids)[0])
Start-Sleep -Seconds 1 }
While ($taskstatus.status -match "Progress" -or $taskstatus.status -match "Queued")

Once the task is complete, check the status of what happened:

if ($taskstatus.status -eq "Success")
{ Write-Host "$($cctask.task_name) completed on $nsip" }

As always it’s a lot easier to deal with a success than a failure, here’s wait it takes to see what command failed, and what the error was, if the task faced a conflicting config:

if ($taskstatus.status -eq "Failed")
{	
 $ccfilter = New-Object com.citrix.cmdctr.nitro.util.filtervalue
 $ccfilter.properties.Add("id",$taskstatus.taskexecution_id + "")
 $errorlog = [com.citrix.cmdctr.nitro.resource.configuration.command_log]::get_filtered($nit rosession,$ccfilter)
 $failedcmd = ($errorlog.output.Split("`n")[2] -replace "`n|`r").Split(':')[1]
 $failedmsg = ($errorlog.output.Split("`n")[3] -replace "`n|`r").Split(':')[1] 
 Write-Host "$($cctask.task_name) failed at '$failedcmd', the error was '$failedmsg'"	
}

I hope this example was useful and that you enjoyed a second Nitro boost for your Citrix scripting repertoire!

Nitro C# APIs for NetScaler – Scripting with PowerShell

Hello again! It’s been a while, I know, but I’m back with some fresh goodness that I hope you will enjoy. I want to give a quick shout out to Thomas Poppelgaard for encouraging me to share some new content, and in return I promised him that I’ll dust off SiteDiag in the near future 🙂 Since my last post I joined a financial services firm where I’ve been working on a global NetScaler deployment, so I’ve got lots of great insights about NetScaler and Command Center that I wanted to share.

During my involvement on the engineering side of a larger NetScaler deployment I came across several situations that warranted scripts for both NetScaler and Command Center. The primary driver behind these scripts was the automation of configuration deployment and management (comparing and setting configurations against lists of NetScalers). This post aims to cover the basics of using the C# Nitro APIs in PowerShell. I also hope to share similar tips on the Command Center APIs in a future post.

So, to get started scripting you’ll need to download and extract the Nitro API SDK for C# to the host where you plan to run the script. The download is hosted on the NetScaler itself under the ‘Downloads’ section (on the far right in 10.5):

NetScaler API SDK Downloads

NetScaler API SDK Downloads

Once you’ve extracted everything out you’ll have two DLLs that will need to be loaded into your PowerShell environment, newtonsoft.json.dll and nitro.dll. To ‘include’ these runtime libraries in your script, simply use the Add-Type cmdlet for each:

Add-Type -Path .\newtonsoft.json.dll
Add-Type -Path .\nitro.dll

Now that the runtime libraries are included you can directly call the Nitro objects using the com.citrix.netscaler.nitro namespace:

com.citrix.netscaler.nitro Namespace


The next step is to connect to the NetScaler by creating com.citrix.netscaler.nitro.service.nitro_service object and calling the login() method, which looks like this in PowerShell:

$Credentials = Get-Credential #prompt for credentials
$nitrosession = New-Object com.citrix.netscaler.nitro.service.nitro_service("netscaler.fqdn",'HTTPS') 
$nitrosession.login($Credentials.GetNetworkCredential().UserName, $Credentials.GetNetworkCredential().Password)

And this is where the ‘fun’ starts. Referencing the Nitro API Documentation, you can explore all of the classes and methods that are now at your disposal, including every imaginable configuration and statistic.

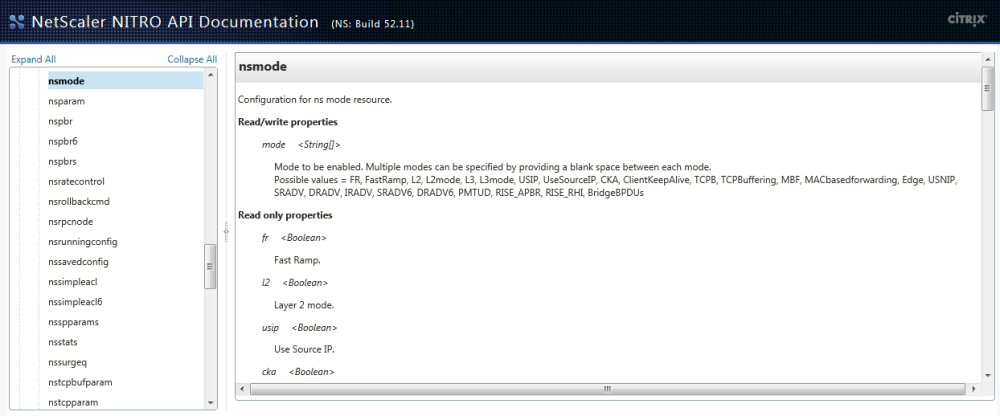
Let’s take an example of checking the status of modes, which is handled by the com.citrix.netscaler.nitro.resource.config.ns.nsmode class:

com.citrix.netscaler.nitro.resource.config.ns.nsmode


Say you wanted to get all of the modes that are currently set on a NetScaler, you’d simply call the get() method, passing the $nitrosession object as the only argument:

[com.citrix.netscaler.nitro.resource.config.ns.nsmode]::get($nitrosession)

mode : {FR, L3, MBF, Edge...}
fr : True
l2 : False
usip : False
cka : False
tcpb : False
mbf : True
edge : True
usnip : True
l3 : True
pmtud : True
sradv : False
dradv : False
iradv : False
sradv6 : False
dradv6 : False
bridgebpdus : False

This command uses the nitro_service object as the connection reference for the nsmode.get() method, pretty straightforward.

Now, say you wanted to change one of the modes, L2 in this example, and this is where it can get a little tricky. First, you’ll need to store nsmode in a PowerShell object using the same get() method above:

$nsmode = [com.citrix.netscaler.nitro.resource.config.ns.nsmode]::get($nitrosession)

Then you’ll need to build an array of modes that you want to enable, including any that are already enabled, to pass to the enable() method (there’s probably an easier way to do this than the below snippet, but hey, it works!):

$modes = @(); foreach ($mode in $nsmode.mode){$modes += $mode}; $modes += "L2"

This will give you an array ($modes) that contains all of the modes that you want to enable, plus the modes that were already enabled. You’ll then need to use the nsmode.set_mode() method to set the modes that should be passed to the enable() method:

$nsmode.set_mode($modes)

And the moment of truth, passing the modified $nsmode object to the enable() method:

[com.citrix.netscaler.nitro.resource.config.ns.nsmode]::enable($nitrosession, $nsmode)
errorcode  message sessionid severity 
---------  ------- --------- -------- 
0         Done              NONE

Let’s explore another example that involves a rewrite policy and action set, which can quickly become a web of interconnecting classes and methods.

First, let’s put all of the rewrite policies into an object:

$rewritepolicies = [com.citrix.netscaler.nitro.resource.config.rewrite.rewritepolicy]::get($nitrosession)

Which will give you a collection of rewrite policy objects in the following format:

__count : 
name : ns_cvpn_sp_js_vgp_pol
rule : http.req.url.path.endswith("ViewGroupPermissions.aspx") && http.req.method.eq(POST) && http.res.body(10).contains("0|/")
action : ns_cvpn_sp_ct_rw_act
undefaction : 
comment : 
logaction : 
newname : 
hits : 0
undefhits : 0
description : 
isdefault : True
builtin :

From here, you can call other methods for the rewrite class by referencing the object that you’re interested in. For example, to get a list of bindings for ns_cvpn_default_bypass_url_pol, which is the first policy returned on a NetScaler, you would reference $rewritepolicies[0].name when using the rewritepolicy_binding.get() method:

[com.citrix.netscaler.nitro.resource.config.rewrite.rewritepolicy_binding]::get($nitrosession, $rewritepolicies[0].name)

Similarly, you can get a rewrite action by referencing the rewrite policy’s action property:

[com.citrix.netscaler.nitro.resource.config.rewrite.rewriteaction]::get($nitrosession,$rewritepolicies[0].action)

I’ll stop here for the sake of time and complexity, as there are so many ways that you can go with this foundation. I highly recommend using a tool like PowerGUI so that you can see the classes as you type, and explore the various objects and methods at your disposal.

Anyways, I hope this all makes enough sense for someone to start scripting for NetScalers in PowerShell, and will try to post a similar article on the Command Center APIs soon.

XenDesktop 7 Session Launch – Part 1, Authentication

The process of enumerating, brokering, and connecting to a XenDesktop resource involves quite a few moving parts, and can be a daunting task to troubleshoot for someone who isn’t familiar with the product. There are several key components involved in the session launch process including authentication, enumeration, registration, ticketing, and display/session handling.

In this post I’d like to briefly explain how the Citrix Receiver authenticates to a XenDesktop 7 application or desktop. To keep it simple, I’m only going to talk about StoreFront (no WI) and XenDesktop (no XenApp/IMA). So just Receiver <> StoreFront <> XenDesktop.

The first step to launching a XenDesktop session is to authenticate to the StoreFront Store that the XenDesktop resource is connected to. In this step, a user connects to the StoreFront server and:

  1. Authenticates to a StoreFront virtual directory via Citrix Receiver:
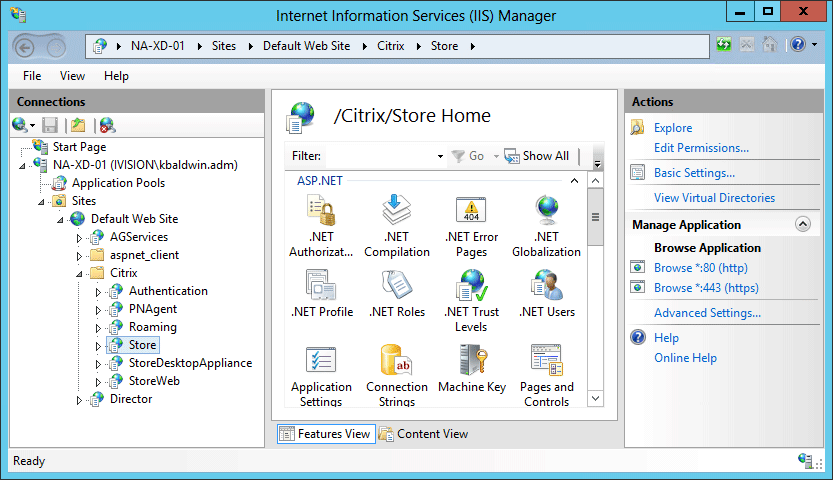
    • The Receiver is connecting to a StoreFront Store, StoreWeb, StoreDesktopAppliance, or PNAgent IIS virtual directory. IIS allows anonymous authentication since the StoreFront .NET services (Citrix.Storefront.exe & Citrix.StoreFront.PrivilegedService.exe) handle authentication:

storefront-IIS

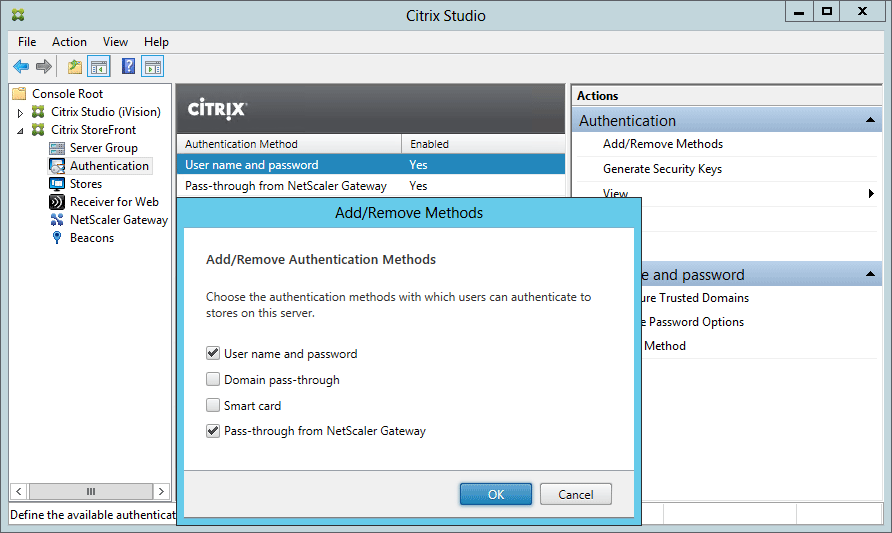
    • To configure a StoreFront server’s authentication methods, use the Citrix Studio MMC to open the Authentication TreeNode of the Citrix StoreFront deployment. Here you can specify which authentication methods to allow on Stores hosted by that server:

storefront-authmethods

    • There are four authentication methods available as of StoreFront 2.0:
      • User name and password: Similar to windows basic auth in IIS, or explicit authentication in Citrix Web Interface Server.Prompts the user to enter their credentials at logon.
        • In this scenario, the broker passes the user’s credentials to the target ICA server on behalf of the client
      • Domain Pass-through: Similar to Integrated Authentication in IIS, and
        • Allows Receiver for Windows endpoints automatically log on using the local session’s logged on user domain account (via NTLM)
        • In this scenario, the client sends credentials (via ssonsvr.exe) directly to the target ICA server
        • For pass-through authentication to work, you must use the /includesson switch when installing Receiver (per CTX133982), which tells the meta-installer to include the ‘SSON’ component (ssonsvr.exe) that is needed to capture the user’s domain credentials at logon. Receiver relies on the SSON component to send the user’s domain credentials to the StoreFront server’s StoreWeb (via browser), Store (via Receiver), or legacy PNAgent (via Online Plugin / Receiver Enterprise) virtual directory.
          • There is currently a bug with XenDesktop 7 published desktops using pass-through authentication to provide ‘FlexCast’ functionality (enumerate and launch published apps from the published desktop) where ssonsvr.exe wouldn’t run (crashed at login) because pnsson.dll wasn’t playing nice with the ICA stack at session logon.
          • Citrix has provided a provisional test-fix to customers with an open case, and will soon be releasing a public hotfix. As of this post, pass-through authentication doesn’t work on XenDesktop 7 published desktops running Receiver 3/4 without this fix in place.
      • Smart Card: Allows smart card pass-through
        • Thankfully I don’t work with this method very often, so I’ll refrain from digging in. Just know that it’s required if smart-cards are used in the environment
      • Pass-through from NetScaler Gateway: Allows a NetScaler Gateway virtual server to handle user authentication on behalf of the user
        • Requires Set-BrokerSite -TrustRequestsSentToTheXmlServicePort $true to be set on the DDC/XML broker)
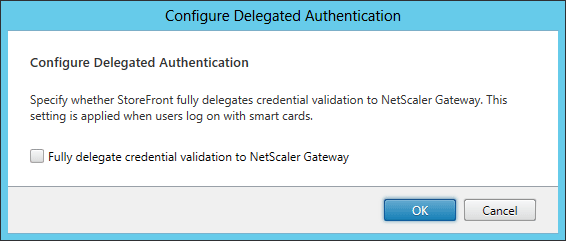
        • Use the Configure Delegated Authentication option to specify that the NetScaler send logon credentials directly to the remote Windows session

delegatedauth

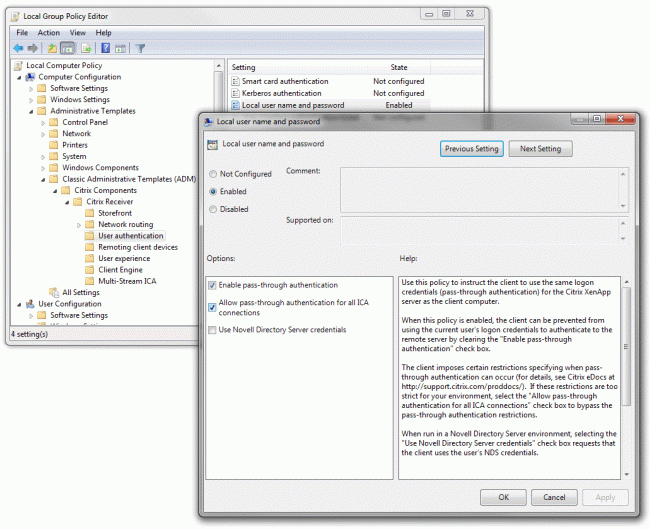
    • There are also client-side registry values that control whether or not to allow pass-through authentication, and can even lock down the feature to only work with StoreFront sites in specified Internet Explorer Security Zones (aka Client Selective Trust). The easiest way to adjust this is to use the ADM template in %ProgramFiles%\Citrix\ICA Client\Configuration\icaclient.adm

Image

In my next post on XD7 session launch I’ll talk about resource enumeration, including details about the virtual XML broker and XenDesktop broker services.

NetScaler Gateway VPX v10.1 with StoreFront v2.0 – Encrypt and Theme!

I just finished up on a XenApp 6.5 upgrade where I replaced a single 2008R2 server running a DMZ’d CSG v3.2 SSL-proxied Citrix Web Interface v5.3 ‘Direct’ site with a NetScaler Gateway 10.1 Access Gateway virtual server and a StoreFront v2.0 Store.

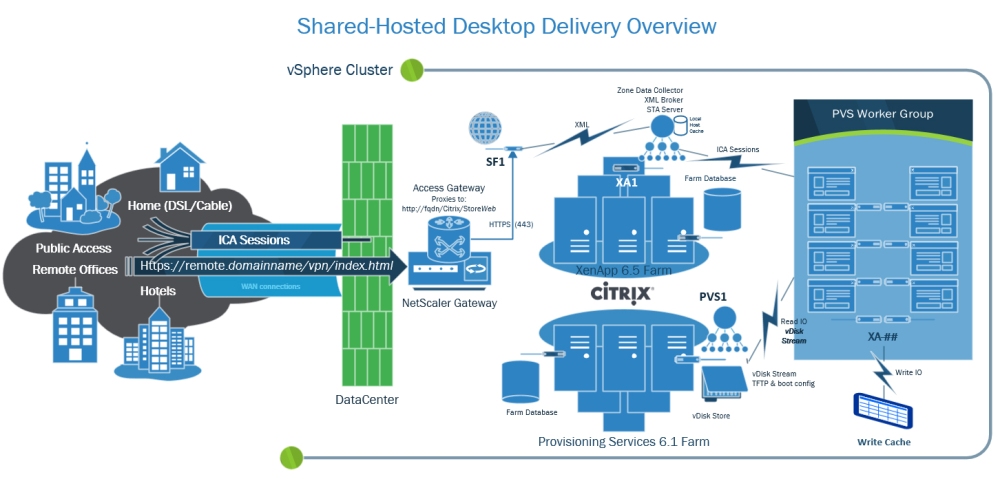
This post is meant to share some tips on setting up and customizing a Citrix Receiver <> NetScaler Gateway <> StoreFront deployment. Before I get into the thick of it, I thought I’d share the following high-level topology of the environment I was working with:

XenApp65_SharedHostedDesktopDelivery

This scenario consists of WAN-connected Citrix Receivers accessing the XenApp farm via a NetScaler Gateway Access Gateway VPN fronted StoreFront Store. The NetScaler Gateway Access Gateway virtual server provides AD-auth via an LDAP Authentication policy, and replaces the SSL-Proxied ICA & HTTP traffic that the Secure Gateway server previously handled (EOL’d since ‘06!, yet running on Win2008R2??). The NG-AG virtual server also acts as the landing page for web browsers, and as such has it’s own visual style that can (and SHOULD) be customized. Receiver connections are passed through to the Store virtual directory, and all other connections (web browsers) are directed to the StoreWeb virtual directory.

One major consideration I found in this topology is that if your StoreFront ‘Store’ is not SSL-encyrpted, Citrix Receiver for Windows 3.1 and later will not work without tweaking a few client-side registry values (see CTX134341), even though the NetScaler Gateway session is encrypted. That said, a resultant consideration of securing the StoreFront site is that you need to be sure that the NetScaler trusts the StoreFront server’s SSL certificate.

To do this you need to install any of the StoreFront server’s certificate chain certs on the NetScaler (here’s a good Citrix blog on the topic) and make sure the Access Gateway session policy profile’s ‘Web Interface Address’ uses the same name that the StoreFront server’s certificate was issued to, and that the NetScaler can resolve the name via DNS. The other pieces of getting this setup working are pretty easy, thanks mostly in part to the foolproof NetScaler Gateway setup wizard (eDocs link), and StoreFront’s ‘Add NetScaler Gateway Appliance’ wizard (eDocs). As long as your SSL is working properly, this is a fairly painless install.

Once I got the site up and running, I immediately wanted to customize the NetScaler Gateway VPN web interface to make it look like the StoreWeb site that browser users are redirected to. Out of the box, the NG-AG site is themed with the old (boring) CAG visual style, which is themed to look like the old WI 5.0-5.3 black & blue sites. Since this page is proxying and for the StoreFront site, is makes for a very awkward, time-machinish, experience to login to the black and blue site, and land in StoreFront’s newer green bubble land!

I didn’t look hard to find Jeff Sani’s blog article that I’ve referenced many times before, which provides step-by-step instructions on applying the StoreFront look and feel to a NetScaler’s Access Gateway. After running through this, I decided to change the the logo and background, and referenced Terry D’s blog on customizing a StoreFront site by way of custom CSS. I used WinSCP and PuTTY to make the changes, and pretty quickly had a nice looking landing page to front the StoreFront Store:

CustomLandingPage

I then did the same on the StoreFront server using NotePad++, and was able to give the customer a customized and consistent look and by adding the following custom.style.css to the c:\inetpub\wwwroot\Citrix\StoreWeb\contrib folder of the StoreFront server:

body { background-image: url("custom.jpg");
  background-color: #262638;}
#credentialupdate-logonimage, #logonbox-logoimage 
{ background-image: url("custom.png");
  width: 180px;
  height: 101px;
  right: 63%;}
#.myapps-name 
{ font-weight: bold; color: #000; }

CustomStoreFrontWeb

Well, that’s about all the time I have for today. I hope someone finds this post helpful in producing a functional, and visually consistent, NetScaler Gateway fronted StoreFront deployment!

NetScaler Bootcamp

The most advanced cloud network platform.

The most advanced cloud network platform.

A few of us at iVision just completed a two day NetScaler bootcamp led by Richard Nash at my old office in Alpharetta. With access to a hands-on learning lab, we were able to gain a solid understanding of Netscaler fundamentals.

Day one started with a lecture that covered core topics, including the following key features:

  • TCP Connection Multiplexing
  • Load Balancing
  • SQL Load Balancing (DataStream)
  • Compression
  • Clustering
  • High Availability
  • SSL Acceleration
  • Attack Defense
  • SSL VPN
  • Application Firewall
  • Global Server Load Balancing
  • Caching

We then worked through several scenarios in the learning lab. Being new to NetScaler, I was impressed with how well the Java UI performed, and was quite pleased with it’s functionality and ease of use. The main menu was a bit scary looking at first, but once I navigated through the categories a few times, I was able to quickly find the settings I needed to configure.

The day one lab gave us a good understanding of the steps needed to setup a NetScaler VPX HA pair for load balancing, content switching, and SSL Offload. Generating the SSL cert was a hassle as it always is,  but fortunately the lab was already equipped with a Certificate server.

On day two of the bootcamp, we spent time working with HTTP header modification, port redirection, and URL transformation. We also covered DataStream SQL load balancing and rate limiting, which was very impressive functionality to configure and see in action. Database responders, token-based load balancing, and integrated SQL caching really rounded out the lab.

Unfortunately we didn’t get to cover Access Gateway, but I took some time to review Bill Hackley’s step by step instructions on the Citrix Blogs, which I was able to fairly easily implement in my lab environment. I was pretty satisfied with this training, and believe our team is much better equipped to lead many successful implementations with the foundation that this two day crash course provided!

-Kenny