XenDesktop 7 Session Launch – Part 3, Brokering

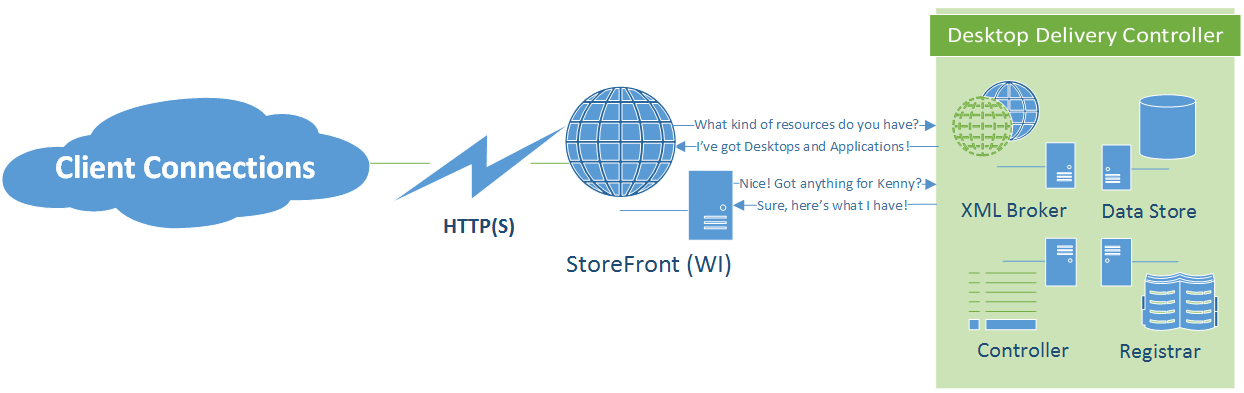
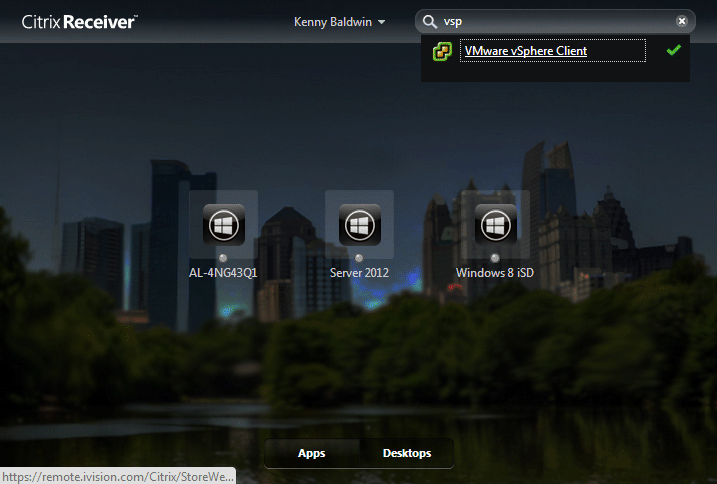
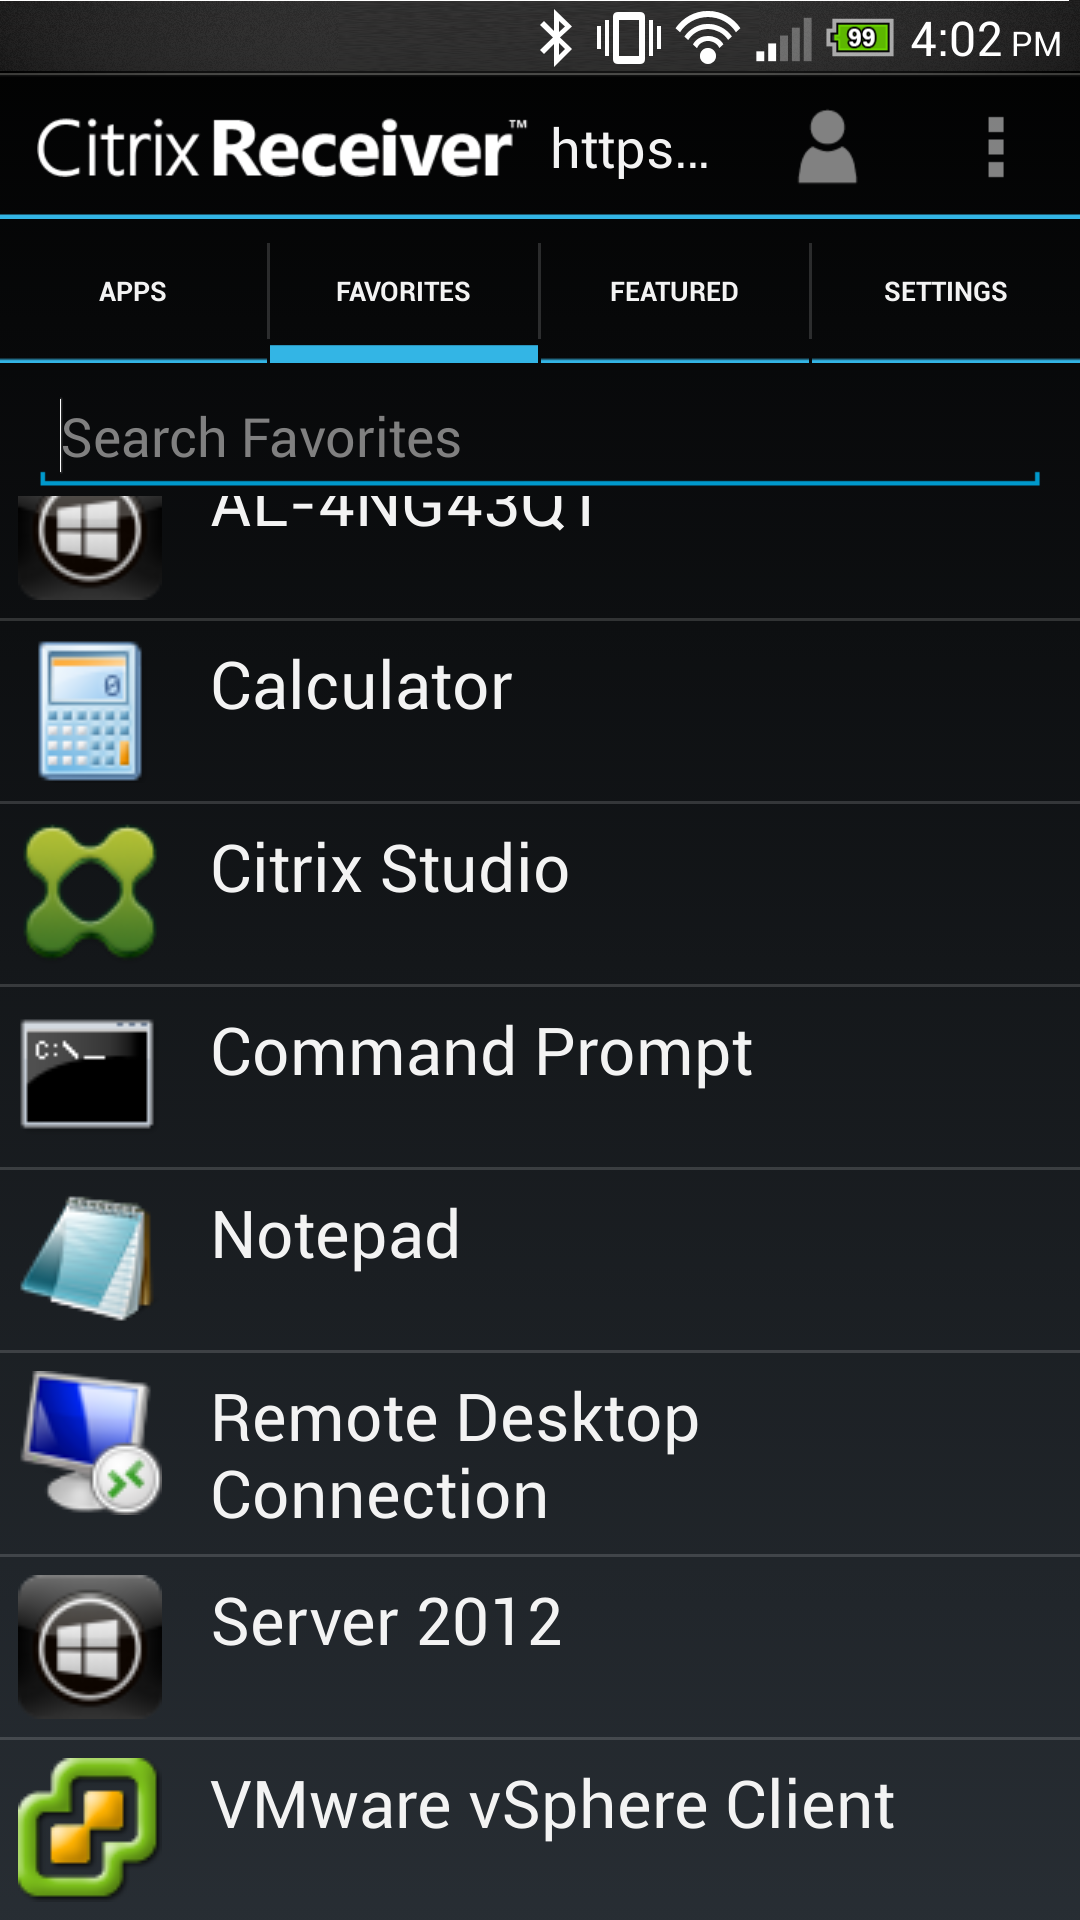
In my last post I talked about the ways that the Citrix client/WI enumerates XenDesktop resources by way of NFuse transactions to the site’s XML broker. The XML broker is responsible for telling the StoreFront server which published resources were found for a particular user. For more technical detail on NFuse transactions, check out my XML Broker Health Check post which gives a good example of NFuse transactions by way of some pretty straightforward XML requests sent through PowerShell.

The next major piece of the session launch process is what’s known as Brokering. This process allows a user to click a desktop or app resource, and have a ‘worker’ selected and readied for an inbound ICA connection. XenDesktop 7’s brokering functionality is mostly unchanged from that of XenDesktop 5, the only main difference being that it now includes multi-user RDS workers.

Conceptually, this factor doesn’t change how the Citrix Connection Brokering Protocol works, it simply adds multi-user support for Windows RDS servers. This functionality has actually existed with limited capabilities since XenDesktop 5.6 for CSPs (Hosted Server VDI), so it’s certainly not a huge leap in terms of changes to the broker agent. The XenDesktop brokering process consists of several key components, including:

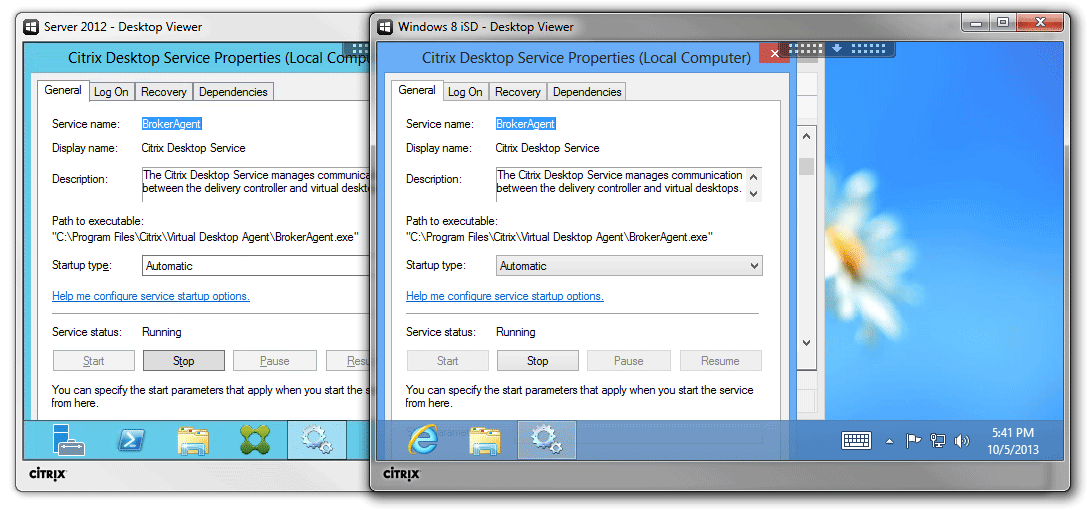
  • Citrix Desktop Service (CDS / VDA) – This component provides a bridge between the ‘Delivery Controller’ and the ‘Worker’ and is commonly referred to as the ‘Virtual Desktop Agent’ or VDA. In XD5 this was the WorkstationAgent.exe process, though in XD7 the process was renamed to BrokerAgent.exe. However, the directory still reflects the VDA designation, so I still like to refer to it as the VDA:

CDS

  • Citrix Broker Service – The Broker Service is responsible for negotiating session launch requests with ‘workers’. The Broker service communicates with the CDS over a protocol that Citrix refers to as CBP (connection brokering protocol) to validate a worker’s readiness to fulfill a session launch request, gather the necessary details (IP address or host name), and send the details back to the StoreFront site to be packaged and delivered as an .ICA launch file that’s consumed by the Receiver.
  • Connection Brokering Protocol – This protocol behaves much like NFuse, though it uses .NET WCF endpoints to exchange a series of contracts to communicate registration and session launch details between a worker and delivery controller. This protocol was designed with the following key requirements as it’s functionality is highly critical to reliably providing on-demand desktop sessions:
    • Efficient: information should be exchanged only if and when required (just in time). Limiting the data exchange to a minimum also reduces the risk of leaking sensitive data.
    • Versioned: It must be possible for both workers and controllers to evolve concurrently and out of step without breaking protocol syntax or semantics.
    • Scalable: The delivery controller is a key piece of infrastructure, and its performance must not be impacted by unprompted messages and data from workers, as can happen in IMA, for instance during “election storms”.
    • Flexible: the protocol should allow the architecture to evolve over time, by not building key assumptions into the protocol’s foundation code. Factoring independent operations into separate service interfaces is one example of how a protocol can allow for increasing controller differentiation in future.
    • Compliant: Standards-based mechanisms (WCF) are used instead of proprietary technologies (IMA).
    • Secure: Security is critical, and the protocol must support appropriate mechanisms to ensure confidentiality, integrity (WCF contracts), and authenticity (NTLM/Kerberos auth) of data exchanged between workers and controllers.

The XenDesktop brokering process makes the following basic assumptions about CDS workers:

  • Desktops are either Private or Shared
  • Each desktop is associated with a single delivery group
  • Each desktop is backed by a single worker
  • Each worker is individually associated with a hosting unit, with a null unit index value indicating an unmanaged worker (existing or physical catalog types)
  • Desktops within a private desktop group can have permanent user assignments. The association may comprise one or more users, or a single client IP address
  • Multiple desktops within a private desktop group may have the same user assignments
  • Desktops within a shared desktop group may temporarily be assigned to a single user for the duration of a session
  • Multiple desktops within a shared desktop group may be assigned to the same user concurrently
  • Automatic assign-on-first-use behavior involves the broker selecting a desktop within a private desktop group with no assignment, and assigning it to the currently requesting user; the desktop’s group will not change by virtue of user assignment
  • The assignment of a desktop to its assignee(s) in a private desktop group can only be undone by an administrative user through the PoSH SDK

In a nutshell, the Delivery Controller is responsible for negotiating session launch requests by locating and preparing workers to accept ICA sessions that were requested by a StoreFront server via the XML broker.

XD7brokering

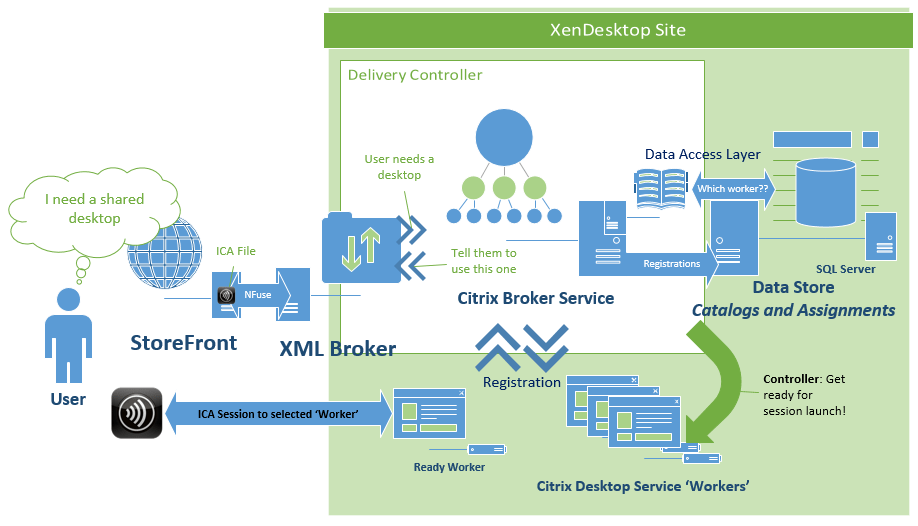
The broker service finds a worker to fulfill the session request, powers it on if needed, waits for it to become ready if a power action was sent. Once the worker is ready, the DDC sends the requisite connection details to the StoreFront server to build and deliver the ICA file, which is sent to the Receiver for consumption by the ICA client.

Hopefully this was a decent enough explanation of brokering. While I didn’t get a chance to go into a lot of detail about how a worker is found, and how CBP interacts with the ICA stack, I think this at least gives a good high level overview of the concept to know what components are involved and what their general interactions with each other are.

My next part in this series will look at the ICA stack, and how a connection is established between ICA clients and servers.

XenDesktop 7 Session Launch – Part 2, Enumeration

In my last post I talked about how the Citrix Receiver authenticates to a StoreFront server. In this post, I want to talk about resource enumeration with Citrix Receiver <> StoreFront <> XenDesktop deployments.

Before I go into the technical aspects of the way Citrix enumerates published resources, I want to briefly explain the history behind the Citrix XML Broker, as well as how the Citrix client enumerates published resources. In case anyone is interested in a broader history of Citrix, I encourage you to check out the 20 years of Citrix History publication that was published in 2009.

Citrix NFuse and the XML Portal Server

Back in 2000, Citrix signed a licensing deal with Sequoia Software (whom they later acquired in 2001) to integrate the NFuse as the foundation for providing an extensible application portal for MetaFrame. The XML Portal Server (XPS) technology was then built around NFuse to provide the ability to dynamically enumerate and present resources to end users. This integration was critical in giving Citrix the ability to stand apart from the competition (terminal services), and was the reason the next version of MetaFrame had the XP designation:

xpsnfuse

Since it’s introduction back in 2000, the NFuse protocol has remained at the core of every Citrix desktop/application virtualization product by way of the ‘XML Broker’ service. This service was included in all future releases, including all versions of XenApp & XenDesktop. Until XenDesktop 5 was released, the XML broker service ran as it’s own standalone service. During the XenDesktop ‘Storm’ site architecture rework (now called FMA, aka NOT IMA) the XenDesktop product team decided to relocate the XML broker service to run as a ‘virtual’ service by piggy-backing on the XenDesktop Broker service. Other than this move to virtualize the XML broker service, the service remains as NFuse capable as the XML broker service used in MetaFrame.

Because of the NFuse protocol, resource enumeration has remained compatible as MetaFrame evolved into XenDesktop. In other words, the old MetaFrame Web Interface Server would still enumerate published desktops from a XenDesktop 7 DDC, and a StoreFront 2.0 server would enumerate published applications from a MetaFrame XP XML broker service (theoretically at least!), as long as the requests are NFuse compatible.

One of the main reasons the NFuse protocol is so durable is that it’s able to negotiate capabilities. In this example, a StoreFront site contacts a XenDesktop XML broker to determine what capabilities it has, and what resources are published to the authenticated user:

enumeration

In this process, the web front-end server sends an XML message to the configured XML broker to request a list of capabilities. The XML broker then responds with an XML formatted list of the types of resources it has access to. StoreFront will then request any compatible resources for the the authenticated user account. The XML broker then works with the XenDesktop broker and controller services to find out what resources are assigned to the user. The enumerated resources are consumed by StoreFront and presented to the end user.  This figure from the NFuse Classic 1.7 is still mostly relevant, just different companion components:

nfuse

StoreFront & Receiver

With Citrix Web Interface, the results of application enumeration were presented all at once to the authenticated user (optionally sorted into tabs and/or folders). In other words, all resources published to a user would be shown to them, though you could hide resources as needed. StoreFront with Receiver added the functionality that was originally introduced with Citrix Merchandising Server and Dazzle, which is to allow a user to pick their ‘favorite’ resources, providing Self-Service ‘App Store’ functionality and allowing a user’s favorite resources to follow them across multiple client devices and device types.

Prior to Dazzle/Receiver, applications were either enumerated in a web browser using a Web Interface ‘Web’ site, or enumerated directly by the Citrix client agent through a ‘Services’ site. In the past three years the Citrix client has evolved from the ‘Online Plug-in’ to the Receiver for Windows.

clients

The concept of client-side agent enumeration began with the ‘Program Neighborhood’ client (pre Online Plug-in), which would access a Services site (hence the default name PNAgent), and looked like this:

Program-Neighborhood-12

Until XenApp replaced Presentation Server, this was the way users would typically connect to applications, as the web portal wasn’t nearly as solid as the old WI server running in IE 5/6. By the time XenApp was released, Citrix decided to rework the ‘PNAgent’ to display resources as a system tray icon jump menu (which remains a fan favorite, quick, easy, intuitive) in what was first called the XenApp Plug-in, and later renamed to the Online Plug-in when XenDesktop was released:

DRXDBoth

However, around the time the Apple App Store was released, and Windows Vista changed some application UI design consideration, Citrix decided to create a self-service framework by way of Dazzle and Merchandising Server. As a result of this they decided to do away with the notification icon ‘jump-menu’ since it didn’t align with Microsoft’s general UI design recommendations for Windows Vista/7. When Receiver was launched, this legacy ‘PNAgent’ functionality was taken out of the standard ‘Receiver’, and moved to only be included in the ‘Enterprise’ flavor of the Receiver, which is really just a nice way to say that they’re accommodating ‘Enterprise’ customers who still want/need to use this legacy functionality.

As of Receiver Enterprise (the black icon) PNAgent enumerated shortcuts are only available in the start-menu or desktop (according to the site/farm settings):

PNA

Citrix’s current preferred method of displaying shortcuts to end-users is using Receiver 3/4 to connect to a StoreFront Store, which uses the ‘Dazzle’ framework to present shortcuts:

receiverwindow

The StoreWeb StoreFront site aims to provide the same look and feel for users that aren’t enumerating via the ‘Receiver’ agent:

receiverweb

Connecting from mobile receivers maintains this consistency of favorite resources:

androidreceiver

I could go on and on about the technical details of enumeration, but am out of time for today. I encourage readers to check out my previous post on the XML broker for a technical example of NFuse transactions.

In my next post I go into more detail about how enumerated resources are brokered to the receiver.

XenDesktop 7 Session Launch – Part 1, Authentication

The process of enumerating, brokering, and connecting to a XenDesktop resource involves quite a few moving parts, and can be a daunting task to troubleshoot for someone who isn’t familiar with the product. There are several key components involved in the session launch process including authentication, enumeration, registration, ticketing, and display/session handling.

In this post I’d like to briefly explain how the Citrix Receiver authenticates to a XenDesktop 7 application or desktop. To keep it simple, I’m only going to talk about StoreFront (no WI) and XenDesktop (no XenApp/IMA). So just Receiver <> StoreFront <> XenDesktop.

The first step to launching a XenDesktop session is to authenticate to the StoreFront Store that the XenDesktop resource is connected to. In this step, a user connects to the StoreFront server and:

  1. Authenticates to a StoreFront virtual directory via Citrix Receiver:
    • The Receiver is connecting to a StoreFront Store, StoreWeb, StoreDesktopAppliance, or PNAgent IIS virtual directory. IIS allows anonymous authentication since the StoreFront .NET services (Citrix.Storefront.exe & Citrix.StoreFront.PrivilegedService.exe) handle authentication:

storefront-IIS

    • To configure a StoreFront server’s authentication methods, use the Citrix Studio MMC to open the Authentication TreeNode of the Citrix StoreFront deployment. Here you can specify which authentication methods to allow on Stores hosted by that server:

storefront-authmethods

    • There are four authentication methods available as of StoreFront 2.0:
      • User name and password: Similar to windows basic auth in IIS, or explicit authentication in Citrix Web Interface Server.Prompts the user to enter their credentials at logon.
        • In this scenario, the broker passes the user’s credentials to the target ICA server on behalf of the client
      • Domain Pass-through: Similar to Integrated Authentication in IIS, and
        • Allows Receiver for Windows endpoints automatically log on using the local session’s logged on user domain account (via NTLM)
        • In this scenario, the client sends credentials (via ssonsvr.exe) directly to the target ICA server
        • For pass-through authentication to work, you must use the /includesson switch when installing Receiver (per CTX133982), which tells the meta-installer to include the ‘SSON’ component (ssonsvr.exe) that is needed to capture the user’s domain credentials at logon. Receiver relies on the SSON component to send the user’s domain credentials to the StoreFront server’s StoreWeb (via browser), Store (via Receiver), or legacy PNAgent (via Online Plugin / Receiver Enterprise) virtual directory.
          • There is currently a bug with XenDesktop 7 published desktops using pass-through authentication to provide ‘FlexCast’ functionality (enumerate and launch published apps from the published desktop) where ssonsvr.exe wouldn’t run (crashed at login) because pnsson.dll wasn’t playing nice with the ICA stack at session logon.
          • Citrix has provided a provisional test-fix to customers with an open case, and will soon be releasing a public hotfix. As of this post, pass-through authentication doesn’t work on XenDesktop 7 published desktops running Receiver 3/4 without this fix in place.
      • Smart Card: Allows smart card pass-through
        • Thankfully I don’t work with this method very often, so I’ll refrain from digging in. Just know that it’s required if smart-cards are used in the environment
      • Pass-through from NetScaler Gateway: Allows a NetScaler Gateway virtual server to handle user authentication on behalf of the user
        • Requires Set-BrokerSite -TrustRequestsSentToTheXmlServicePort $true to be set on the DDC/XML broker)
        • Use the Configure Delegated Authentication option to specify that the NetScaler send logon credentials directly to the remote Windows session

delegatedauth

    • There are also client-side registry values that control whether or not to allow pass-through authentication, and can even lock down the feature to only work with StoreFront sites in specified Internet Explorer Security Zones (aka Client Selective Trust). The easiest way to adjust this is to use the ADM template in %ProgramFiles%\Citrix\ICA Client\Configuration\icaclient.adm

Image

In my next post on XD7 session launch I’ll talk about resource enumeration, including details about the virtual XML broker and XenDesktop broker services.

XML Broker Health Check

I saw an interesting question in the Citrix support forum today, and thought I’d share. Scott Curtsinger asked the following:

Does anyone know what the easiest way is to check the health of the XML service on XenDesktop 5.6? I’m seeing a lot of information on the web for XenApp but not very much for XenDesktop beyond leveraging devices like a NetScaler.

My first instinct is that this could easily be done via PowerShell, so I did a quick search and found this blog post by Jason Pettys. I also found this great article on working with the Citrix XML service, and quickly put together the following script which I tested against my XenDesktop 5.6 XML broker:

$url = "http://localhost/scripts/wpnbr.dll"
$parameters = '<?xml version="1.0" encoding="utf-8"?><!DOCTYPE NFuseProtocol SYSTEM "NFuse.dtd"><NFuseProtocol version="5.1"><RequestCapabilities></RequestCapabilities></NFuseProtocol>'
$http_request = New-Object -ComObject Msxml2.XMLHTTP
$http_request.open('POST', $url, $false)
$http_request.setRequestHeader("Content-type", "text/xml")
$http_request.setRequestHeader("Content-length", $parameters.Length)
$http_request.setRequestHeader("Connection", "close")
$http_request.send($parameters)
$http_request.statusText
$http_request.responseText

Running this script in PowerShell on my XML broker returned the following list of capabilities, which is a good indication that the XML broker is up and running:

<?xml version="1.0" encoding="UTF-8"?> <!DOCTYPE NFuseProtocol SYSTEM "NFuse.dtd"> <NFuseProtocol version="5.1"> <ResponseCapabilities> <CapabilityId>separate-credentials-validation</CapabilityId> <CapabilityId>multi-image-icons</CapabilityId> <CapabilityId>launch-reference</CapabilityId> <CapabilityId>user-identity</CapabilityId> <CapabilityId>full-icon-data</CapabilityId> <CapabilityId>full-icon-hash</CapabilityId> <CapabilityId>accepts-client-identity-for-power-off</CapabilityId> <CapabilityId>session-sharing</CapabilityId> </ResponseCapabilities> </NFuseProtocol>

This simple script lays a nice foundation to perform XML broker health checks via PoSH. I then took the script a little bit further to test some other XML requests:

param($server, $port)
if ($port){$port = 80}
$creds = Get-Credential
$domainuser= $creds.UserName.Split('\')
$domain = $domainuser[0]
$user = $domainuser[1]
[String]$pw = [Runtime.InteropServices.Marshal]::PtrToStringAuto([Runtime.InteropServices.Marshal]::SecureStringToBSTR($creds.Password))
$nwINFO = Get-WmiObject -ComputerName $env:COMPUTERNAME Win32_NetworkAdapterConfiguration | Where-Object { $_.IPAddress -ne $null }
$ip = $nwINFO.IPAddress
$fqdn = $nwINFO.DNSHostName
$xmlcreds = '<Credentials><UserName>' + $user + '</UserName><Password encoding="cleartext">' + $pw + '</Password><Domain Type="NT">' + $domain + '</Domain></Credentials>'
$envelope = '<?xml version="1.0" encoding="utf-8"?><!DOCTYPE NFuseProtocol SYSTEM "NFuse.dtd"><NFuseProtocol version="5.1">'
$clienttype = '<ClientType>ica30</ClientType>'
$clientdetails = '<ClientName>' + $env:COMPUTERNAME + '</ClientName><ClientAddress addresstype="dot">' + $ip[0] + '</ClientAddress>'
function request ($parameters)
{
 $http_request = New-Object -ComObject Msxml2.XMLHTTP
 $http_request.open('POST', $url, $false)
 $http_request.setRequestHeader("Content-type", "text/xml")
 $http_request.setRequestHeader("Content-length", $parameters.Length)
 $http_request.setRequestHeader("Connection", "close")
 $http_request.send($parameters)
 $http_request.statusText
 $http_request.responseText
}
$url = "http://" + $server + ":" + $port + "/scripts/wpnbr.dll"
$capabilities = request ($envelope + '<RequestCapabilities></RequestCapabilities></NFuseProtocol>')
if (!$capabilities[1].contains('error'))
{
 $testcreds = request ($envelope + '<RequestValidateCredentials>' + $xmlcreds + '</RequestValidateCredentials></NFuseProtocol>')
 if (!$testcreds[1].contains('bad'))
 {
 $appdatareq = request ($envelope + '<RequestAppData><Scope traverse="subtree"></Scope><DesiredDetails>rade-offline-mode</DesiredDetails><ServerType>all</ServerType>' + $clienttype + '<ClientType>content</ClientType>' + $xmlcreds + $clientdetails + '</RequestAppData></NFuseProtocol>')
 $app = $appdatareq[1] -split "<FName>"
 $app = $app[1] -split "</FName>"
 $launchreq = request ($envelope + '<RequestAddress><Name><AppName>' + $app[0] + '</AppName></Name>' + $clientdetails + '<ServerAddress addresstype="dns-port"></ServerAddress>' + $xmlcreds + $clienttype + '</RequestAddress></NFuseProtocol>')
 $launchreq
 }
}

This script takes the server and port, prompts for the credentials that you’re testing (password is sent in clear text), and sends a RequestCapabilities request, followed by RequestValidateCredentials, RequestAppData, and RequestAddress requests. To avoid dependencies on NFuse.dtd, I used a -split on the XML results of the RequestAppData results to get the ‘friendly name’ of the first application returned by RequestAppData, which I used for the RequestAddress post.

From here I’m going to develop a C# service that can monitor the XML service, though I’d like to figure out how to encode the password into the ‘ctx1’ format so that I’m not sending it in clear text.