‘ADM Power’: Power Tools for Citrix ADM

Hi everyone, I know it’s been a while but I figured this post would be one of those ‘better late than never’ types where readers can hopefully forgive me in exchange for a shiny new utility that I created and felt was useful enough to share!

Without further ado I give you ‘ADM Power‘, a forms-based PowerShell script that automates and simplifies a lot of Citrix ADM & ADC tasks in an enterprise environment (i.e. more than a few ADCs).

What is ADM Power?

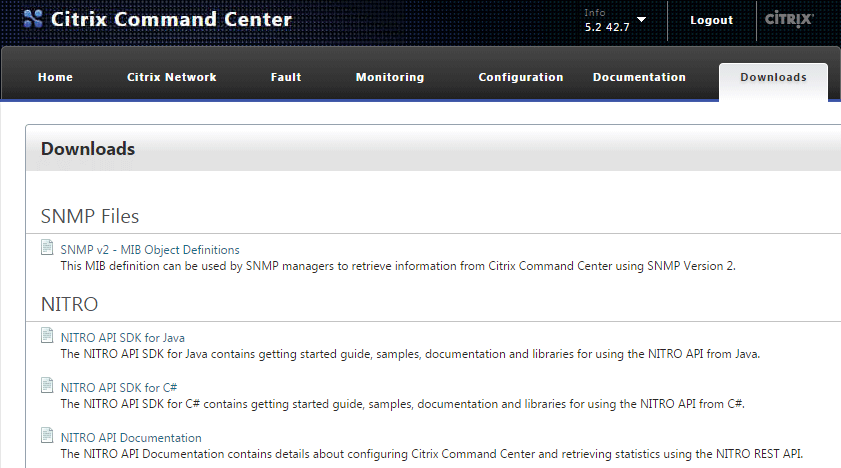
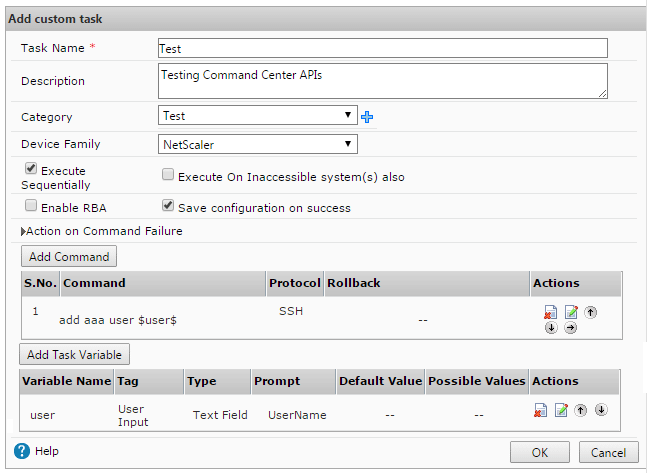
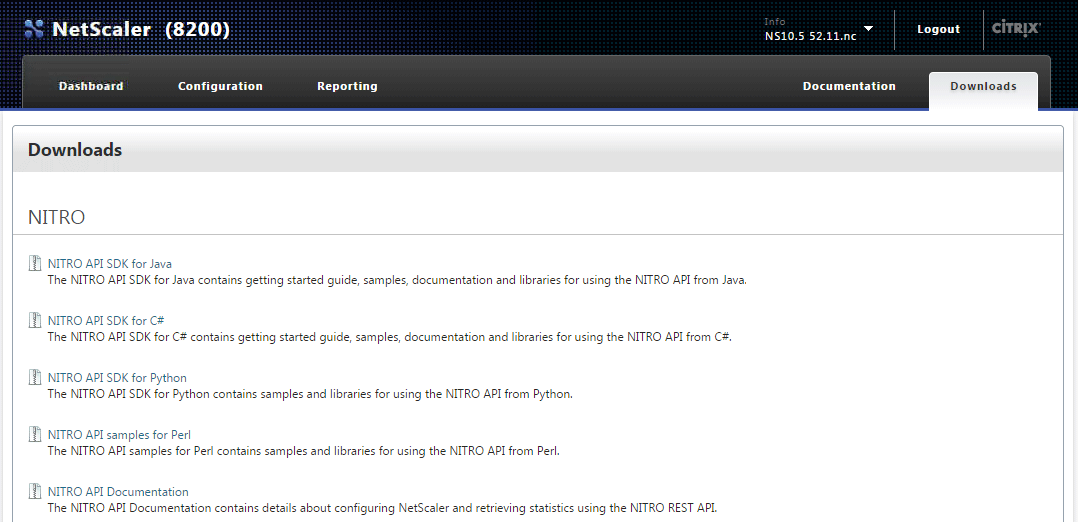
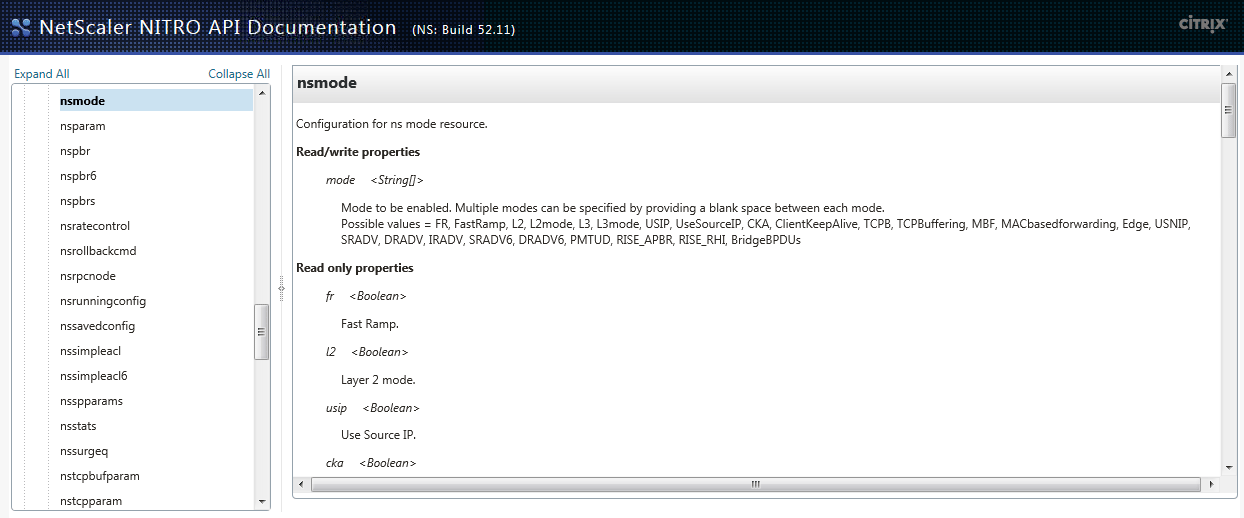
As the name implies this PowerShell script uses Citrix’s Nitro APIs to interact with a target ADM, as well as the ADCs it manages, and includes several ‘power tools’ that I’ve started trying to describe in the readme.

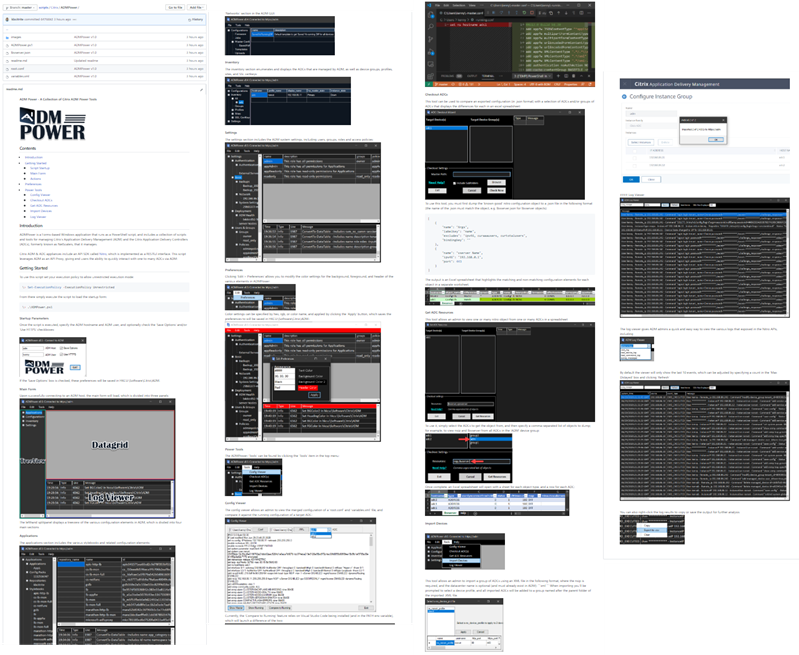
The script builds upon and includes modified versions of the functions that I shared in this PowerShell module for Citrix ADM last year, is designed to be self contained, and only requires the ADMPower.ps1 file and ability to run it.. and of course access to a functional ADM 🙂

How do you use it?

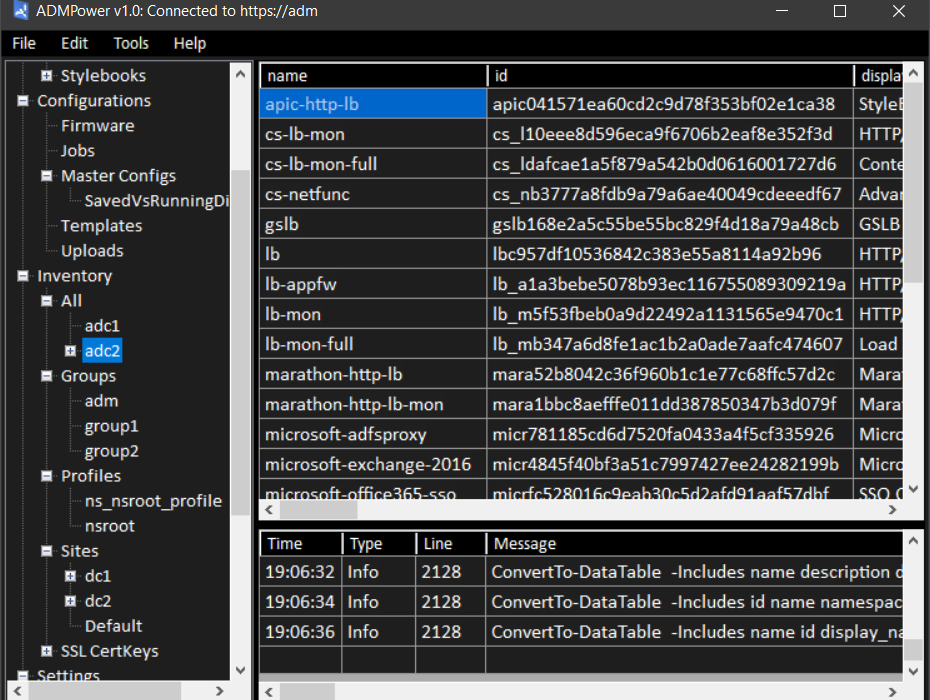
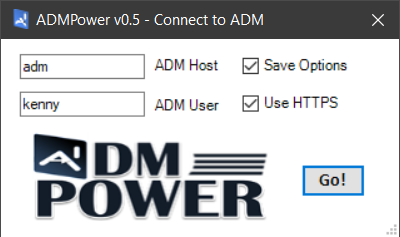
Because the script uses Windows form objects to interact with the user, it’s more like a utility than a script. For example, instead of using startup parameters when you launch the script, it prompts you for the relevant details to connect to your ADM instance:

Once connected, you can do lots of ‘stuff & things’ that I’ve added along the way, and can even add your own by reverse engineering my probably not-so-organized script :S

What can it do?

I’ve added a lot of stuff that I find useful, and so there are a lot of things in the readme that I won’t mention here.

That said, I haven’t documented everything that it can do because I tried to make usage as intuitive as possible by leveraging standard GUI elements like labels, toolstrips, and context menus.

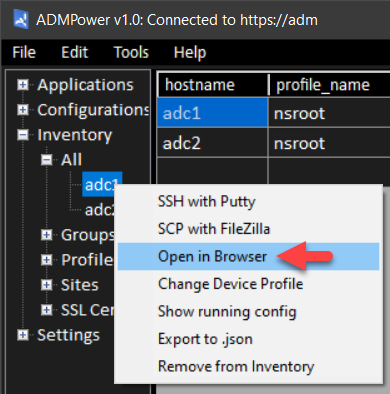
For example, you can right-click ADCs to perform common tasks against them, such as logging on in the browser (using the ADM device profile), or opening an SSH or SCP session using prompted credentials:

Right-click nodes for actions
Search for actions to modify or add your own

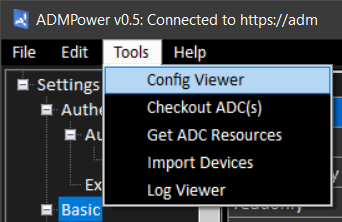
As you can see there are a few other right-click options on ADCs, and there are others elsewhere, particularly in the ‘Inventory’ and ‘Configurations’ sections, as well as a collection of Tools in the menu bar:

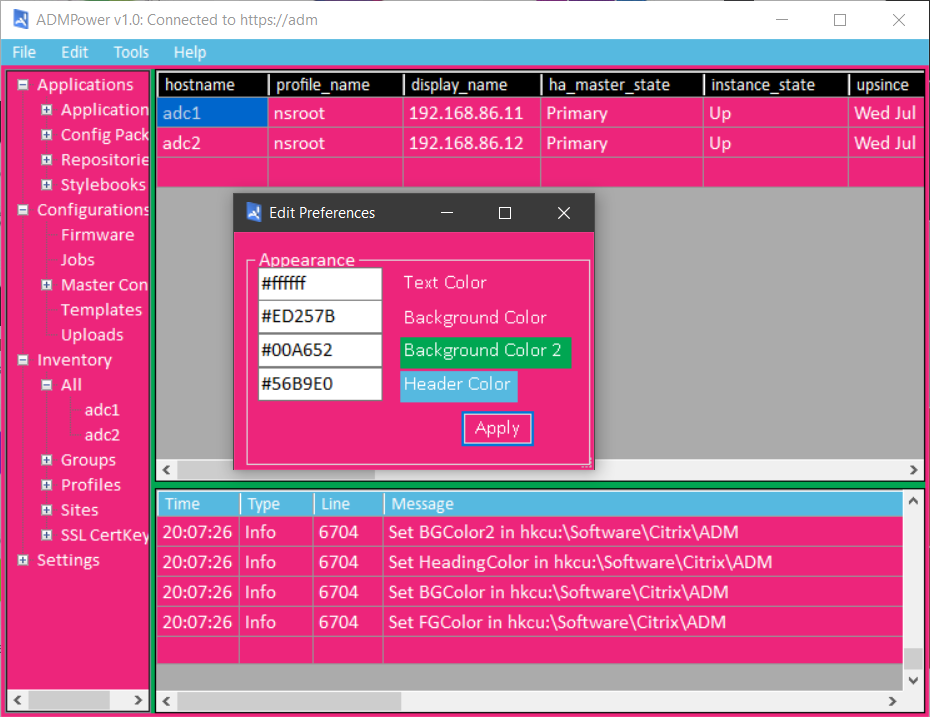
I even added an ‘Edit>Preferences’ form so that you can make ADM Power look the way you like!

Why is Kenny sharing this?

The reason I wrote this in PowerShell was to give anyone who can run it the opportunity to use it while also giving those who can edit and/or write scripts (or use tools like poshgui) the ability to use or extend whatever parts they find useful.

In return I’d ask that if you use this script you give credit where it’s due, and otherwise help me to make the tool more Powerful by providing useful feedback and/or bug fixes! 🙂

In Conclusion..

I’m still working on documenting everything, but I felt like the readme has enough to get most started. I’d like to emphasize that you should use caution when running any script from the internet, and would checking with your organization’s internal policies before you start using it in a production environment.

In general I would suggest starting with a read-only account if you want to step through it first and get acquainted, but would otherwise say that it reads more than it writes and is mostly safe from accidental screw-ups.. but please be careful regardless.

I plan to keep the utility updated as I add features and/or fix bugs, so please feel free to ask questions and share any feedback you might have.

Thanks! -KB

PowerShell Module for Citrix ADM

I know it’s been a while since my last post, but I felt compelled to share a PowerShell module for Citrix ADM I wrote for interacting with Citrix Application Delivery Management appliances. The module uses Invoke-RestMethod to interface the Nitro REST APIs for ADM, and was inspired by the module that Citrix originally shared which was credited to Esther Barthel, and so thank you Esther for the foundation!

Basically, this module works much in the same was as the NetScaler version, and makes it easier to talk to an ADM and the ADCs that it manages by acting as an API Proxy to the ADCs. It also allows for advanced API operations such as uploading firmware, certificates, configuration jobs & templates, and pretty much anything else you can do in the GUI, for both ADM and ADCs.

Anyways, check out ADM.psm1 along with Sample.ps1 to get a feel for it (there’s also a readme), and hopefully this is helpful for others that manage ADMs and/or ADCs on a regular basis!

RDP-Proxy on NetScaler!

In case you weren’t paying attention (it was easy to miss) RDP-proxy is now available on the 10.5 enhancement branch! This feature appears to have been added as of the 10.5 51.1017.e.nc:

Users can connect with single sign-on to Remote Desktop (RDP) connections through NetScaler Gateway. [From Build 51.1017.e] [#422442]

That’s right, you can now configure NetScaler Gateway vServers to host RDP-proxy with CredSSP single-sign on. And it’s not all that difficult to set up; here’s the quick and dirty on doing so.

First, you’ll want to create your RDP profile under the NetScaler Gateway section in the GUI, or using the ‘add rdp profile’ command in the CLI:RDP Profile

RDP Profile CLI

Assuming you can manage building a NetScaler Gateway vServer, there’s not much different here, you just need to specify the RDP IP (optional) and port:

rdp_proxy_vserver

Next, specify the RDP profile in your NetScaler Gateway vServer’s session profile under the new ‘Remote Desktop’ tab:
RDP Session Profile


And that should take care of the configuration. Once configured you can launch RDP sessions by logging into the vServer and opening /rdpproxy/rdphostip:

rdp_launch

This will cause the NetScaler to generate a .rdp file that will look something like this:

redirectclipboard:i:0
redirectdrives:i:0
redirectprinters:i:1
keyboardhook:i:2
audiocapturemode:i:0
videoplaybackmode:i:1
negotiate security layer:i:1
enablecredsspsupport:i:1
authentication level:i:0
full address:s:rdp.desktopsandapps.com:3389
loadbalanceinfo:s:461346de68dd72323493ddd65585ae1b77bbdc1b1c61cafec567bcbbee5a9380

Notice the loadbalanceinfo parameter which is populated with a random string. This reference is used to validate the launch (a self-contained STA of sorts). Also, the enablecredsspsupport parameter instructs the NetScaler to attempt single sign-on to the target RDP host using CredSSP.

Well, that’s about all the time I have for now. Remember that this is in fact an ‘enhancement’ build, though it is now also included in the v11 main branch. Hopefully Citrix continues to improve this functionality as I’m sure they have customers everywhere who could benefit from native RDP-Proxy on the same ADC that’s serving up ICA-Proxy.. Enjoy!

Nitro C# APIs for Command Center – Scripting with PowerShell

In my previous post on the Nitro APIs for NetScaler I shared some PowerShell examples for interacting with a NetScaler using the Nitro C# API SDK in PowerShell. I wanted to share some similar tips and samples for scripting with the Command Center APIs, which has quite a few more gotchas than the NetScaler APIs (in my opinion :).

Loading the Command Center version of the Nitro C# framework in PowerShell is about the same as the NetScaler. Just like on the NetScaler, the needed assemblies can be found at the ‘Downloads’ section on the Command Center web console:

Command Center Downloads

Download and extract the tarball to your scripting environment’s working directory. Next, add the Command Center Nitro .NET framework into your runspace using the Add-Type cmdlet:

Add-Type -Path .\newtonsoft.json.dll
Add-Type -Path .\cmdctr_nitro.dll

The last requirement, which is not needed with the NetScaler APIs, is to copy ccapi.xml to your $HOME directory:

Copy-Item -Path .\ccapi.xml -Destination $HOME

If you don’t have this file in your $HOME directory you’ll get an exception when attempting to connect to the server. To do so, use com.citrix.cmdctr.nitro.service.nitro_service.login(UserName, Password):

$Credentials = Get-Credential
$nitrosession = new-object com.citrix.cmdctr.nitro.service.nitro_service($ccserver,8443,"https")
$nitrosession.login($Credentials.GetNetworkCredential().UserName, $Credentials.GetNetworkCredential().Password)

Once logged in the class heirarchy is very similar to the NetScaler APIs. Let’s look at a couple of examples of what you can do from here with some code snips along the way.

The primary reason that I wanted to write a script against Command Center was to run batches of tasks against a list of NetScalers and variables. In the script I took two such csv lists as parameters loop on each to execute the tasks sequentially against each NetScaler in the list.In this example I’ll show you how to run a custom task and passing values to populate the task’s ‘UserInput’ variables.

First, create a custom task in Command Center, in this example we’ll add a user that’s passed as a variable $user$:

Command Center Custom Task

In your PowerShell runspace load the following cmdctr.nitro.resource.configuration objects; ns_task_execution_data to get the task’s UserInput values, an ns_task of the task that will be executed, and a scheduler_data to specify how it should be execute:

$taskname = "Test"
$user = "User1"
$nsip = "10.0.0.1"
$task = New-Object com.citrix.cmdctr.nitro.resource.configuration.ns_task_execution_data
$taskdetails = [com.citrix.cmdctr.nitro.resource.configuration.ns_task]::get($nitrosession, $taskname)
$taskschedule = New-Object com.citrix.cmdctr.nitro.resource.configuration.scheduler_data
$taskschedule.recurr_type = "no_reccur"

From here we’ll need to put the user variable into the $task.user_input_props property. To do this you’ll need to build an explicit Dictionary[System.String,System.String] object:

$userinputprops = New-Object "System.Collections.Generic.Dictionary``2[System.String,System.String]"

Next, assign the user name variable taskdetails.task_variable_list[0].name dictionary entry. Note that the format is very specific here, most notably explicit single quotes around $UserInput$ to make sure the $’s stay in the string:

$userinputprops['$UserInput$' + $taskdetails.task_variable_list[0].name] = $user)

Since there’s only one variable in this task, we can set the $task.user_input_props property using ns_taskexecution_data.set_user_input_props(), but would otherwise do a for loop on the $taskdetails.task_variable[] array to assign multiple variables:

$task.set_user_input_props($userinputprops)

Now fill out a few other task properties, including the user who ran the job, an annotation notating the computer it was executed from, the target NetScaler IP to run the task against

$task.task_name = $taskdetails.name
$task.executed_by = ($Credentials.UserName).Split('\')[1]
$task.scheduler_data = $taskschedule
$task.annotation = "Nitro automated task executed from $($env:COMPUTERNAME)"
$task.device_list = $nsip

Then execute the task using the execute() method of the ns_task_execution_data class, passing the $task object as the second parameter:

$task = [com.citrix.cmdctr.nitro.resource.configuration.ns_task_execution_data]::execute($nitrosession,$cctask)

This will start the task in Command Center, which can then be monitored by calling get() in ns_task_status:

$taskstatus = [com.citrix.cmdctr.nitro.resource.configuration.ns_task_status]::get($nitrosession, ($cctask.execution_ids)[0])

You can then do a while/start-sleep loop on $taskstatus.status to find out what happened:

Do { $taskstatus = [com.citrix.cmdctr.nitro.resource.configuration.ns_task_status]::get($nitrosession, ($cctask.execution_ids)[0])
Start-Sleep -Seconds 1 }
While ($taskstatus.status -match "Progress" -or $taskstatus.status -match "Queued")

Once the task is complete, check the status of what happened:

if ($taskstatus.status -eq "Success")
{ Write-Host "$($cctask.task_name) completed on $nsip" }

As always it’s a lot easier to deal with a success than a failure, here’s wait it takes to see what command failed, and what the error was, if the task faced a conflicting config:

if ($taskstatus.status -eq "Failed")
{	
 $ccfilter = New-Object com.citrix.cmdctr.nitro.util.filtervalue
 $ccfilter.properties.Add("id",$taskstatus.taskexecution_id + "")
 $errorlog = [com.citrix.cmdctr.nitro.resource.configuration.command_log]::get_filtered($nit rosession,$ccfilter)
 $failedcmd = ($errorlog.output.Split("`n")[2] -replace "`n|`r").Split(':')[1]
 $failedmsg = ($errorlog.output.Split("`n")[3] -replace "`n|`r").Split(':')[1] 
 Write-Host "$($cctask.task_name) failed at '$failedcmd', the error was '$failedmsg'"	
}

I hope this example was useful and that you enjoyed a second Nitro boost for your Citrix scripting repertoire!

Nitro C# APIs for NetScaler – Scripting with PowerShell

Hello again! It’s been a while, I know, but I’m back with some fresh goodness that I hope you will enjoy. I want to give a quick shout out to Thomas Poppelgaard for encouraging me to share some new content, and in return I promised him that I’ll dust off SiteDiag in the near future 🙂 Since my last post I joined a financial services firm where I’ve been working on a global NetScaler deployment, so I’ve got lots of great insights about NetScaler and Command Center that I wanted to share.

During my involvement on the engineering side of a larger NetScaler deployment I came across several situations that warranted scripts for both NetScaler and Command Center. The primary driver behind these scripts was the automation of configuration deployment and management (comparing and setting configurations against lists of NetScalers). This post aims to cover the basics of using the C# Nitro APIs in PowerShell. I also hope to share similar tips on the Command Center APIs in a future post.

So, to get started scripting you’ll need to download and extract the Nitro API SDK for C# to the host where you plan to run the script. The download is hosted on the NetScaler itself under the ‘Downloads’ section (on the far right in 10.5):

NetScaler API SDK Downloads

NetScaler API SDK Downloads

Once you’ve extracted everything out you’ll have two DLLs that will need to be loaded into your PowerShell environment, newtonsoft.json.dll and nitro.dll. To ‘include’ these runtime libraries in your script, simply use the Add-Type cmdlet for each:

Add-Type -Path .\newtonsoft.json.dll
Add-Type -Path .\nitro.dll

Now that the runtime libraries are included you can directly call the Nitro objects using the com.citrix.netscaler.nitro namespace:

com.citrix.netscaler.nitro Namespace


The next step is to connect to the NetScaler by creating com.citrix.netscaler.nitro.service.nitro_service object and calling the login() method, which looks like this in PowerShell:

$Credentials = Get-Credential #prompt for credentials
$nitrosession = New-Object com.citrix.netscaler.nitro.service.nitro_service("netscaler.fqdn",'HTTPS') 
$nitrosession.login($Credentials.GetNetworkCredential().UserName, $Credentials.GetNetworkCredential().Password)

And this is where the ‘fun’ starts. Referencing the Nitro API Documentation, you can explore all of the classes and methods that are now at your disposal, including every imaginable configuration and statistic.

Let’s take an example of checking the status of modes, which is handled by the com.citrix.netscaler.nitro.resource.config.ns.nsmode class:

com.citrix.netscaler.nitro.resource.config.ns.nsmode


Say you wanted to get all of the modes that are currently set on a NetScaler, you’d simply call the get() method, passing the $nitrosession object as the only argument:

[com.citrix.netscaler.nitro.resource.config.ns.nsmode]::get($nitrosession)

mode : {FR, L3, MBF, Edge...}
fr : True
l2 : False
usip : False
cka : False
tcpb : False
mbf : True
edge : True
usnip : True
l3 : True
pmtud : True
sradv : False
dradv : False
iradv : False
sradv6 : False
dradv6 : False
bridgebpdus : False

This command uses the nitro_service object as the connection reference for the nsmode.get() method, pretty straightforward.

Now, say you wanted to change one of the modes, L2 in this example, and this is where it can get a little tricky. First, you’ll need to store nsmode in a PowerShell object using the same get() method above:

$nsmode = [com.citrix.netscaler.nitro.resource.config.ns.nsmode]::get($nitrosession)

Then you’ll need to build an array of modes that you want to enable, including any that are already enabled, to pass to the enable() method (there’s probably an easier way to do this than the below snippet, but hey, it works!):

$modes = @(); foreach ($mode in $nsmode.mode){$modes += $mode}; $modes += "L2"

This will give you an array ($modes) that contains all of the modes that you want to enable, plus the modes that were already enabled. You’ll then need to use the nsmode.set_mode() method to set the modes that should be passed to the enable() method:

$nsmode.set_mode($modes)

And the moment of truth, passing the modified $nsmode object to the enable() method:

[com.citrix.netscaler.nitro.resource.config.ns.nsmode]::enable($nitrosession, $nsmode)
errorcode  message sessionid severity 
---------  ------- --------- -------- 
0         Done              NONE

Let’s explore another example that involves a rewrite policy and action set, which can quickly become a web of interconnecting classes and methods.

First, let’s put all of the rewrite policies into an object:

$rewritepolicies = [com.citrix.netscaler.nitro.resource.config.rewrite.rewritepolicy]::get($nitrosession)

Which will give you a collection of rewrite policy objects in the following format:

__count : 
name : ns_cvpn_sp_js_vgp_pol
rule : http.req.url.path.endswith("ViewGroupPermissions.aspx") && http.req.method.eq(POST) && http.res.body(10).contains("0|/")
action : ns_cvpn_sp_ct_rw_act
undefaction : 
comment : 
logaction : 
newname : 
hits : 0
undefhits : 0
description : 
isdefault : True
builtin :

From here, you can call other methods for the rewrite class by referencing the object that you’re interested in. For example, to get a list of bindings for ns_cvpn_default_bypass_url_pol, which is the first policy returned on a NetScaler, you would reference $rewritepolicies[0].name when using the rewritepolicy_binding.get() method:

[com.citrix.netscaler.nitro.resource.config.rewrite.rewritepolicy_binding]::get($nitrosession, $rewritepolicies[0].name)

Similarly, you can get a rewrite action by referencing the rewrite policy’s action property:

[com.citrix.netscaler.nitro.resource.config.rewrite.rewriteaction]::get($nitrosession,$rewritepolicies[0].action)

I’ll stop here for the sake of time and complexity, as there are so many ways that you can go with this foundation. I highly recommend using a tool like PowerGUI so that you can see the classes as you type, and explore the various objects and methods at your disposal.

Anyways, I hope this all makes enough sense for someone to start scripting for NetScalers in PowerShell, and will try to post a similar article on the Command Center APIs soon.

XenApp PowerShell Scripting with Get-XASession

I was working on a PowerShell script in XenApp today to quickly view active sessions by user, server, application, and session duration. Having focused most of my PoSH time in recent years to the XenDesktop SDK, I was somewhat disappointed with the limited flexibility (and official documentation) of the XenApp SDK, specifically with the Get-XASession cmdlet.

My main complaint is that Get-XASession doesn’t have many ‘Required’ parameters, which means that queries are limited to a subset of session details:

Get-XASession

For example, if I want to find all sessions that are ‘Active’, I have to pipe the results of Get-XASession and evaluate each returned object. So, the following pipeline evaluation is required if you wanted to see all active sessions:

Get-XASession | Where-Object { $_.State -match 'Active'}

Using this as a foundation to find Active sessions, I took it a step further by using an input parameter (application name) to list sessions by application, and then formatted the output of the session details to get me what I’m looking for:

param ([String]$app)
foreach ($session in (Get-XASession | Where-Object { 
$_.BrowserName -match $app -and $_.State -match 'Active'} | 
select AccountName, ServerName, LogonTime, ConnectTime, CurrentTime, SessionID | 
Sort-Object LogonTime -Descending))
{
 $logon = (Get-Date) - $session.LogOnTime
 $connect = (Get-Date) - $session.ConnectTime
 "$($session.AccountName) logged on to $($session.ServerName) {0:00}:{1:00}:{2:00}" 
 -f $logon.Hours,$logon.Minutes,$logon.Seconds + " ago."
}

This script returns a active sessions by user name, connected to $app, the server on which it’s running, and the elapsed time (in ascending order) since they logged on (just subtract the $_.LogonTime date/time object from Get-Date). Notice how the $session object is compiled of properties of the sorted Get-XASession output by way of piping the output through several filters, which lets you create your own objects that can be easily manipulated and cross-referenced in the script. I also did some date/time formatting with {0:00}:{1:00}:{2:00}” -f $logon.Hours,$logon.Minutes,$logon.Seconds, though you can present this time duration in any way that makes sense.

Well, I hope this was worth a quick read, have a good weekend!

XenDesktop 7 Session Launch – Part 3, Brokering

In my last post I talked about the ways that the Citrix client/WI enumerates XenDesktop resources by way of NFuse transactions to the site’s XML broker. The XML broker is responsible for telling the StoreFront server which published resources were found for a particular user. For more technical detail on NFuse transactions, check out my XML Broker Health Check post which gives a good example of NFuse transactions by way of some pretty straightforward XML requests sent through PowerShell.

The next major piece of the session launch process is what’s known as Brokering. This process allows a user to click a desktop or app resource, and have a ‘worker’ selected and readied for an inbound ICA connection. XenDesktop 7’s brokering functionality is mostly unchanged from that of XenDesktop 5, the only main difference being that it now includes multi-user RDS workers.

Conceptually, this factor doesn’t change how the Citrix Connection Brokering Protocol works, it simply adds multi-user support for Windows RDS servers. This functionality has actually existed with limited capabilities since XenDesktop 5.6 for CSPs (Hosted Server VDI), so it’s certainly not a huge leap in terms of changes to the broker agent. The XenDesktop brokering process consists of several key components, including:

  • Citrix Desktop Service (CDS / VDA) – This component provides a bridge between the ‘Delivery Controller’ and the ‘Worker’ and is commonly referred to as the ‘Virtual Desktop Agent’ or VDA. In XD5 this was the WorkstationAgent.exe process, though in XD7 the process was renamed to BrokerAgent.exe. However, the directory still reflects the VDA designation, so I still like to refer to it as the VDA:

CDS

  • Citrix Broker Service – The Broker Service is responsible for negotiating session launch requests with ‘workers’. The Broker service communicates with the CDS over a protocol that Citrix refers to as CBP (connection brokering protocol) to validate a worker’s readiness to fulfill a session launch request, gather the necessary details (IP address or host name), and send the details back to the StoreFront site to be packaged and delivered as an .ICA launch file that’s consumed by the Receiver.
  • Connection Brokering Protocol – This protocol behaves much like NFuse, though it uses .NET WCF endpoints to exchange a series of contracts to communicate registration and session launch details between a worker and delivery controller. This protocol was designed with the following key requirements as it’s functionality is highly critical to reliably providing on-demand desktop sessions:
    • Efficient: information should be exchanged only if and when required (just in time). Limiting the data exchange to a minimum also reduces the risk of leaking sensitive data.
    • Versioned: It must be possible for both workers and controllers to evolve concurrently and out of step without breaking protocol syntax or semantics.
    • Scalable: The delivery controller is a key piece of infrastructure, and its performance must not be impacted by unprompted messages and data from workers, as can happen in IMA, for instance during “election storms”.
    • Flexible: the protocol should allow the architecture to evolve over time, by not building key assumptions into the protocol’s foundation code. Factoring independent operations into separate service interfaces is one example of how a protocol can allow for increasing controller differentiation in future.
    • Compliant: Standards-based mechanisms (WCF) are used instead of proprietary technologies (IMA).
    • Secure: Security is critical, and the protocol must support appropriate mechanisms to ensure confidentiality, integrity (WCF contracts), and authenticity (NTLM/Kerberos auth) of data exchanged between workers and controllers.

The XenDesktop brokering process makes the following basic assumptions about CDS workers:

  • Desktops are either Private or Shared
  • Each desktop is associated with a single delivery group
  • Each desktop is backed by a single worker
  • Each worker is individually associated with a hosting unit, with a null unit index value indicating an unmanaged worker (existing or physical catalog types)
  • Desktops within a private desktop group can have permanent user assignments. The association may comprise one or more users, or a single client IP address
  • Multiple desktops within a private desktop group may have the same user assignments
  • Desktops within a shared desktop group may temporarily be assigned to a single user for the duration of a session
  • Multiple desktops within a shared desktop group may be assigned to the same user concurrently
  • Automatic assign-on-first-use behavior involves the broker selecting a desktop within a private desktop group with no assignment, and assigning it to the currently requesting user; the desktop’s group will not change by virtue of user assignment
  • The assignment of a desktop to its assignee(s) in a private desktop group can only be undone by an administrative user through the PoSH SDK

In a nutshell, the Delivery Controller is responsible for negotiating session launch requests by locating and preparing workers to accept ICA sessions that were requested by a StoreFront server via the XML broker.

XD7brokering

The broker service finds a worker to fulfill the session request, powers it on if needed, waits for it to become ready if a power action was sent. Once the worker is ready, the DDC sends the requisite connection details to the StoreFront server to build and deliver the ICA file, which is sent to the Receiver for consumption by the ICA client.

Hopefully this was a decent enough explanation of brokering. While I didn’t get a chance to go into a lot of detail about how a worker is found, and how CBP interacts with the ICA stack, I think this at least gives a good high level overview of the concept to know what components are involved and what their general interactions with each other are.

My next part in this series will look at the ICA stack, and how a connection is established between ICA clients and servers.

XenDesktop 7 Session Launch – Part 2, Enumeration

In my last post I talked about how the Citrix Receiver authenticates to a StoreFront server. In this post, I want to talk about resource enumeration with Citrix Receiver <> StoreFront <> XenDesktop deployments.

Before I go into the technical aspects of the way Citrix enumerates published resources, I want to briefly explain the history behind the Citrix XML Broker, as well as how the Citrix client enumerates published resources. In case anyone is interested in a broader history of Citrix, I encourage you to check out the 20 years of Citrix History publication that was published in 2009.

Citrix NFuse and the XML Portal Server

Back in 2000, Citrix signed a licensing deal with Sequoia Software (whom they later acquired in 2001) to integrate the NFuse as the foundation for providing an extensible application portal for MetaFrame. The XML Portal Server (XPS) technology was then built around NFuse to provide the ability to dynamically enumerate and present resources to end users. This integration was critical in giving Citrix the ability to stand apart from the competition (terminal services), and was the reason the next version of MetaFrame had the XP designation:

xpsnfuse

Since it’s introduction back in 2000, the NFuse protocol has remained at the core of every Citrix desktop/application virtualization product by way of the ‘XML Broker’ service. This service was included in all future releases, including all versions of XenApp & XenDesktop. Until XenDesktop 5 was released, the XML broker service ran as it’s own standalone service. During the XenDesktop ‘Storm’ site architecture rework (now called FMA, aka NOT IMA) the XenDesktop product team decided to relocate the XML broker service to run as a ‘virtual’ service by piggy-backing on the XenDesktop Broker service. Other than this move to virtualize the XML broker service, the service remains as NFuse capable as the XML broker service used in MetaFrame.

Because of the NFuse protocol, resource enumeration has remained compatible as MetaFrame evolved into XenDesktop. In other words, the old MetaFrame Web Interface Server would still enumerate published desktops from a XenDesktop 7 DDC, and a StoreFront 2.0 server would enumerate published applications from a MetaFrame XP XML broker service (theoretically at least!), as long as the requests are NFuse compatible.

One of the main reasons the NFuse protocol is so durable is that it’s able to negotiate capabilities. In this example, a StoreFront site contacts a XenDesktop XML broker to determine what capabilities it has, and what resources are published to the authenticated user:

enumeration

In this process, the web front-end server sends an XML message to the configured XML broker to request a list of capabilities. The XML broker then responds with an XML formatted list of the types of resources it has access to. StoreFront will then request any compatible resources for the the authenticated user account. The XML broker then works with the XenDesktop broker and controller services to find out what resources are assigned to the user. The enumerated resources are consumed by StoreFront and presented to the end user.  This figure from the NFuse Classic 1.7 is still mostly relevant, just different companion components:

nfuse

StoreFront & Receiver

With Citrix Web Interface, the results of application enumeration were presented all at once to the authenticated user (optionally sorted into tabs and/or folders). In other words, all resources published to a user would be shown to them, though you could hide resources as needed. StoreFront with Receiver added the functionality that was originally introduced with Citrix Merchandising Server and Dazzle, which is to allow a user to pick their ‘favorite’ resources, providing Self-Service ‘App Store’ functionality and allowing a user’s favorite resources to follow them across multiple client devices and device types.

Prior to Dazzle/Receiver, applications were either enumerated in a web browser using a Web Interface ‘Web’ site, or enumerated directly by the Citrix client agent through a ‘Services’ site. In the past three years the Citrix client has evolved from the ‘Online Plug-in’ to the Receiver for Windows.

clients

The concept of client-side agent enumeration began with the ‘Program Neighborhood’ client (pre Online Plug-in), which would access a Services site (hence the default name PNAgent), and looked like this:

Program-Neighborhood-12

Until XenApp replaced Presentation Server, this was the way users would typically connect to applications, as the web portal wasn’t nearly as solid as the old WI server running in IE 5/6. By the time XenApp was released, Citrix decided to rework the ‘PNAgent’ to display resources as a system tray icon jump menu (which remains a fan favorite, quick, easy, intuitive) in what was first called the XenApp Plug-in, and later renamed to the Online Plug-in when XenDesktop was released:

DRXDBoth

However, around the time the Apple App Store was released, and Windows Vista changed some application UI design consideration, Citrix decided to create a self-service framework by way of Dazzle and Merchandising Server. As a result of this they decided to do away with the notification icon ‘jump-menu’ since it didn’t align with Microsoft’s general UI design recommendations for Windows Vista/7. When Receiver was launched, this legacy ‘PNAgent’ functionality was taken out of the standard ‘Receiver’, and moved to only be included in the ‘Enterprise’ flavor of the Receiver, which is really just a nice way to say that they’re accommodating ‘Enterprise’ customers who still want/need to use this legacy functionality.

As of Receiver Enterprise (the black icon) PNAgent enumerated shortcuts are only available in the start-menu or desktop (according to the site/farm settings):

PNA

Citrix’s current preferred method of displaying shortcuts to end-users is using Receiver 3/4 to connect to a StoreFront Store, which uses the ‘Dazzle’ framework to present shortcuts:

receiverwindow

The StoreWeb StoreFront site aims to provide the same look and feel for users that aren’t enumerating via the ‘Receiver’ agent:

receiverweb

Connecting from mobile receivers maintains this consistency of favorite resources:

androidreceiver

I could go on and on about the technical details of enumeration, but am out of time for today. I encourage readers to check out my previous post on the XML broker for a technical example of NFuse transactions.

In my next post I go into more detail about how enumerated resources are brokered to the receiver.

XenDesktop 7 Session Launch – Part 1, Authentication

The process of enumerating, brokering, and connecting to a XenDesktop resource involves quite a few moving parts, and can be a daunting task to troubleshoot for someone who isn’t familiar with the product. There are several key components involved in the session launch process including authentication, enumeration, registration, ticketing, and display/session handling.

In this post I’d like to briefly explain how the Citrix Receiver authenticates to a XenDesktop 7 application or desktop. To keep it simple, I’m only going to talk about StoreFront (no WI) and XenDesktop (no XenApp/IMA). So just Receiver <> StoreFront <> XenDesktop.

The first step to launching a XenDesktop session is to authenticate to the StoreFront Store that the XenDesktop resource is connected to. In this step, a user connects to the StoreFront server and:

  1. Authenticates to a StoreFront virtual directory via Citrix Receiver:
    • The Receiver is connecting to a StoreFront Store, StoreWeb, StoreDesktopAppliance, or PNAgent IIS virtual directory. IIS allows anonymous authentication since the StoreFront .NET services (Citrix.Storefront.exe & Citrix.StoreFront.PrivilegedService.exe) handle authentication:

storefront-IIS

    • To configure a StoreFront server’s authentication methods, use the Citrix Studio MMC to open the Authentication TreeNode of the Citrix StoreFront deployment. Here you can specify which authentication methods to allow on Stores hosted by that server:

storefront-authmethods

    • There are four authentication methods available as of StoreFront 2.0:
      • User name and password: Similar to windows basic auth in IIS, or explicit authentication in Citrix Web Interface Server.Prompts the user to enter their credentials at logon.
        • In this scenario, the broker passes the user’s credentials to the target ICA server on behalf of the client
      • Domain Pass-through: Similar to Integrated Authentication in IIS, and
        • Allows Receiver for Windows endpoints automatically log on using the local session’s logged on user domain account (via NTLM)
        • In this scenario, the client sends credentials (via ssonsvr.exe) directly to the target ICA server
        • For pass-through authentication to work, you must use the /includesson switch when installing Receiver (per CTX133982), which tells the meta-installer to include the ‘SSON’ component (ssonsvr.exe) that is needed to capture the user’s domain credentials at logon. Receiver relies on the SSON component to send the user’s domain credentials to the StoreFront server’s StoreWeb (via browser), Store (via Receiver), or legacy PNAgent (via Online Plugin / Receiver Enterprise) virtual directory.
          • There is currently a bug with XenDesktop 7 published desktops using pass-through authentication to provide ‘FlexCast’ functionality (enumerate and launch published apps from the published desktop) where ssonsvr.exe wouldn’t run (crashed at login) because pnsson.dll wasn’t playing nice with the ICA stack at session logon.
          • Citrix has provided a provisional test-fix to customers with an open case, and will soon be releasing a public hotfix. As of this post, pass-through authentication doesn’t work on XenDesktop 7 published desktops running Receiver 3/4 without this fix in place.
      • Smart Card: Allows smart card pass-through
        • Thankfully I don’t work with this method very often, so I’ll refrain from digging in. Just know that it’s required if smart-cards are used in the environment
      • Pass-through from NetScaler Gateway: Allows a NetScaler Gateway virtual server to handle user authentication on behalf of the user
        • Requires Set-BrokerSite -TrustRequestsSentToTheXmlServicePort $true to be set on the DDC/XML broker)
        • Use the Configure Delegated Authentication option to specify that the NetScaler send logon credentials directly to the remote Windows session

delegatedauth

    • There are also client-side registry values that control whether or not to allow pass-through authentication, and can even lock down the feature to only work with StoreFront sites in specified Internet Explorer Security Zones (aka Client Selective Trust). The easiest way to adjust this is to use the ADM template in %ProgramFiles%\Citrix\ICA Client\Configuration\icaclient.adm

Image

In my next post on XD7 session launch I’ll talk about resource enumeration, including details about the virtual XML broker and XenDesktop broker services.

XenApp/PVS Global Farm Overview

Since there was a lot of interest in the last Visio I posted, I thought I’d share another.

These diagrams outline high level overviews of a global XenApp w/PVS deployment, with XenApp zones and PVS sites in each datacenter. Each XenApp zone has two data collectors/XML brokers, PVS-Streamed OU-based worker groups. Each geographic region has a corresponding StoreFront Store (directed by host name):

XenAppGlobal


The PVS farm configuration is very similar, consisting of sites in each datacenter to stream XenApp workers for each XenApp zone in that datacenter, with the master database homed in the US datacenter:

PVSGlobal


The intent of these overviews are mainly to demonstrate how the XenApp and PVS farms interact in a global zone/site architecture. I’ll share some overview diagrams of XenApp zones and PVS sites in another post. Hope you enjoy!